


If DaVinci Resolve playback feels choppy, freezes during scrubbing, or drops frames on a busy timeline, the problem usually comes from codec load, effects processing, audio plugins, storage speed, or hardware settings. The good news is that you can usually fix stuttering without lowering your final export quality. Start with proxies, render cache, and a fast SSD, then fine-tune Resolve’s memory, GPU, and media settings.
Quick Answer
Choppy playback in DaVinci Resolve is usually caused by heavy codecs, high-resolution footage, demanding effects, audio processing, or slow storage. The fastest fixes are to generate proxy media, lower timeline playback resolution, enable Smart Render Cache, cache heavy audio, and keep active projects on a fast SSD.
Key Takeaways
- Use proxy media for high-resolution or hard-to-decode footage so editing stays smooth.
- Lower timeline playback resolution to reduce preview load without changing final export quality.
- Enable Smart Render Cache or Render In Place for clips with heavy effects, grades, or Fusion work.
- Cache or bounce complex audio when Fairlight plugins, voice isolation, or effects cause stutters.
- Store active media, cache, and project files on a fast SSD instead of a slow HDD.
At a Glance
| Time Required | 10 minutes for basic settings, longer if you generate proxies or cache large projects |
| Difficulty | Beginner to intermediate |
| Tools Needed | DaVinci Resolve, project media, enough free storage, and preferably an SSD |
| Cost | Free if you change settings only; extra cost only if you upgrade storage, RAM, or GPU hardware |
🔧 Why playback stutters in DaVinci Resolve
Quick Answer
Choppy playback usually stems from heavy file codecs, complex effects, or slow storage drives. You can fix this by using proxy media, enabling the render cache, or ensuring your media sits on a fast SSD. These steps help smooth editing without compromising your final output quality.
If your timeline stutters or feels sluggish, common culprits include inefficient codecs, heavy effects, slow storage, or unoptimized hardware settings. Check whether the issue happens with every clip or only with specific clips, effects, grades, or audio tracks. This helps you identify whether the bottleneck is media decoding, graphics processing, disk speed, or real-time effects.
Use DaVinci Resolve’s playback tools and system monitoring options to watch CPU, GPU, RAM, and disk activity during playback. If one resource spikes while playback drops frames, that resource is likely part of the problem. This guide covers practical fixes to help you optimize your editing workflow.
Note: Playback quality and export quality are separate. Lowering preview resolution or using proxies can make editing smoother while your final render can still use the original full-quality media.
🎯 Use proxies for smoother performance
Proxies act as a fast fix for high-resolution footage. They are not just smaller files. They are lighter versions encoded in an editing-friendly format, so Resolve can decode frames more easily during playback and scrubbing.
Proxy media works especially well with 4K, 6K, 8K, long-GOP footage, screen recordings, drone clips, action-camera files, and files from phones. These formats can look great, but they often require more decoding power than your computer can provide in real time.

Follow these steps to set up proxies:
- Go to File, then Project Settings, and open Master Settings.
- Set the Proxy Media Format to an intra-frame codec like ProRes 422 Proxy or DNxHR LB.
- Choose Half or Quarter for Proxy Media Resolution depending on your original file size.
- Select a storage location for generated files under Working Folders.
- Right-click your clips in the Media or Edit page and choose Proxy Media, then Generate Proxy Media.
- Set Playback to Proxy Handling and choose Prefer Proxies to ensure you edit with proxies but export from original source files.

Pro Tip: Store proxies and cache files on a fast SSD with plenty of free space. If proxies are saved to a slow drive, you may still see stutters even after generating lightweight media.
🎞️ Manage heavy effects with resolution and cache
Effects and plugins often demand high processing power. Color grades, noise reduction, sharpening, motion effects, speed changes, stabilization, titles, and AI tools can all slow down real-time playback. Use these three strategies to reduce the strain on your system.
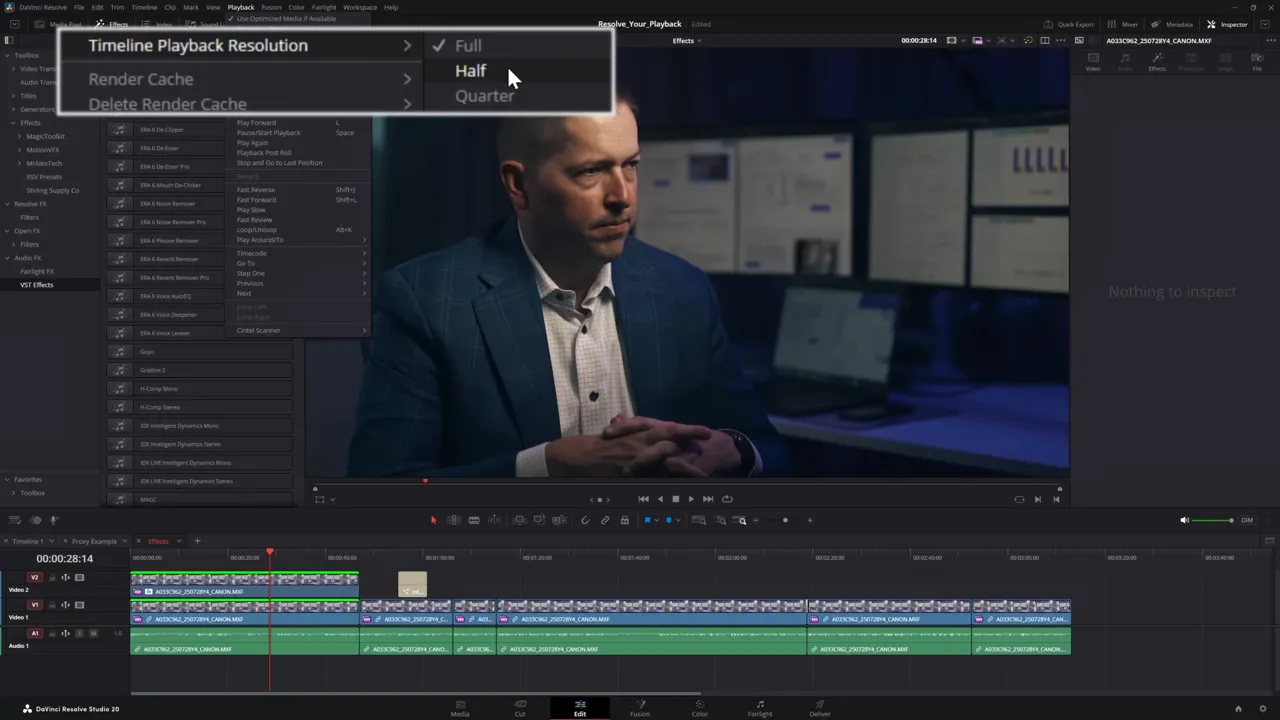
Adjust your timeline playback resolution to reduce preview quality, which lowers the workload for your computer without affecting the final export. Start with Half Resolution. If playback still stutters, switch to Quarter Resolution for editing, then return to a higher preview setting when checking detail.
You can also enable the render cache in your Project Settings or from the Playback menu. Render Cache creates preview files for demanding sections, so Resolve does not need to calculate every effect from scratch during each playback pass.

Use these caching options:
- Set Playback to Render Cache and select Smart to let Resolve auto-detect heavy effects such as demanding grades, Fusion work, or AI-based tools.
- Use the User setting to manually select specific clips for caching when you want more control.
- Monitor your storage and delete old cache files to keep your drive space clear.
Note: Render Cache may take time to build. If the cache line above your timeline has not finished rendering, playback may still stutter until Resolve completes the background cache process.
🔉 Fix audio-related lag in Fairlight
Complex audio processing, such as voice isolation, noise reduction, real-time EQ, dynamics, or third-party plugins, can cause stutters. Audio effects may look lightweight compared with video effects, but real-time processing can still interrupt smooth playback on a busy timeline.
If playback stutters only when certain audio tracks are active, mute those tracks one by one to find the cause. Then cache, bounce, or simplify the audio processing before you continue editing.

To clear audio bottlenecks:
- Right-click an audio clip and select Cache to store processed audio.
- Bounce your audio to a new WAV file to remove the need for real-time processing.
- Export individual audio tracks and relink them to your project if performance remains poor.
Always consult a professional if you need specific advice on audio mastering, broadcast delivery, or complex Fairlight routing.
🎬 Render In Place for complex clips
When you finish grading or animating a specific clip, use the Render In Place feature. This replaces the live, effect-heavy clip with a pre-rendered video file that plays back more reliably.
To use this feature, right-click the clip or compound clip in your timeline and select Render In Place. Choose a codec that fits your workflow. For example, choose a high-quality option when you need to preserve detail, or a format with alpha support if your clip needs transparency.
This method eliminates the need for your system to calculate effects on every playback frame. It works well for heavy color grades, speed effects, motion graphics, titles, stabilization, and clips with multiple processing layers.
Warning: Render In Place can create large files. Check your cache and render location before using it on many clips, especially if your SSD has limited free space.
🧩 Pre-render Fusion compositions
Large Fusion compositions often struggle to play back in real time. Multiple nodes, particles, masks, motion blur, tracking, and high-resolution elements can overload your system during preview.
Use a Saver node in your Fusion flow to render out an image sequence, then load that sequence back into your project with a Loader node. This workflow creates a pre-rendered version of your composition that acts like standard media.
You can also use optimization tools inside Fusion when available. The goal is simple: stop Resolve from recalculating the full Fusion tree every time you press play.
🖥️ Update GPU drivers
Your graphics card needs the correct drivers to communicate effectively with Resolve. Outdated or unstable drivers can affect playback, export, GPU effects, hardware acceleration, and timeline responsiveness.
Tips for drivers:
- Nvidia users should choose the Studio Driver for better stability during creative work.
- AMD users should look for professional or recommended drivers, and Windows users can test the available GPU processing mode if performance is inconsistent.
- Mac users do not need to manage graphics drivers manually, as macOS updates handle these through Apple’s graphics system.
After updating a driver, restart your computer before testing Resolve again. If a new driver causes problems, consider rolling back to the last stable version that worked well with your editing setup.
⚡ Optimize RAM and system memory
DaVinci Resolve needs significant memory to function well. If your RAM runs at default speeds, your computer may not be using the full performance your memory kit supports.
Follow these steps to optimize:
- Open Task Manager on Windows to check your current RAM speed.
- Restart your computer and enter the BIOS.
- Enable your XMP, DOCP, or EXPO profile to ensure your RAM runs at its full rated speed.
- Save the settings, reboot, and confirm the new speed in your system task manager.
Warning: BIOS settings can affect system stability. If you are not comfortable changing memory settings, check your motherboard manual first or ask a qualified technician for help.
⚙️ Configure Resolve preferences
Ensure Resolve has full access to your hardware resources. Go to Preferences, then select Memory and GPU. These settings help Resolve use your computer’s available RAM and graphics hardware more effectively.
Manually allocate your RAM and check the GPU selection settings. Choose your specific GPU when needed and enable hardware acceleration if your system supports it. You can also review performance-related settings so Resolve keeps your chosen optimization options active.

If you use a laptop, plug it into power and use a high-performance power mode while editing. Many laptops reduce CPU and GPU performance on battery power, which can make Resolve playback feel worse even when your settings are correct.
💾 Improve drive performance
Drive speed limits your playback capability. Use fast SSDs, such as NVMe drives, for active project files, camera media, proxies, optimized media, and cache. Use older HDDs only for long-term storage or backups when possible.
A slow drive can cause dropped frames even when your CPU and GPU are strong. This is especially true with high-bitrate footage, multi-camera edits, image sequences, and projects where cache files are being written during playback.
Avoid mixing media across multiple drives with different speeds. When media is scattered across slow and fast drives, Resolve struggles to maintain a consistent data flow, which can lead to dropped frames.
🗂️ Consolidate media storage
Keeping all clips on the same fast drive prevents unnecessary disk seeking and reduces the chance that one slow drive will hold back the whole timeline. This matters most when working with large projects, multi-camera edits, and footage from several cameras.

To check your setup:
- Go to the Media page and show the File Path column.
- Sort your bins by file path to identify which clips live on which drive.
- Use the Clip Operations menu to relink any files that sit on the wrong drive.

Pro Tip: Keep your active media, proxies, optimized media, and render cache on the same fast SSD when possible. This makes troubleshooting easier because you remove slow or disconnected drives from the workflow.
✅ Recommended optimization checklist
Follow this sequence to diagnose and fix playback issues. Start with the easiest software changes before spending money on hardware upgrades.
- Create proxies and set Proxy Handling to Prefer Proxies.
- Lower the timeline playback resolution.
- Enable Smart Render Cache for heavy effects.
- Cache or bounce heavy audio in Fairlight.
- Use Render In Place for complex clips.
- Update your GPU drivers.
- Enable RAM XMP or EXPO profiles in the BIOS if you are comfortable doing so.
- Configure GPU and RAM allocations in Resolve Preferences.
- Store all active project media on one fast SSD.
Frequently Asked Questions
How do proxies affect final export quality?
Proxy handling lets Resolve use lightweight files for editing, but your final export can still use the original high-quality footage. This means you can edit smoothly without lowering final output quality.
Which proxy codec should I choose?
ProRes 422 Proxy and DNxHR LB are good choices for many editing workflows because they are easier to decode than many camera-native formats. Choose a format that works well on your operating system and storage setup.
When should I use Render Cache vs Render In Place?
Use Render Cache when you want Resolve to manage background preview files for heavy sections. Use Render In Place when you want to turn a specific finished clip into a new rendered media file for more reliable playback.
Will enabling XMP cause stability issues?
Enabling XMP, DOCP, or EXPO sets your RAM closer to its advertised speed. It usually works when your motherboard and memory are compatible, but unstable systems may need manual adjustment or the default memory setting.
Does Resolve require an SSD?
DaVinci Resolve can run from an HDD, but an SSD can make a major difference in project loading, cache performance, media access, and timeline responsiveness. Use an SSD for active editing whenever possible.
How should I handle stutter with AI effects?
Enable Smart Render Cache for demanding AI tools and let the cache finish building before judging playback. If the clip still struggles, use Render In Place on that specific clip.
Final steps for better editing
Fixing laggy playback requires a mix of good media management and correct hardware settings. Start with proxies and render caches because they often solve the biggest playback problems quickly. Once those are set, make sure your storage, GPU, RAM, and Resolve preferences are working together instead of fighting your timeline.
For the smoothest workflow, keep your active project files on a fast SSD, use editing-friendly proxy formats, cache demanding clips, and avoid unnecessary real-time processing. These habits help DaVinci Resolve stay responsive while preserving the quality of your final export.
Last Updated on June 27, 2026 by Logan Carter

