

Imagine this: one simple Instagram ad could bring your next one hundred customers. It might sound like a dream, but in 2025, it’s a real possibility—and today, I’ll walk you through exactly how to make it happen. Whether you’ve never run an ad before or you’re looking to refine your Instagram advertising strategy, this comprehensive guide will empower you to create high-performing ads that attract the right audience, engage users, and convert views into sales.
In this article, we’ll cover everything from setting up your Instagram business account and connecting it to Facebook’s Meta Business Suite to creating compelling ads and tracking their performance with smart tools like Meta Pixel and AI-powered copywriting. So, let’s dive in and transform your Instagram presence in 2025!
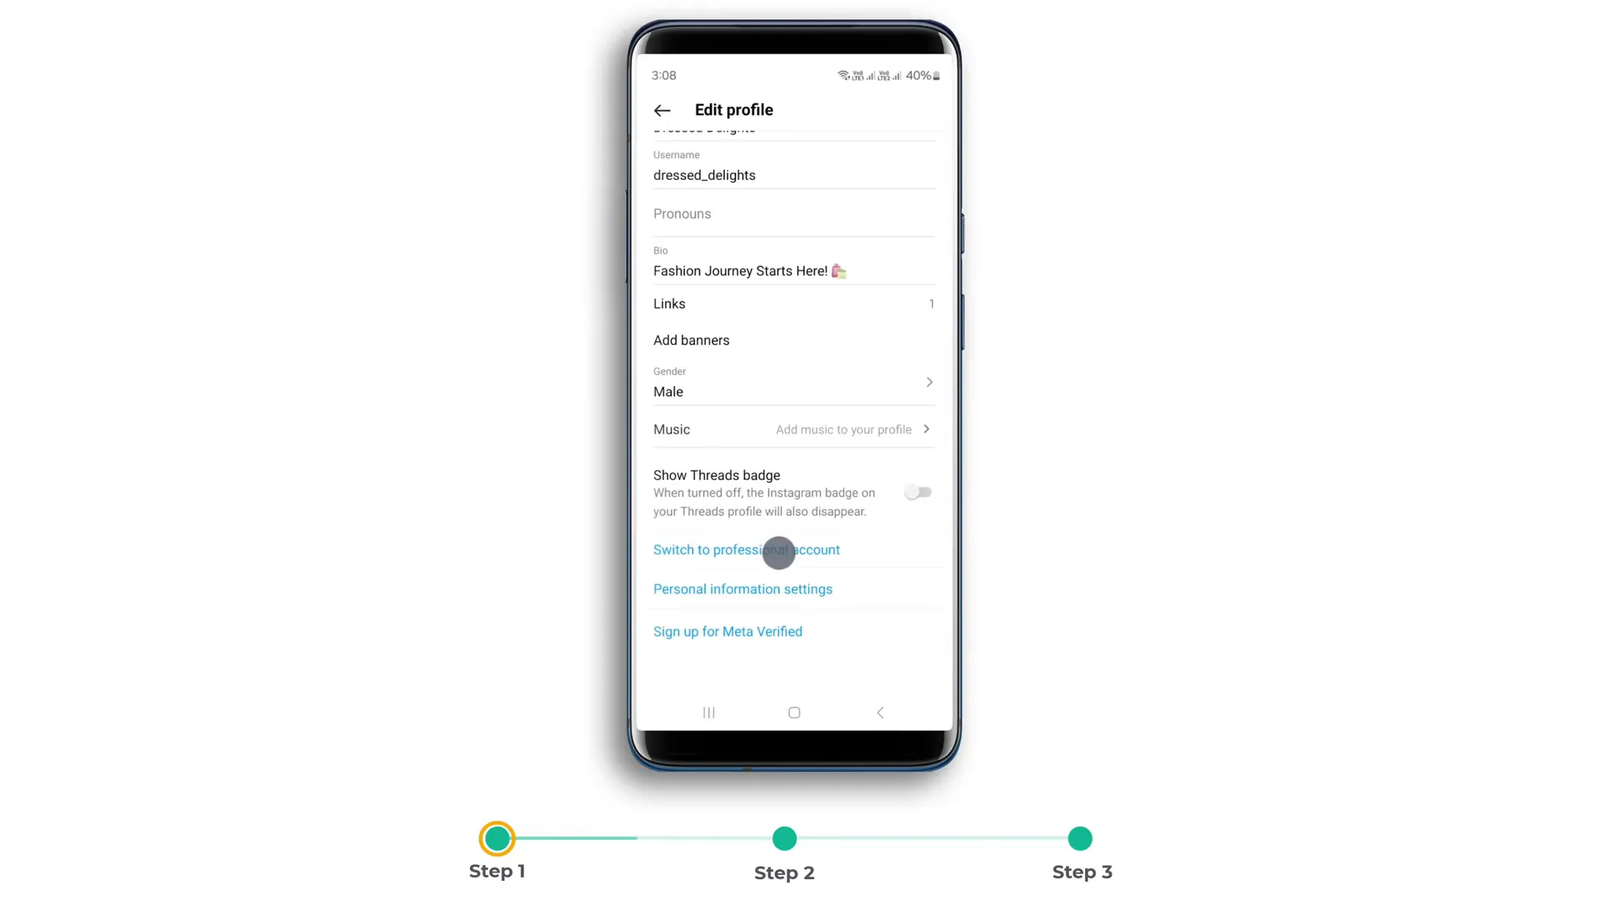
Step 1: Switch to an Instagram Business Account 📱
Before you start running Instagram ads, you need to set up your Instagram account as a business account. This step unlocks essential tools for advertising such as ad creation, audience insights, and performance tracking. The great news? You don’t need a new account; you can switch your existing Instagram profile to a business account with just a few clicks.
Here’s how to do it:
- Open your Instagram app and go to your profile.
- Tap on Edit Profile.
- Scroll down and select Switch to Professional Account.
- Click Next and choose your business category. For example, if you run a clothing store, select Clothing.
- Select your account type and click Next.
- Fill in your contact information and click Next.
- That’s it! Your Instagram business account is ready.
This switch is crucial because it gives you access to Instagram’s advertising features and analytics, helping you understand your audience and optimize your ads.
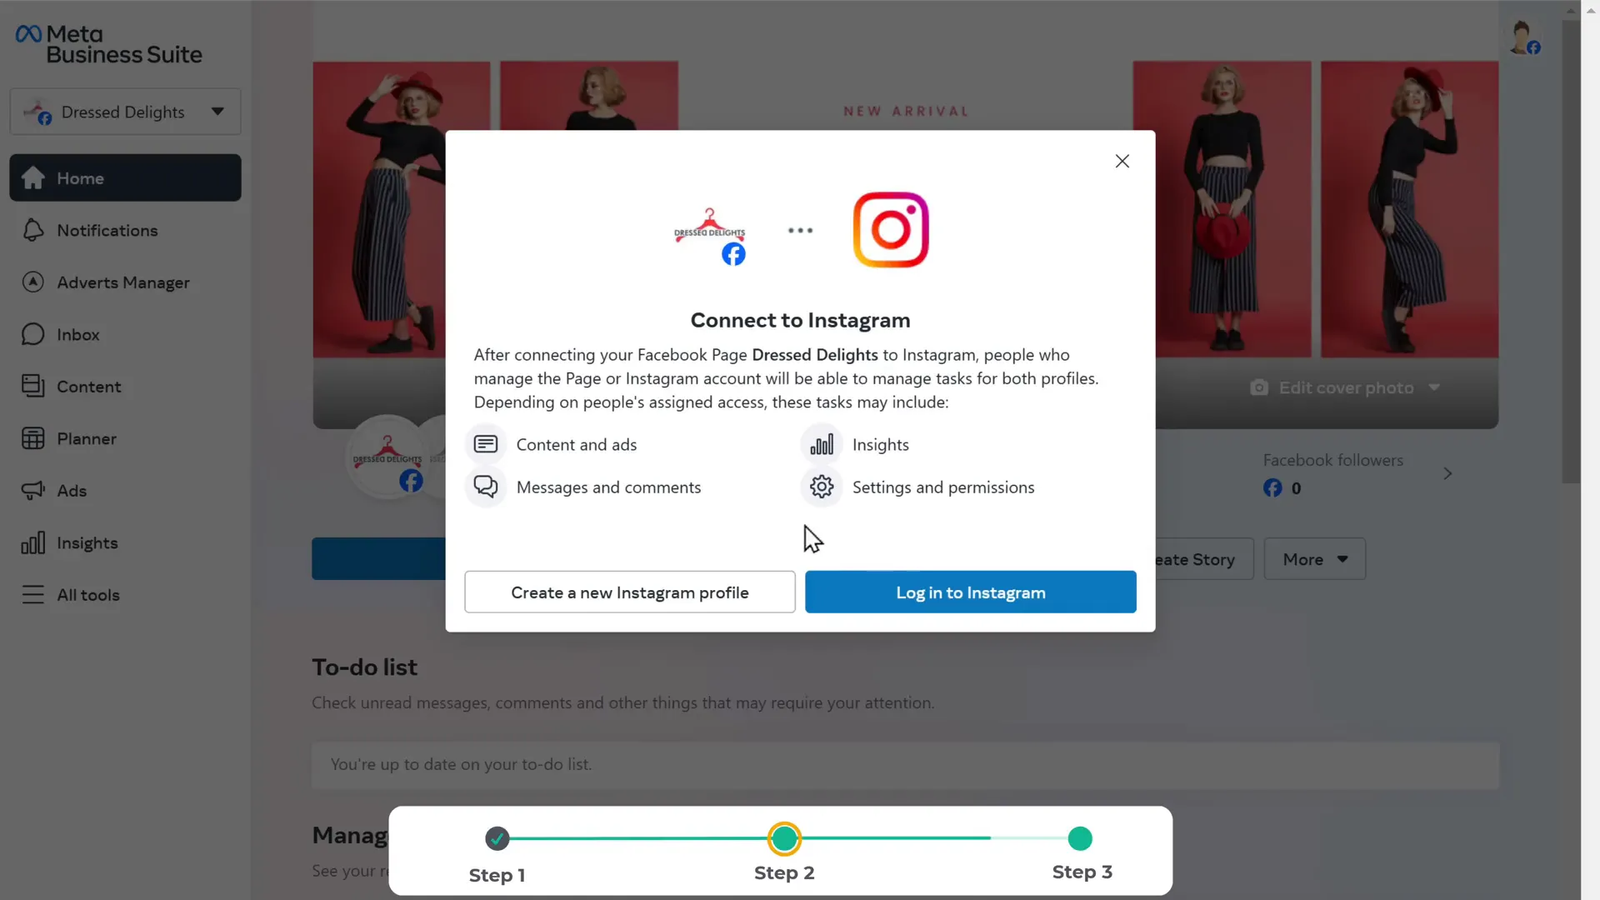
Step 2: Connect Instagram and Facebook to Meta Business Suite 🔗
Instagram ads are managed through Facebook’s Meta Business Suite, which acts as a central hub for managing your Facebook pages, Instagram accounts, and ad campaigns. To run ads on Instagram, you’ll need to connect your Instagram business account and Facebook business page to Meta Business Suite.
If you don’t have a Facebook business page yet, you’ll need to create one because this page is essential for managing your Instagram ads.
Follow these steps to connect your accounts:
- Click the link in the description (or visit the Meta Business Suite page directly).
- Click Get Started and log in with your Facebook account.
- Once Facebook is connected to Meta Business Suite, click Connect Instagram.
- Log in with your Instagram business account, then click Continue, Next, and Confirm Connection.
Now your Facebook and Instagram accounts are linked within Meta Business Suite, enabling you to manage your ads efficiently from one place.
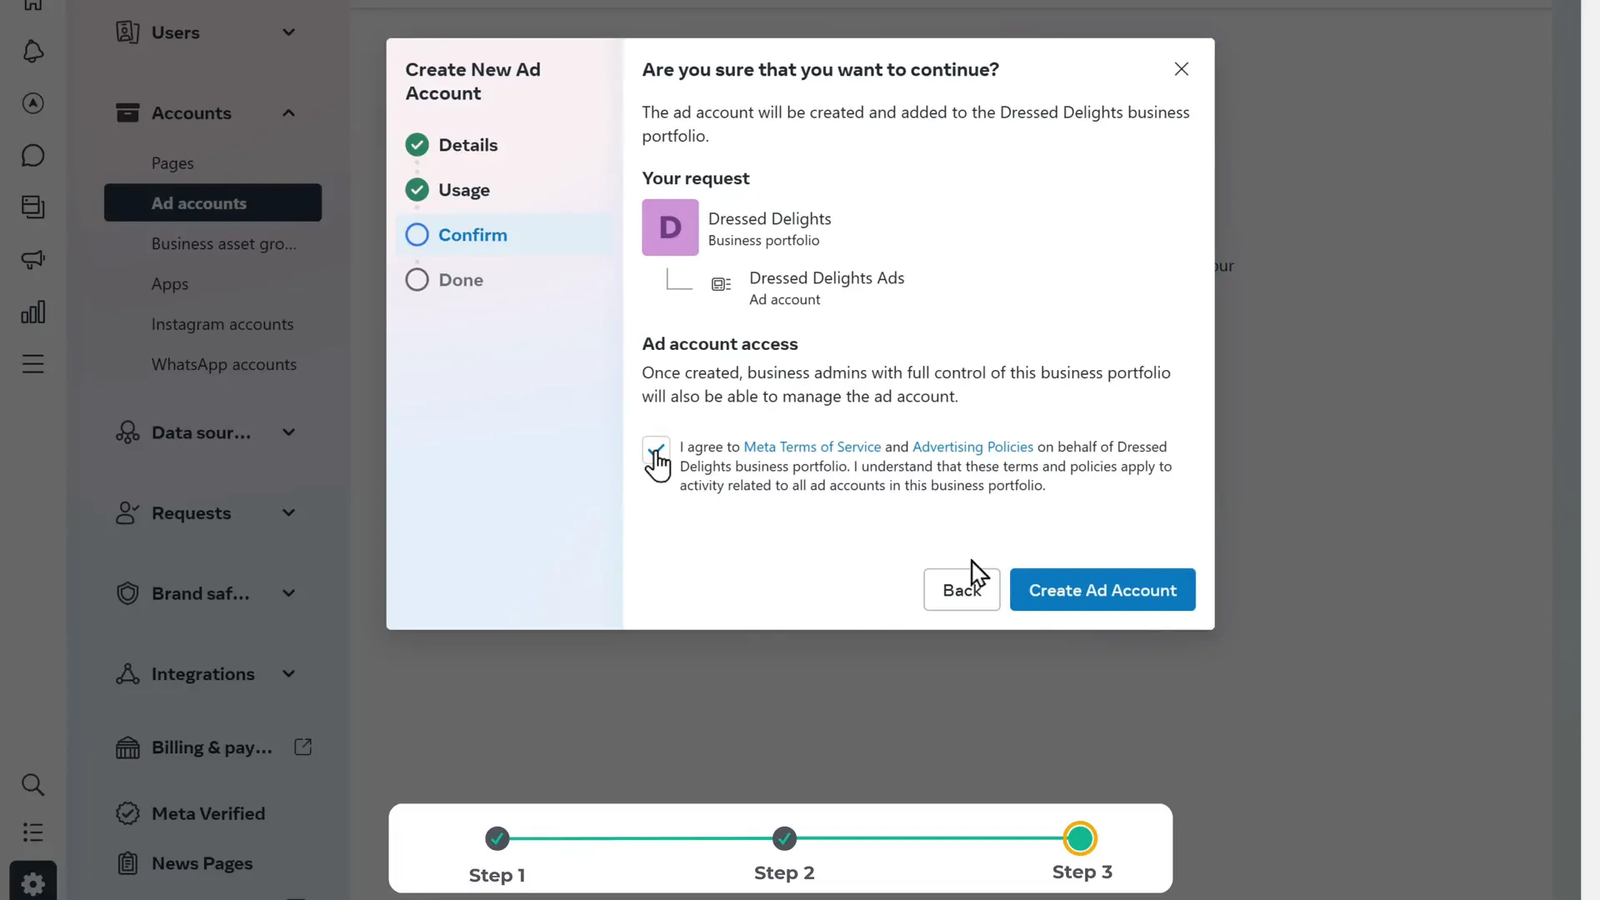
Step 3: Create an Ad Account for Instagram Ads 💳
An ad account is where all your Instagram ads are created, run, and tracked. Without it, you can’t launch campaigns or monitor their success. Here’s how to create your ad account:
- In Meta Business Suite, go to Settings.
- Click on Accounts, then Add Accounts.
- Click Add, then choose Create a New Ad Account.
- Fill in the ad account details such as the name and time zone.
- Click Next and select your business.
- Confirm adding the ad account to your business portfolio by clicking Create Ad Account.
- Add your payment information and click Done.
With your ad account set up, you’re ready to start creating and managing ads.
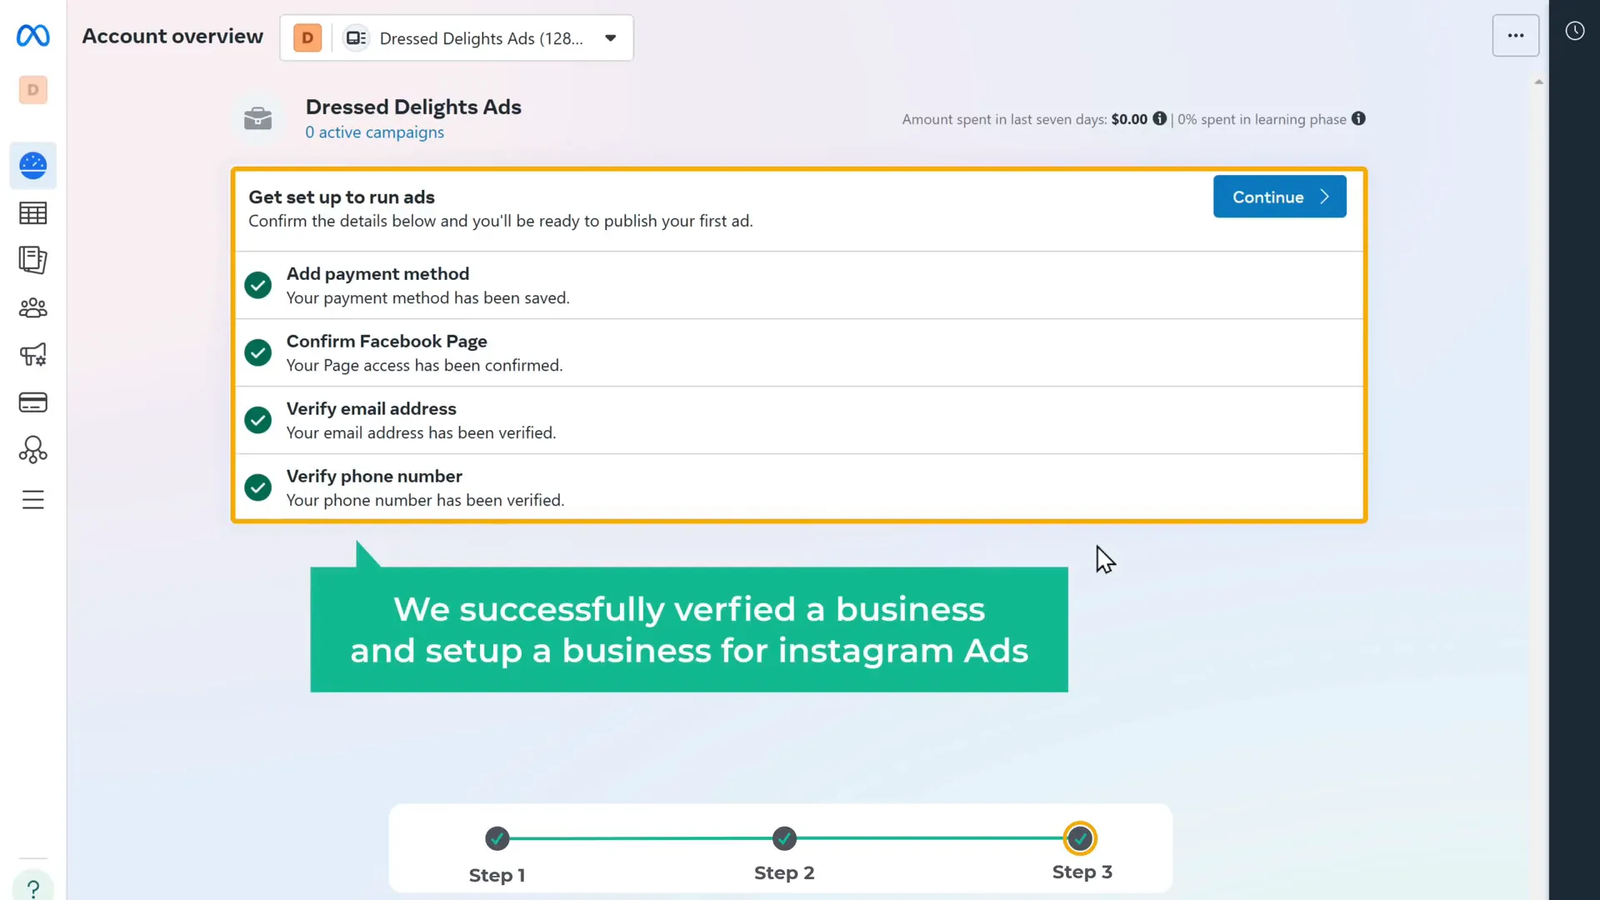
Step 4: Verify Your Business Details ✅
Verification adds credibility and unlocks more features for your Instagram ads. It involves confirming your payment method, business information, Facebook page, and phone number. Here’s the verification process:
- Go to All Tools and then to Ads Manager.
- Click Account Overview.
- Add a payment method by clicking Add Payment Method, select your preferred payment option, enter the details, and save.
- Enter your business information and save.
- If you already have a Facebook business page, confirm it by clicking Create Facebook Page and then Confirm.
- Verify your phone number: click Add Phone Number, enter your number, choose to receive a confirmation via message or call, enter the code received, and submit.
Once verified, you’re officially set up and ready to launch Instagram ads that can scale your business.
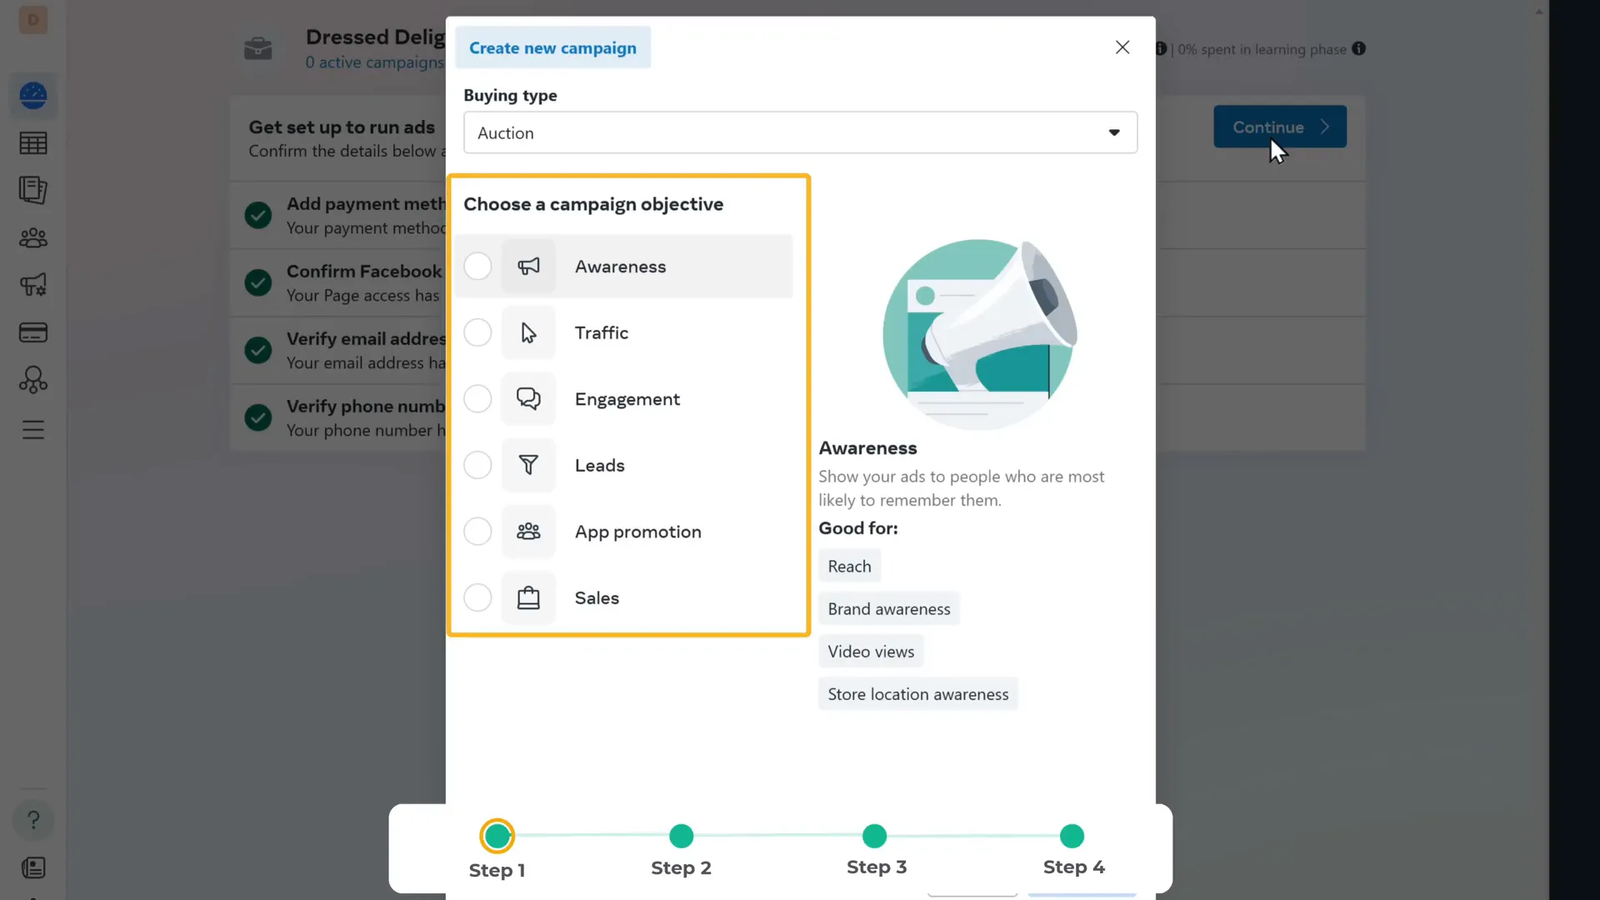
Step 5: Set a Goal for Your Instagram Ad 🎯
Setting a clear goal for your Instagram ad is essential because it tells Meta what you want to achieve and helps optimize your ad delivery. When creating your ad, you’ll see several objective options:
- Awareness: Increase brand recognition and reach more people.
- Traffic: Drive users to a website, app, or event page.
- Engagement: Boost likes, comments, messages, or video views.
- Leads: Collect signups, contact info, or calls.
- App Installs: Encourage more installs and engagement with your app.
- Sales: Increase purchases on your website or app.
Choose the objective that best matches your business goals. For example, if you want more sales on your e-commerce site, select Sales. This choice will guide how your ad is optimized and shown to the right audience.
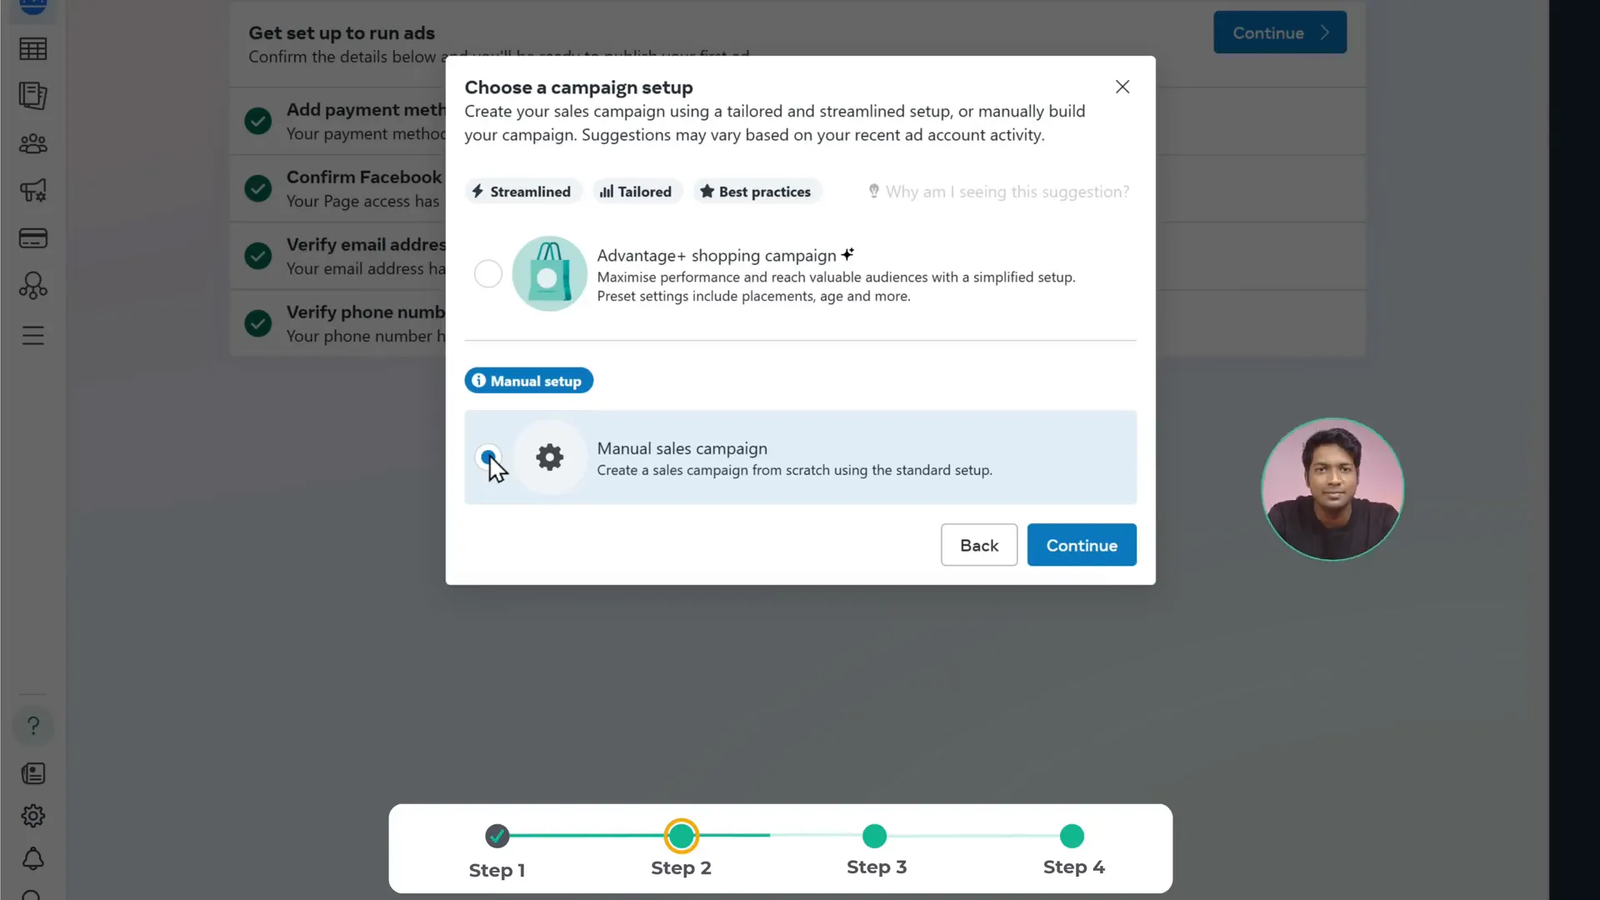
Step 6: Create a Campaign for Your Instagram Ad 📊
A campaign is the highest level in your Instagram ad structure. It defines your main advertising objective and controls how your ads are delivered. To create a campaign:
- Choose Manage Sales Campaign for more control over audience, placements, and budget.
- Click Continue.
- Name your campaign something clear and descriptive, such as “January Sales Promo” or “Spring Collection Launch”.
- If your ad falls under special categories like credit, jobs, housing, or social issues, select the appropriate category. Otherwise, you can skip this.
Having a well-named campaign helps you stay organized, especially if you run multiple campaigns simultaneously.
Step 7: Create Your Ad Set 🎯
The ad set is where you define who will see your ad, where it appears, and how much you want to spend. It’s a critical step because precise targeting and budget control make your ads effective and cost-efficient.
Here’s how to create your ad set in six simple steps:
1. Set Up Basic Ad Details
Name your ad set to keep things organized. Then choose the conversion location where you want people to complete their action. For example, if you want customers to buy from your online store, select Website.
Next, set your performance goal. Select the action you want your audience to take after seeing your ad, such as making a purchase, signing up, or installing an app. For sales-focused campaigns, choose Maximum Number of Conversions.
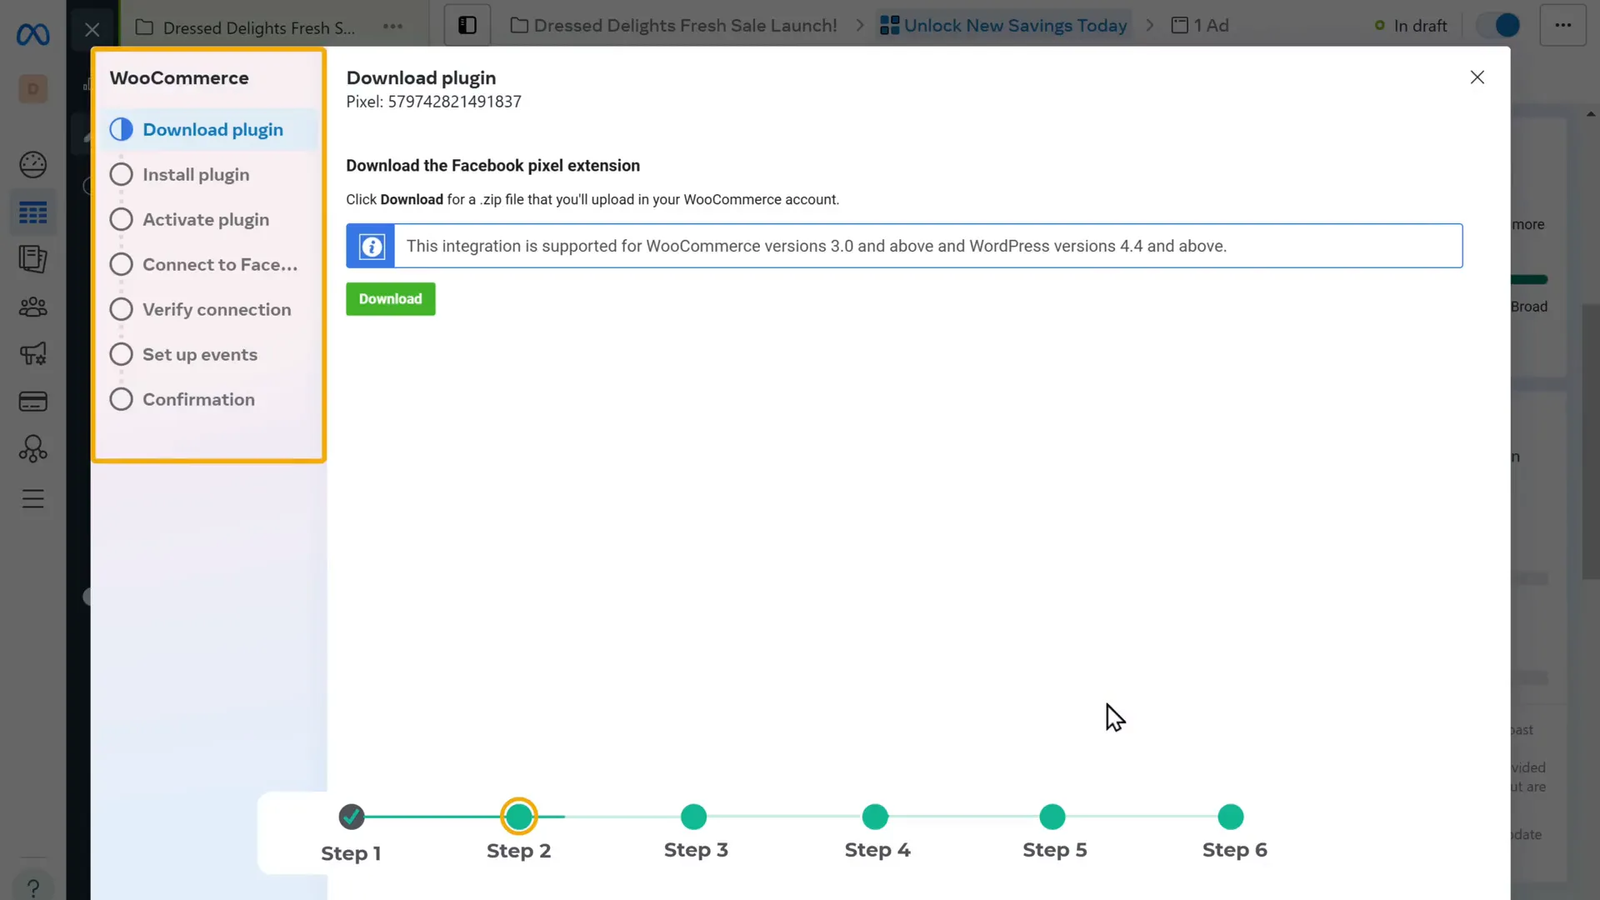
2. Create and Connect Meta Pixel to Your Website
The Meta Pixel is a small piece of code that tracks your website visitors’ interactions after they click or view your ad. It’s essential for measuring performance and optimizing your campaigns.
To set up your Meta Pixel:
- Click Create Pixel and give it a name.
- Enter your website URL and click Check.
- Meta will suggest the easiest way to connect the pixel based on your website platform. For example, WooCommerce users can download a plugin.
- Download the plugin and install it on your WordPress dashboard: go to Plugins > Add New > Upload Plugin, upload the downloaded file, install, and activate.
- Click Configure, then Get Started, and log in with your Facebook account.
- Follow the prompts to connect your WooCommerce site and enable automatic advanced matching for better tracking.
Once connected, verify the pixel installation by installing the Meta Pixel Helper extension for Chrome. Visit your website, refresh the page, and check if the pixel is detected.
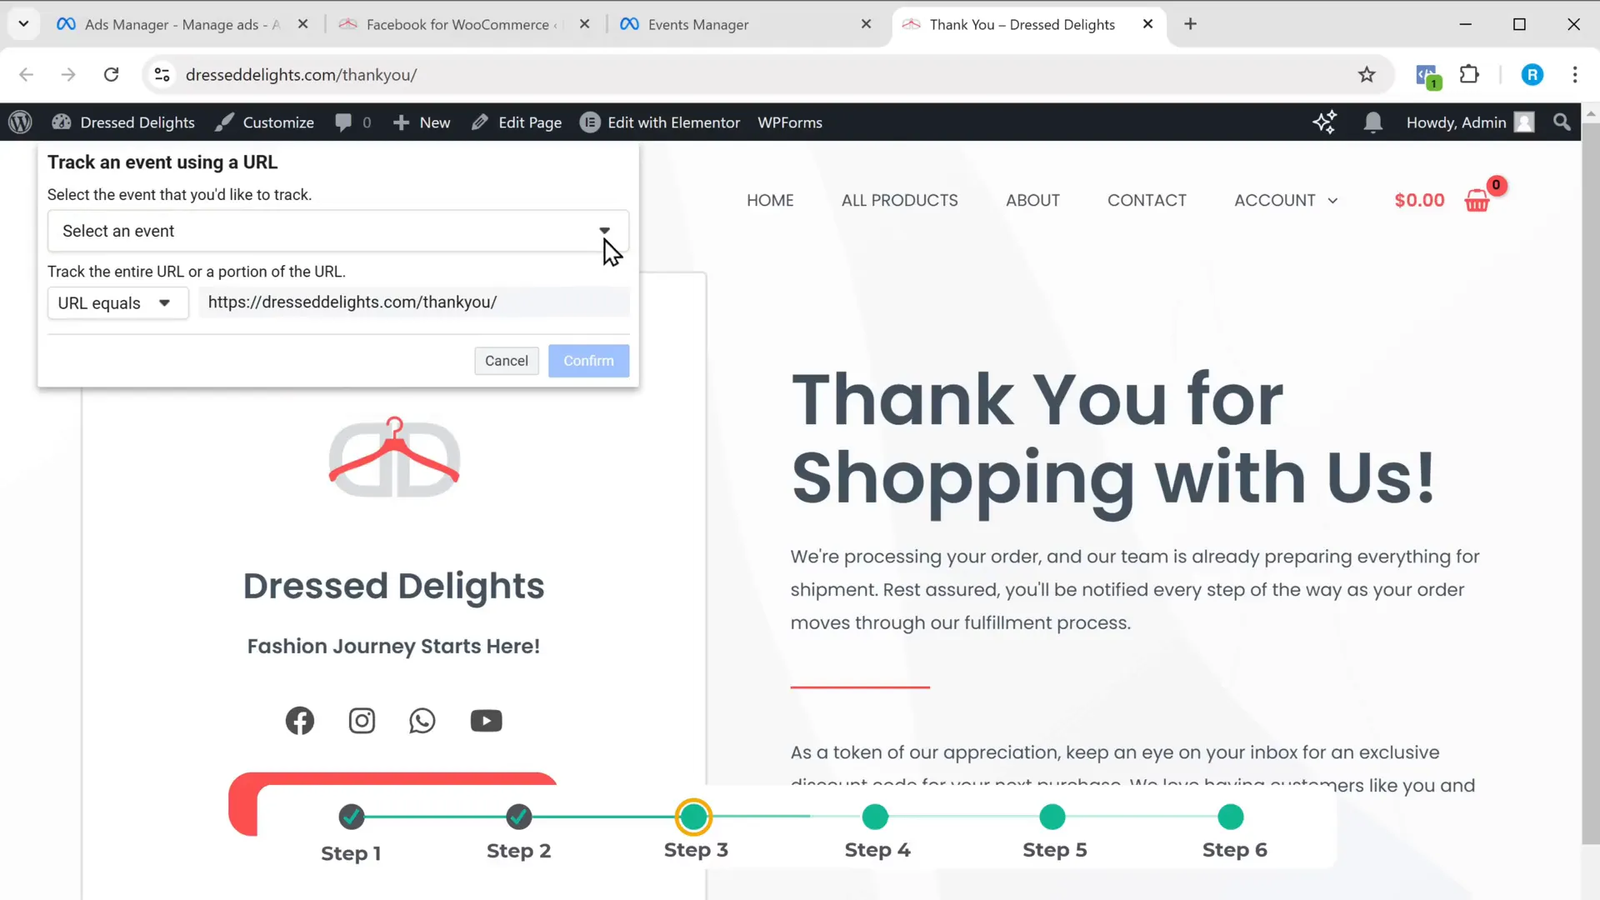
3. Set Up a Conversion Event
A conversion event tells Meta what specific action you want to track on your website, such as a purchase, form submission, or sign-up. Typically, you track conversions using the URL of a confirmation or thank you page.
To set up a conversion event:
- Click Event Setup and then Open Event Setup Tool.
- Enter the URL of the page where the conversion happens (e.g., your thank you page after purchase) and click Add Events.
- When the page loads, the event setup tool appears. You can track the entire page URL or specific actions like button clicks.
- Select the event type that matches your goal, such as Purchase.
- Confirm the event setup.
You can create multiple events depending on your business needs. After setting up, refresh your page and use the pixel helper extension to confirm the event is active.
4. Set Your Budget
Controlling your ad spend is vital. You can set a daily budget to limit how much you spend per day, helping you monitor and adjust your campaigns efficiently.
Also, schedule your ad duration based on your campaign goals. For example, if you run a limited-time sale, set the ad to run only during that period.
5. Choose Your Target Audience
Targeting is where you specify who will see your ad, making sure your message reaches the right people. You can target based on:
- Location
- Age range
- Gender
- Interests and behaviors
For example, if you sell women’s clothing, you might target people interested in “women’s clothing” and “dresses.” The more specific your targeting, the better your ad performance tends to be.
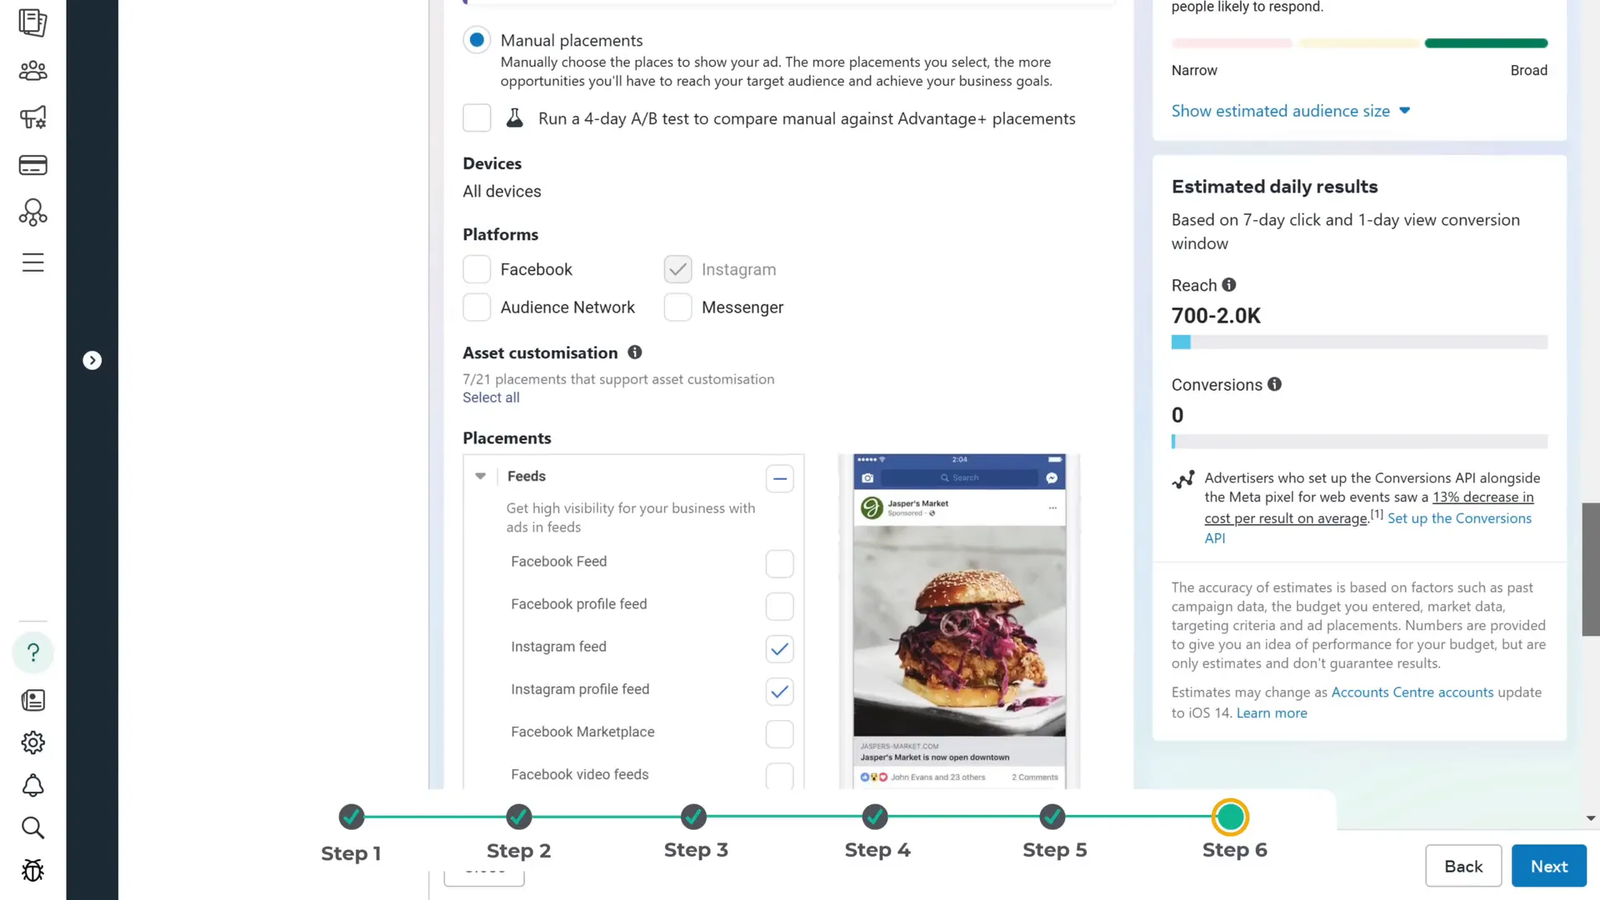
6. Choose Your Ad Placements
You have two options for ad placements:
- Automatic Placements: Meta optimizes where your ad is shown across Instagram, Facebook, and other platforms.
- Manual Placements: You select exactly where your ad appears, such as Instagram Stories, Reels, or Feed.
Since we are focusing on Instagram ads, select Manual Placements and choose only Instagram placements.
Step 8: Set Up and Publish Your Instagram Ad 🚀
Now comes the exciting part—creating the ad that your audience will see. Follow these steps:
- Give your ad a clear, descriptive name.
- Choose the ad format. Instagram offers several options like:
- Single Image or Video
- Carousel (multiple images or videos)
- Collection (a group of products)
- For this example, select Single Image or Video.
- Enter the URL where you want people to go after clicking your ad, typically your website.
- Click Setup Creative to add your ad content.
- Select your ad media (video or image). If you have a video ready, choose Video Ad.
- Add engaging text and a catchy headline. This is the first thing people will see, so make it relevant and attention-grabbing.
- If you need help writing ad copy, use AI-powered tools that generate professional ad content based on your product description and requirements.
- Paste the generated text into your ad setup.
- Add a call-to-action button like Shop Now or Sign Up, which makes it easy for your audience to take action.
- Upload your video or image and review everything carefully.
- Double-check your visuals, captions, links, and call-to-action button.
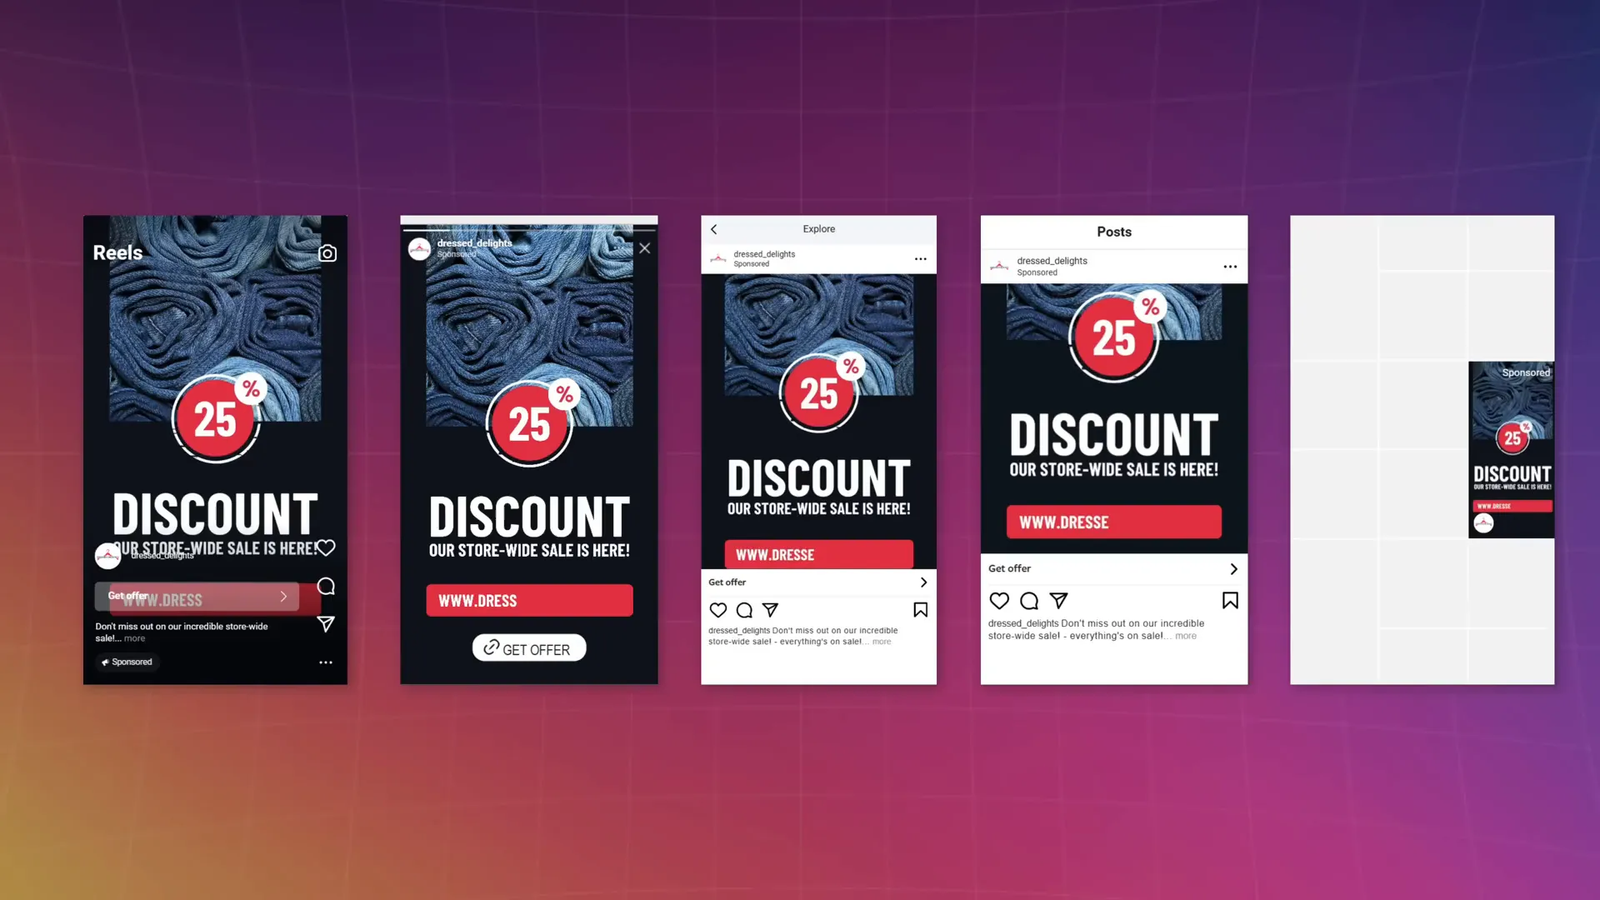
- Click Publish to launch your Instagram ad.
Once published, Instagram will start showing your ad to the audience you selected. Here’s how your ad might look on Instagram:
Step 9: Track and Analyze Your Instagram Ad Performance 📈
Launching your ad is just the beginning. To maximize your return on investment, you need to monitor how well your ad is performing. Meta Business Suite provides detailed analytics to help you do this.
Here’s how you can check your ad’s performance:
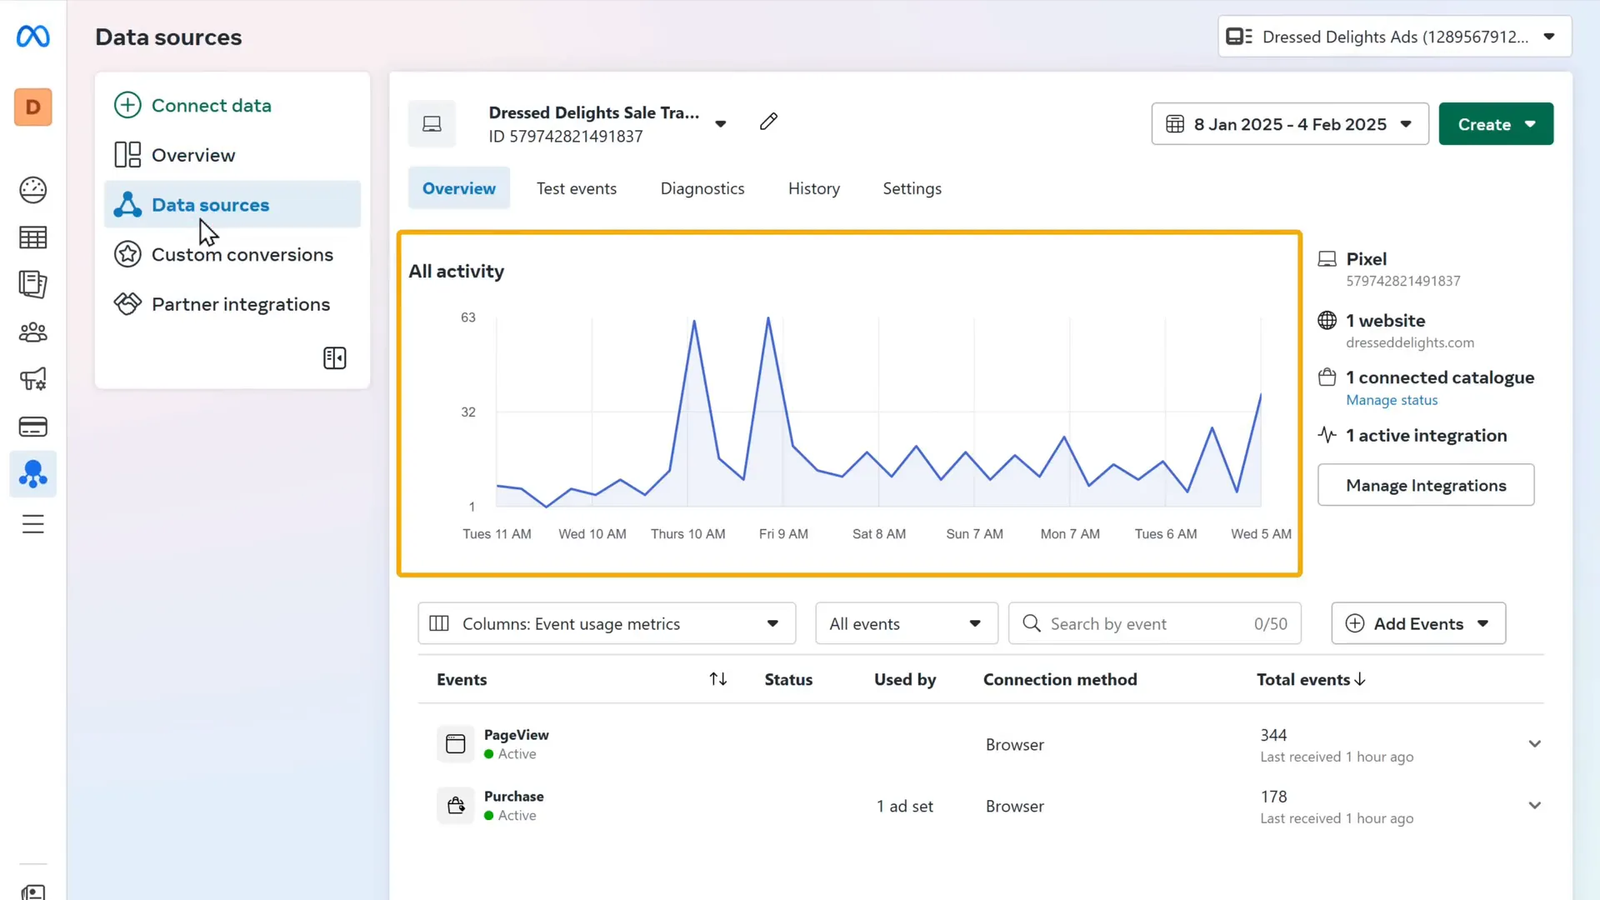
- Go to the Event Manager in Meta Business Suite.
- Click on Data Sources to view the activity related to your ads.
- You’ll see graphs showing key metrics like page views, clicks, and purchases generated from your ad.
- Use this data to understand what’s working and where you might want to make improvements for future campaigns.
Tracking your ad performance allows you to tweak your targeting, creative, or budget to get better results over time.
Frequently Asked Questions (FAQ) ❓
Q1: Do I need a separate Instagram account to run ads?
No! You can easily switch your existing Instagram account to a business account without creating a new one.
Q2: Why do I need to connect Instagram to Facebook?
Instagram ads are managed through Facebook’s Meta Business Suite. Connecting your accounts allows you to create, manage, and track ads efficiently.
Q3: What is a Meta Pixel and why is it important?
The Meta Pixel is a piece of code added to your website to track visitor actions after interacting with your ad. It helps optimize campaigns by providing valuable data on conversions.
Q4: How do I choose the right audience for my ad?
Start by defining your ideal customer’s location, age, gender, interests, and behaviors. The more specific your targeting, the more effective your ad will be.
Q5: Can I run Instagram ads without a Facebook business page?
No. A Facebook business page is required to use Meta Business Suite, which manages Instagram ads.
Q6: How much should I budget for Instagram ads?
Set a daily budget that you’re comfortable with, and monitor performance closely. You can start small and scale up as you see positive results.
Q7: Can AI tools help me create better ad content?
Absolutely! AI-powered copywriting tools can generate engaging, professional ad text tailored to your product, saving you time and boosting ad effectiveness.
Q8: How do I know if my ad is successful?
Monitor metrics like click-through rate, conversions, and return on ad spend in Meta Business Suite. Adjust your campaigns based on this data to improve results.
Conclusion: Your Instagram Ad Strategy for 2025 🚀
Advertising on Instagram in 2025 is more accessible and powerful than ever, thanks to integrated tools like Meta Business Suite, Meta Pixel, and AI-driven content creation. By following this step-by-step tutorial, you can set up your business for success, create scroll-stopping ads, target the perfect audience, and track your campaigns for continuous improvement.
Remember, the key to Instagram ad success lies in clear goals, precise targeting, compelling creatives, and ongoing optimization. Start with a business account, connect your platforms, create your ad account, verify your business, set your ad goals, and launch campaigns tailored to your audience.
If you want to grow your business and reach new customers through Instagram ads, this strategy will give you the foundation to do just that. The future of advertising is here, and it starts with one simple ad that could bring you your next hundred customers.
Ready to take your Instagram advertising to the next level? Use the tools and steps outlined here to create your first high-performing Instagram ad campaign today!
