


Are you looking for a simple way to start email marketing without needing technical skills? In this beginner-friendly GetResponse tutorial, brought to you by Metics Media, you’ll learn how to master email automation, create landing pages, and launch high-converting newsletters—step by step.
Whether you’re starting a new business or scaling your current one, this GetResponse tutorial for beginners will guide you through everything you need to know. From setting up your account to launching AI-powered campaigns, you’ll have all the tools and knowledge to grow your audience effectively.
🔑 Getting Started: Account Setup and Importing Contacts
Before diving into the powerful features of GetResponse, the first step is to create your account. Whether you want to start with a free 30-day trial or jump directly into a paid plan (with an exclusive 10% lifetime discount offered by Metics Media), signing up is straightforward.
Once you sign up, you’ll need to verify your email address by clicking the activation link sent to your inbox. After confirmation, GetResponse will prompt you to fill out a qualification form to tailor your experience to your business needs. Completing this will land you on the dashboard, your central hub for managing all your marketing activities.
Next, it’s essential to create your first contact list. This list will be the foundation for your email marketing efforts, allowing you to organize and target your subscribers efficiently. To do this:
- Navigate to the Contacts section on the dashboard.
- Click on Create List and give it a meaningful name, such as “EcoCityThreads Subscribers.”
- Add contacts by choosing one of four methods: manually entering one by one, importing from a file (CSV, XLS, XLSX, TXT, VCF, ODS), integrating with other platforms, or collecting contacts via signup forms on your website.
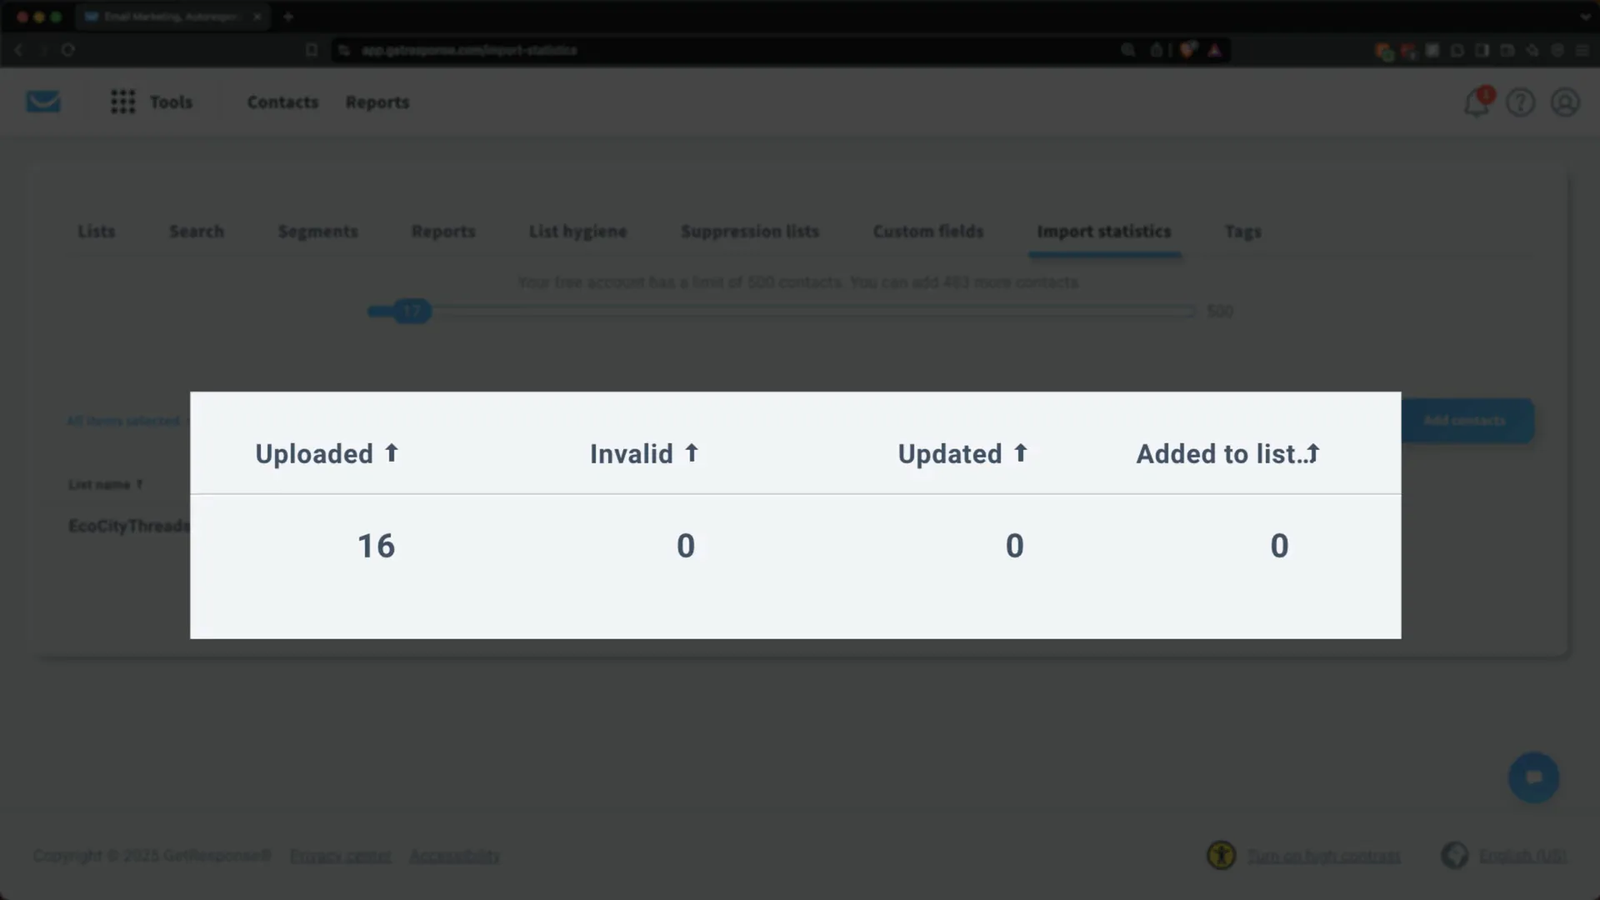
For beginners, importing contacts from a file is often the most efficient method. Upload your spreadsheet or contact file, confirm you have permission to email these contacts, and map the fields properly to ensure data accuracy. You can even create custom fields like job_title for personalized marketing.
After importing, review your import statistics carefully. If any contacts are rejected, troubleshoot by reviewing GetResponse’s guidelines for rejected imports to ensure compliance and avoid delivery issues.
📧 Setting Up a Professional Email for Better Deliverability
A professional email address linked to your own domain is not only more trustworthy to your audience but also significantly improves your email deliverability. Emails sent from free providers like Gmail or Yahoo often end up in spam folders. Therefore, connecting your custom domain email to GetResponse is crucial.
If you already have a domain and professional email, linking it to GetResponse is free and straightforward. If not, you can purchase a domain directly through GetResponse (available on the Creator plan and above) or use popular providers like GoDaddy, Squarespace Domains, or Namecheap to buy your domain and set up your professional email.
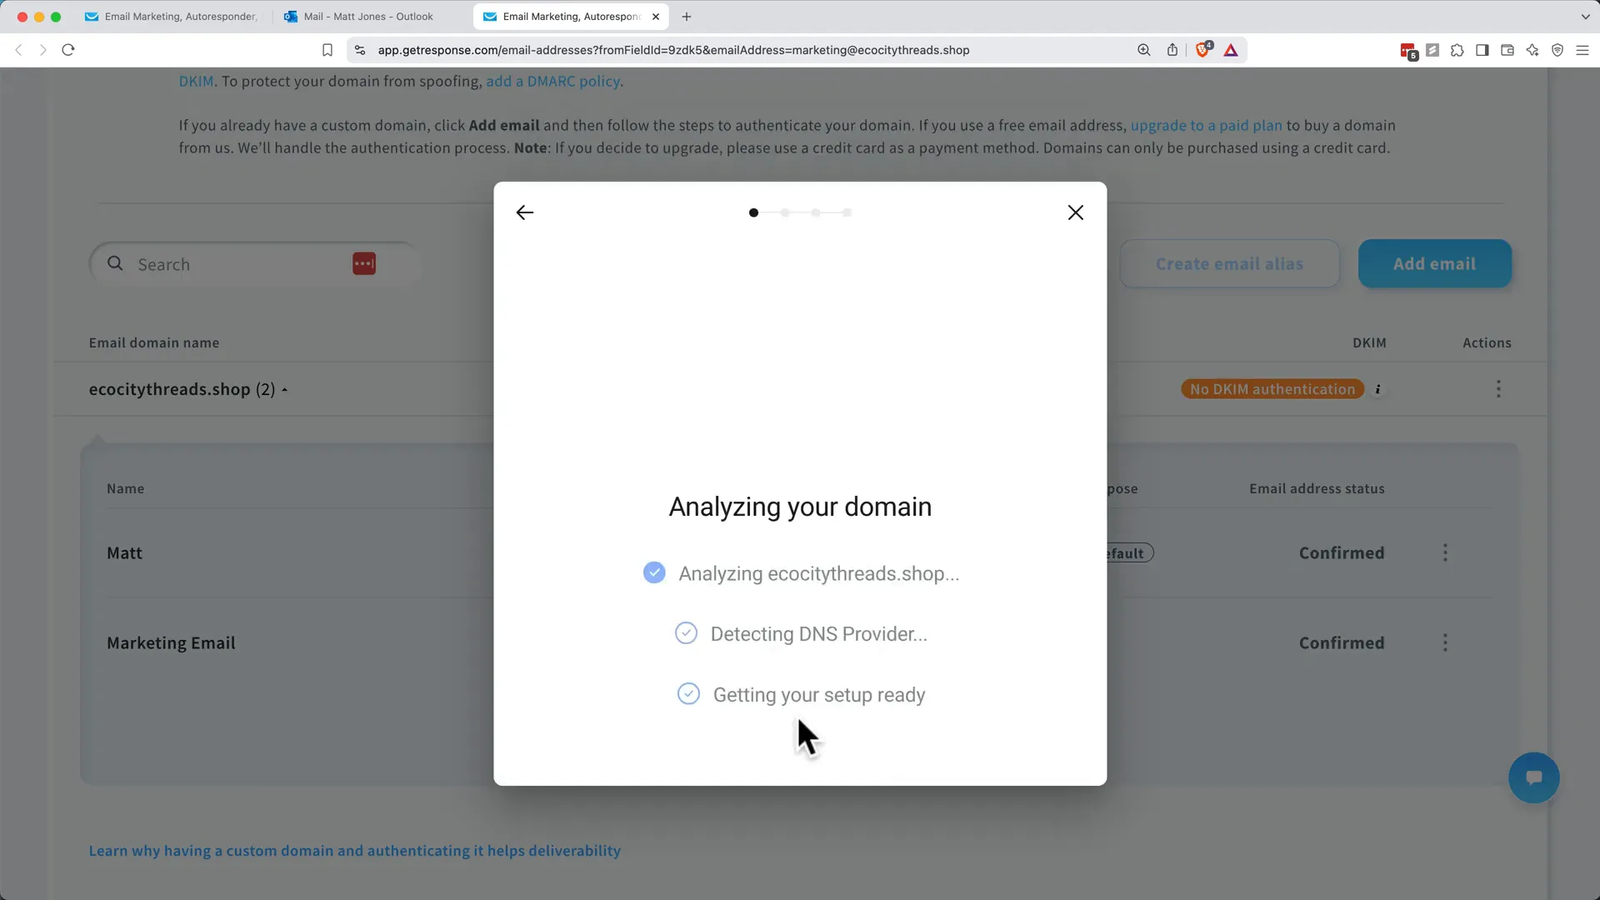
To ensure your emails reach the inbox and are not flagged as spam, email authentication is necessary. This involves setting up DKIM, DMARC, and SPF records, which verify the legitimacy of your emails and prevent spoofing. GetResponse simplifies this process using a tool called Entri, which automatically handles these DNS record updates for compatible domain providers.
To authenticate your email:
- Go to your profile icon and select Email Addresses and Domains.
- Add your professional email and verify it through the confirmation email sent by GetResponse.
- Authenticate your domain using Entri, following the prompts to connect your domain provider account.
- If your provider isn’t compatible, you can manually update DNS records using the detailed instructions provided.
- Allow up to 48 hours for DNS propagation, and verify authentication status using DNSChecker.org.
Once authenticated, your email will show a green DKIM verified badge, confirming it’s ready to send emails with maximum deliverability.
🤖 Launching AI-Powered Campaigns: The Fastest Way to Market
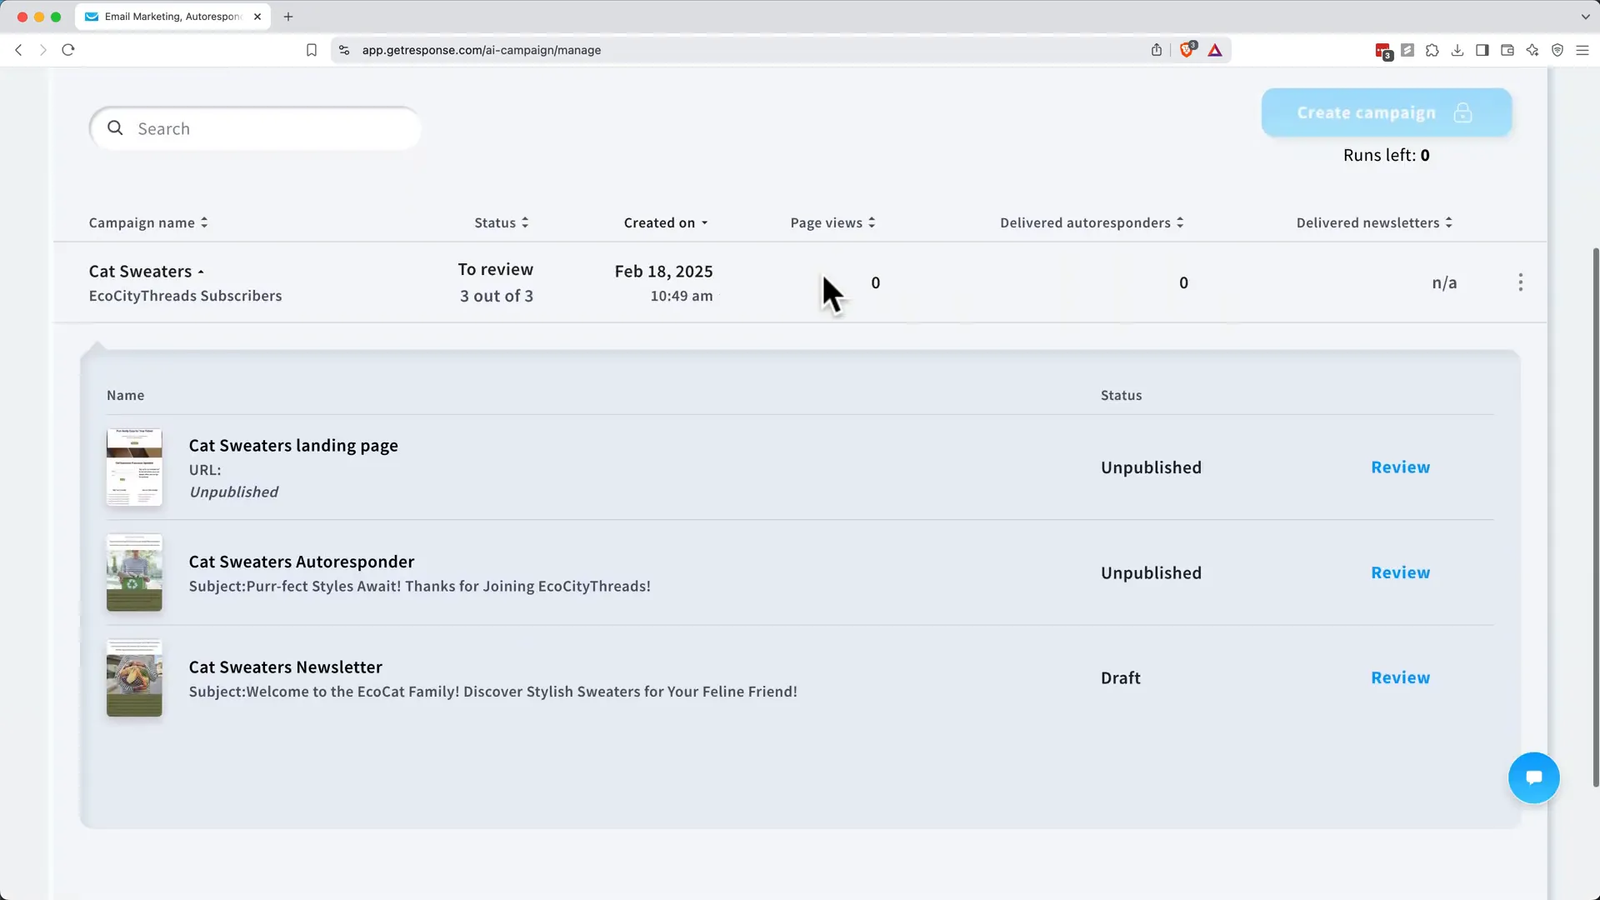
GetResponse boasts some of the most advanced AI features on the market, making it easier than ever to create marketing campaigns quickly and effectively. One standout feature is the AI Campaign Wizard, which can generate a landing page, welcome email, and newsletter—all tailored to your business—based on a few prompts.
To start an AI campaign:
- Navigate to Tools > Automation > AI Campaigns.
- Click Create Campaign and give it a descriptive name, like “Cat Sweaters Winter 2025.”
- Select the contact list where new leads will be saved.
- Describe your product or service, industry, and target audience in detail to help the AI tailor content.
- Choose your brand colors and upload your logo for a consistent look.
The AI then generates marketing assets you can preview and customize further. This approach provides a strong foundation while allowing you to add your personal touch and branding nuances.
📩 Crafting and Sending Newsletters: Manual and AI Options
Email newsletters remain a cornerstone of effective email marketing. With GetResponse, you have two primary options to create newsletters:
- AI Campaign Generator: Automatically creates a newsletter, landing page, and autoresponder based on your AI campaign inputs.
- Manual Creation: Build your newsletter from scratch or using a template, giving you full control over design and content.
If you prefer hands-on control or if you’ve used up your AI credits, manual creation is straightforward:
- Go to Tools > Email Marketing and click Create Newsletter.
- Choose to create the email yourself or use the AI Email Generator.
- Select from a wide range of templates sorted by category or start with a blank canvas.
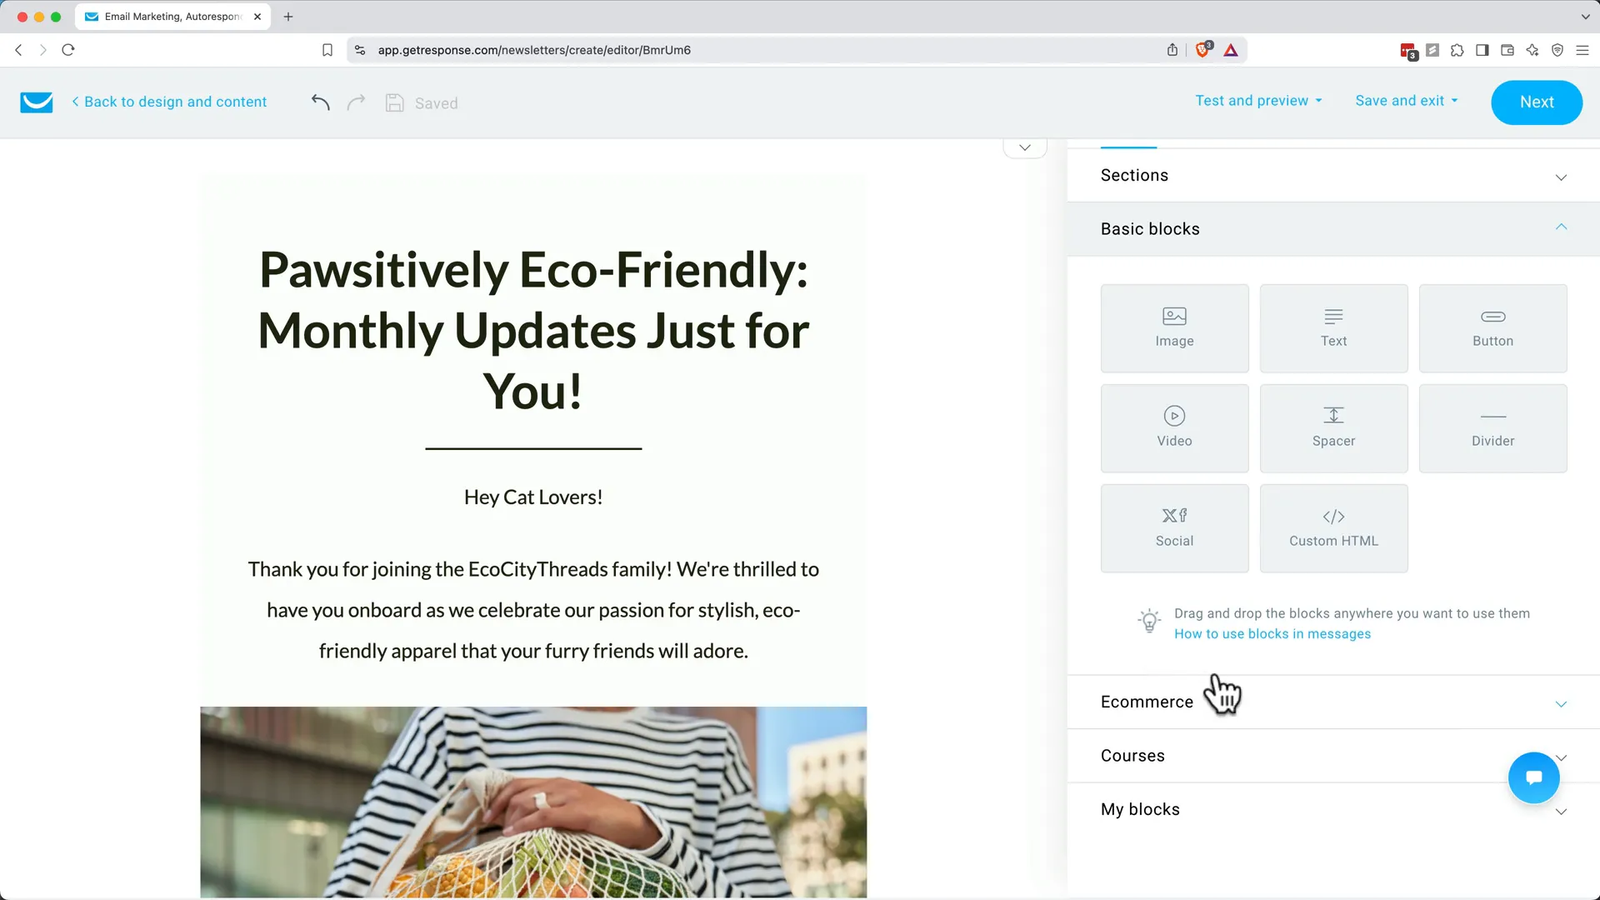
- Customize your newsletter using the drag-and-drop editor, adding text, images, buttons, videos, and more.
The editor is intuitive:
- Drag sections and content blocks to organize your layout.
- Click on any block to edit text and styles.
- Use the magic wand icon to enhance text with AI rewriting or improvements.
- Replace images by uploading your own or choosing from the built-in library, including GIFs.
- Add personalization tokens like the recipient’s first name to create a friendly, customized experience.
- Set up buttons with links to products, landing pages, or external URLs.
Once your newsletter is ready, preview it on desktop and mobile to ensure responsiveness. Send test emails to yourself and run spam checks before scheduling or sending immediately.
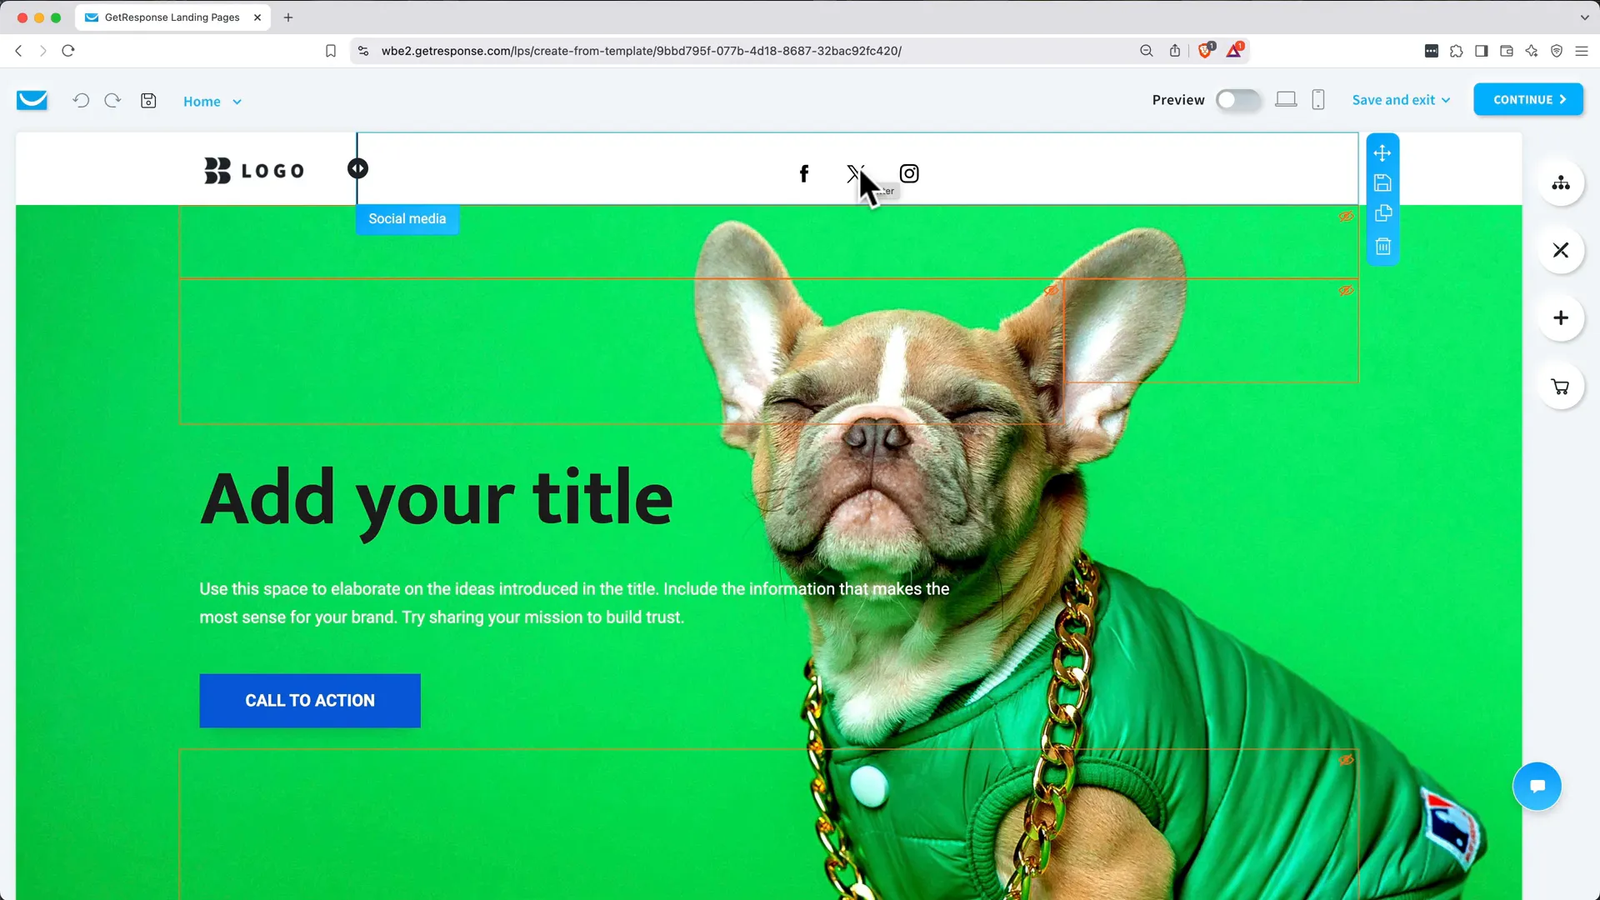
🌐 Building High-Converting Landing Pages
Landing pages are crucial for capturing leads, promoting products, and driving conversions. Unlike full websites, landing pages focus visitors on a single action, reducing distractions and boosting conversion rates.
With GetResponse, creating a landing page is easy, even without design or coding experience:
- Go to Tools > Landing Pages.
- Choose to use AI to generate a page or select from a variety of professionally designed templates.
- Use the editor to customize your page content, images, buttons, and forms.
Key components of a successful landing page include:
- Headline: Clear, attention-grabbing, and benefits-focused.
- Supporting Images: High-quality photos or videos that reinforce your message.
- Call to Action (CTA): A prominent, compelling button or form that directs visitors to convert.
- Social Proof or Benefits: Testimonials, product highlights, or key advantages.
When building your page:
- Customize your brand colors and typography in the Global Design settings.
- Replace placeholder images with your own product photos.
- Use simple, direct CTAs like “Enter your email for 20% off.”
- Include a signup form directly on the page to capture emails.
- Design a thank-you page that confirms the signup and directs users to your store or next steps.
For domain setup, GetResponse offers a free branded domain for immediate publishing. However, connecting a custom domain or subdomain enhances professionalism and brand consistency. Setting up a subdomain with providers like GoDaddy is straightforward with DNS instructions provided by GetResponse.
⏰ Automating Engagement with Autoresponders
Autoresponders are automated emails sent to subscribers based on a schedule, such as welcome messages or drip campaigns. They save time, maintain consistent communication, and keep your audience engaged without manual effort.
After setting up your landing page to collect emails, create an autoresponder to welcome new subscribers and deliver incentives like discount codes:
- Navigate to Tools > Autoresponders.
- Open your AI-generated autoresponder or create a new one manually.
- Name your autoresponder and link it to the same contact list as your landing page.
- Schedule the email to send immediately on signup (Day 0).
- Customize the email content, thanking subscribers and including a promotional code.
GetResponse integrates with e-commerce platforms like Shopify, allowing you to synchronize discount codes directly into your emails. If using other platforms, create codes manually and add them to your autoresponder.
Test your autoresponder thoroughly and publish it to start automatic engagement with your new subscribers.

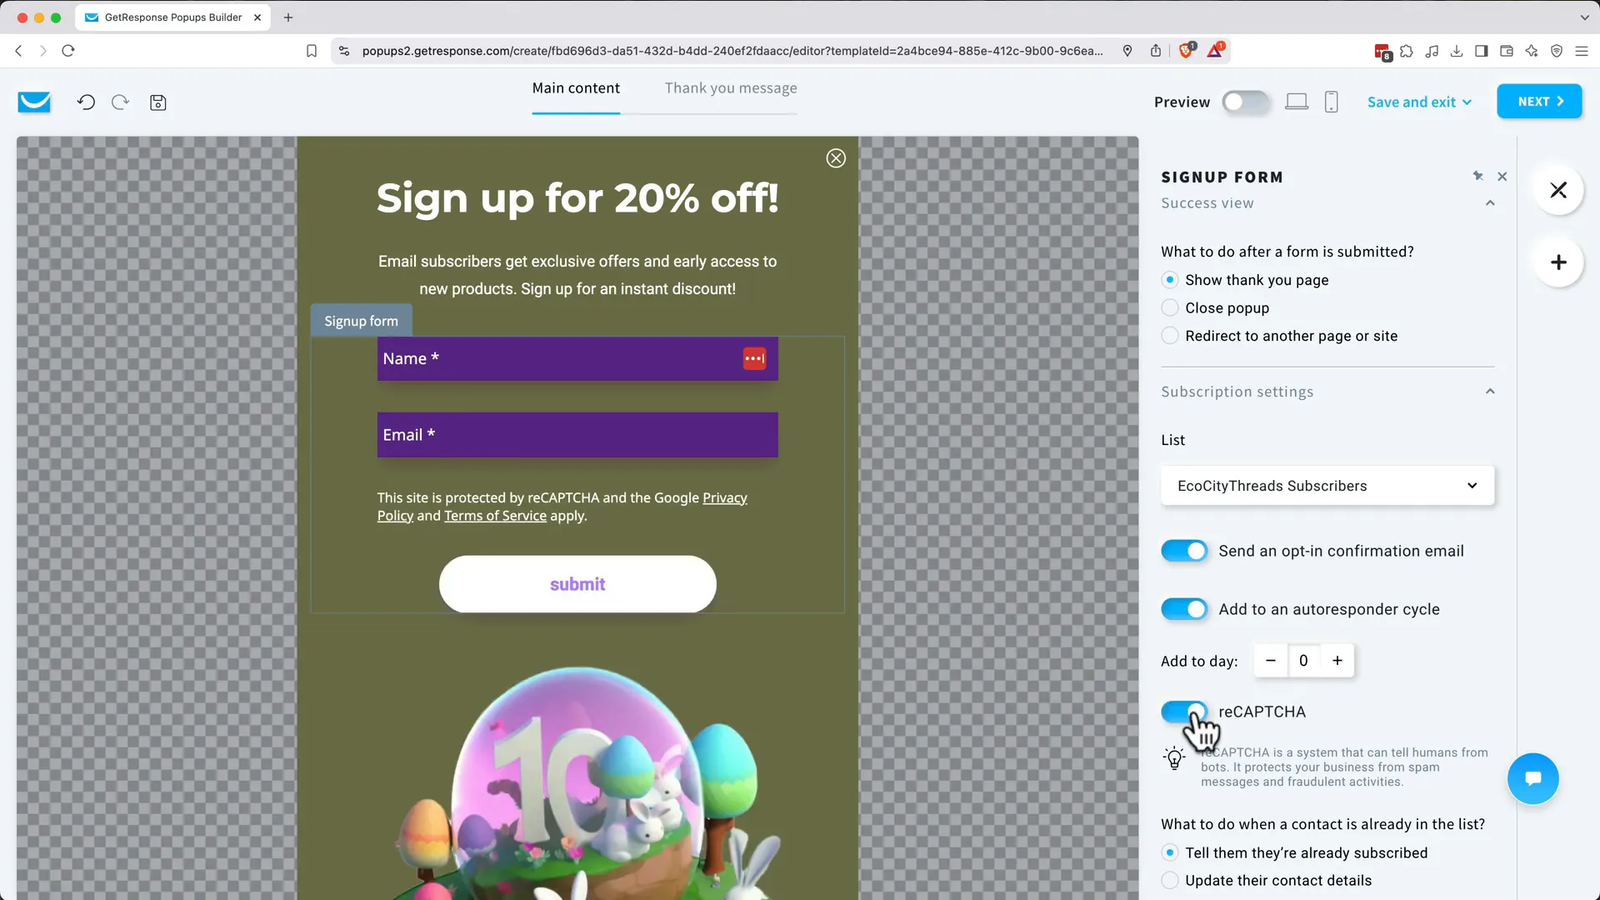
📝 Designing Signup Forms to Grow Your Email List
Signup forms are essential tools for converting website visitors into subscribers. GetResponse offers both embedded forms and popups that can be customized and timed to appear for maximum effect.
To create a popup signup form:
- Go to Tools > Forms & Popups and click Create.
- Select between popup or embedded form styles and choose a template or start from scratch.
- Customize the form’s colors, text, fields, and layout to match your brand.
- Set up success actions like redirecting to a thank-you page.
- Configure subscription settings, including double opt-in if required by your country.
- Enable autoresponder addition to send welcome emails automatically.
Use Web Connect to link the form or popup to your website. Web Connect is a small code snippet inserted into your website’s header, enabling seamless integration of popups, tracking, and automation.
Adjust popup triggers for optimal timing, such as showing after 60 seconds or when the user scrolls 75% down the page. Set display rules to avoid showing the popup to already subscribed visitors.
Test your popup on desktop and mobile to ensure smooth user experience.
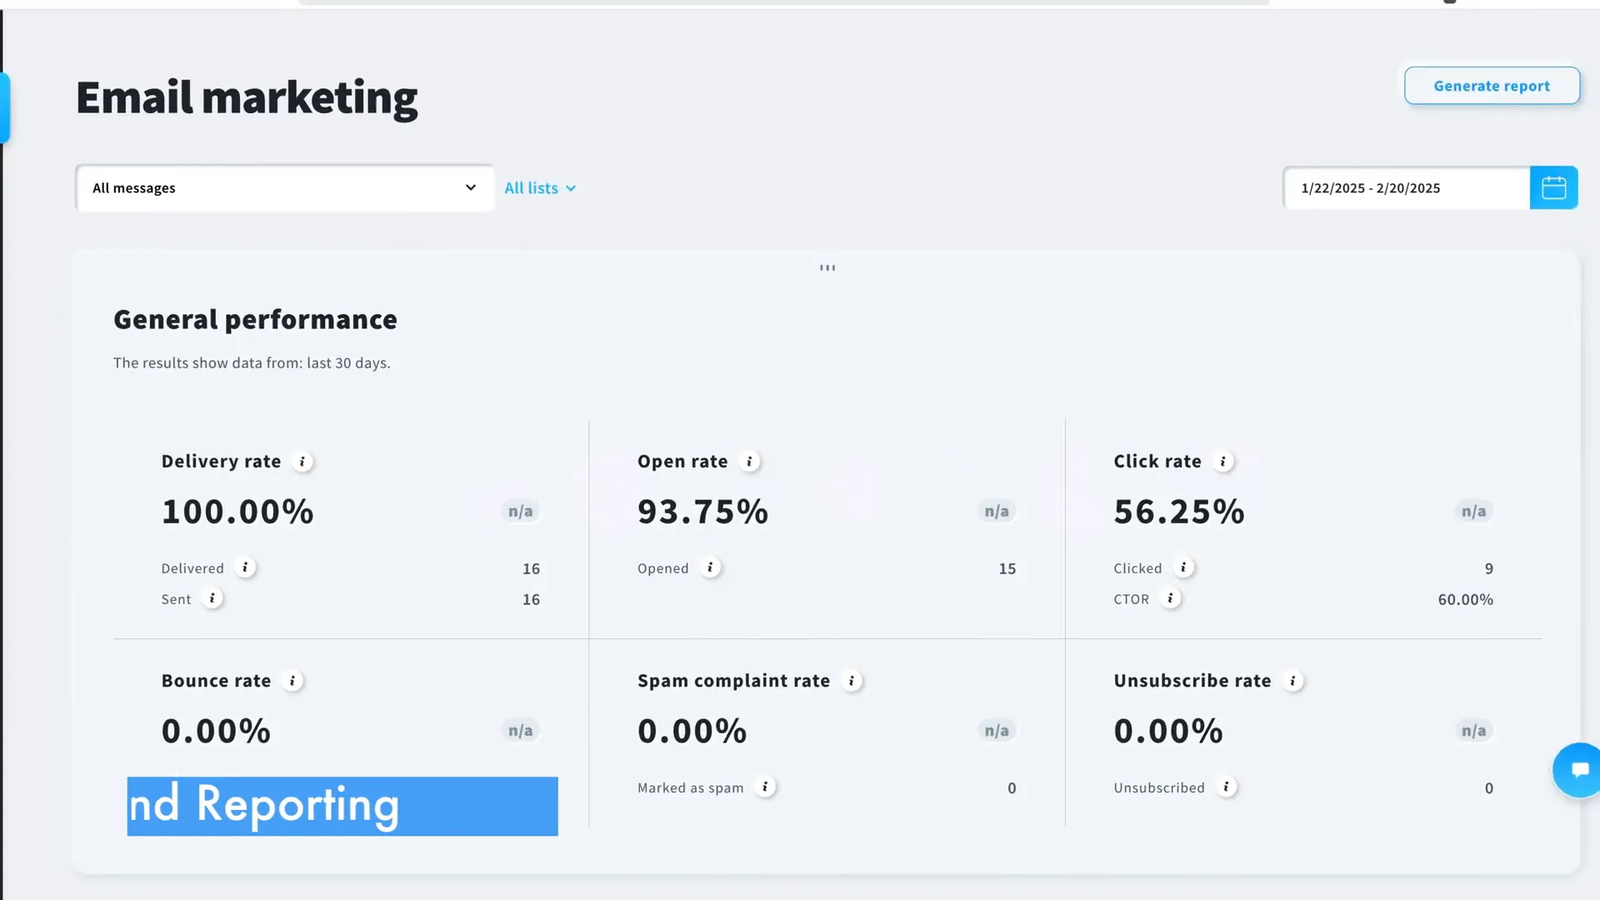
📊 Tracking and Analyzing Your Campaign Performance
Measuring the success of your email marketing and landing pages is vital for continuous improvement. GetResponse provides detailed analytics for newsletters, autoresponders, and landing pages.
For email campaigns, access the Reports section to see open rates, click-through rates, bounce rates, and subscriber engagement. Dive into individual email reports to understand which content resonates best.
Autoresponders have similar analytics, allowing you to monitor each message’s performance within your automation sequence.
Landing pages offer insights into unique visits, conversions, and form submissions. Use this data to optimize your pages, improve CTAs, and increase conversion rates.
Regularly reviewing these metrics helps you refine your messaging, segment your audience effectively, and grow your business sustainably.
Frequently Asked Questions (FAQ) ❓
What is GetResponse and who is it for?
GetResponse is an all-in-one email marketing and marketing automation platform designed for businesses of all sizes to create, send, and automate email campaigns, build landing pages, manage contacts, and analyze marketing performance.
Do I need technical skills to use GetResponse?
No. GetResponse is user-friendly with drag-and-drop editors, AI-powered tools, and automated workflows that allow beginners to launch professional campaigns without coding or design experience.
Can I use my own domain for sending emails?
Yes. Using a professional email tied to your domain improves brand credibility and email deliverability. GetResponse offers tools to authenticate your domain automatically or manually.
How does the AI Campaign Wizard help me?
The AI Campaign Wizard generates marketing assets such as landing pages, welcome emails, and newsletters based on your inputs, speeding up campaign creation and providing a strong starting point for customization.
Can I integrate GetResponse with my e-commerce store?
Yes. GetResponse supports integrations with platforms like Shopify, allowing you to sync products and discount codes directly into your email campaigns and automations.
What is the difference between an autoresponder and marketing automation?
Autoresponders send scheduled emails based on time intervals, such as welcome sequences, while marketing automation can trigger emails based on user behavior or other complex workflows.
How do I track the success of my campaigns?
GetResponse provides detailed analytics for emails, autoresponders, and landing pages, including open rates, click rates, conversion rates, and visitor behavior to help optimize your marketing efforts.
Can I customize signup forms to match my brand?
Absolutely. GetResponse offers customizable forms and popups where you can adjust colors, fonts, fields, and behavior to create a seamless experience that aligns with your brand identity.
Is there a free trial available for GetResponse?
Yes. You can sign up for a 30-day free trial with no credit card required to explore the platform’s features before committing to a paid plan.
What support resources are available for beginners?
GetResponse provides comprehensive tutorials, help articles, and customer support. Additionally, creators like Metics Media offer detailed video tutorials and guides to help you get started quickly.
Conclusion 🎯
Mastering email marketing and automation with GetResponse is within reach for beginners thanks to its intuitive interface, powerful AI tools, and comprehensive features. From setting up your account and professional email to importing contacts, crafting compelling newsletters, building high-converting landing pages, automating your communication with autoresponders, and designing engaging signup forms, GetResponse covers all the essentials to grow your business effectively.
By regularly analyzing your campaign performance and optimizing your strategies, you can build a loyal audience, increase conversions, and scale your marketing efforts efficiently. Whether you’re launching your first campaign or looking to automate complex workflows, GetResponse provides the tools and guidance to succeed without needing advanced technical skills.
Ready to take your email marketing to the next level? Start with GetResponse today and watch your business grow!
