

Welcome to your comprehensive guide on running Snapchat Ads in 2025, Whether you’re just starting out or scaling an established brand, Snapchat Ads offer a unique opportunity to reach one of the most valuable demographics online—millennials and Gen Z—with some of the lowest advertising costs and some of the highest conversion rates.
Did you know that Snapchatters are 34% more likely to buy a product from a Snap ad compared to other platforms? With over 900 million users every month and 75% of those users aged between 13 and 34, Snapchat is a goldmine for advertisers targeting young, engaged audiences.
In this step-by-step tutorial, you will learn how to set up your Snapchat Ads account, install the Snap Pixel on your website, create compelling ads using Snapchat’s built-in creative tools, and launch your first campaign. By the end, your campaign will be live, optimized, and ready to drive conversions.
Ready to double your campaign budget instantly? Use the special link mentioned in this guide to claim a $375 ad credit after spending $350. Let’s dive in!
Step 1: Setting Up Your Snapchat Ads Account 📝
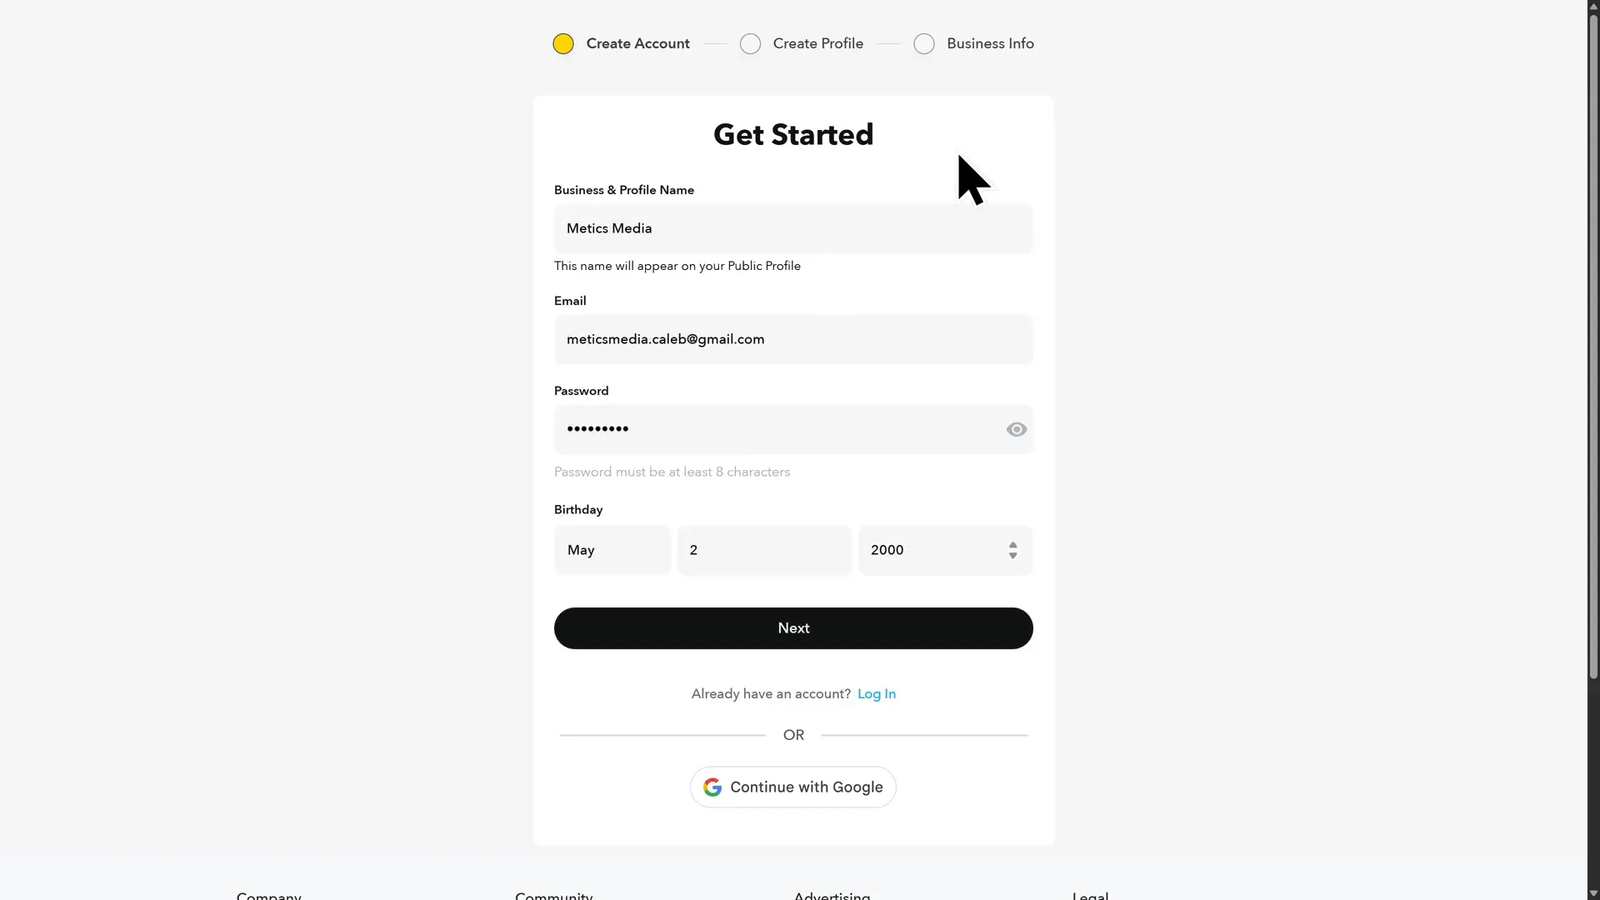
The first step to advertising on Snapchat is creating your Snapchat Ads account. This process is simple and quick, and you’ll unlock a special offer that gives you $375 in ad credit after spending $350, effectively doubling your budget.
To begin, visit the Snapchat Ads sign-up page and click the yellow “Get Started” button. You’ll be prompted to fill out your personal information including your name, email, and password.
Next, you’ll choose a username and enter your website URL. Snapchat offers an excellent time-saving feature called “Import Brand Assets.” If you check this box, Snapchat will automatically pull brand assets like logos and images from your website to populate your Snapchat Ads profile.
Once you fill in your website and confirm your account, you can optionally add a profile photo and bio. Then, enter your business details such as country, currency, and phone number. This information is essential for billing and account verification.
Before finalizing your account, ensure that you select the special offer “Spend $350 Get $375” to claim your ad credit. Once selected, click “Next” and your Snapchat Ads account will be successfully created.
After account creation, you will land on the campaign creation page. For now, let’s familiarize ourselves with the Snapchat Ads Manager interface before launching any campaigns.
Step 2: Navigating the Snapchat Ads Interface 🖥️
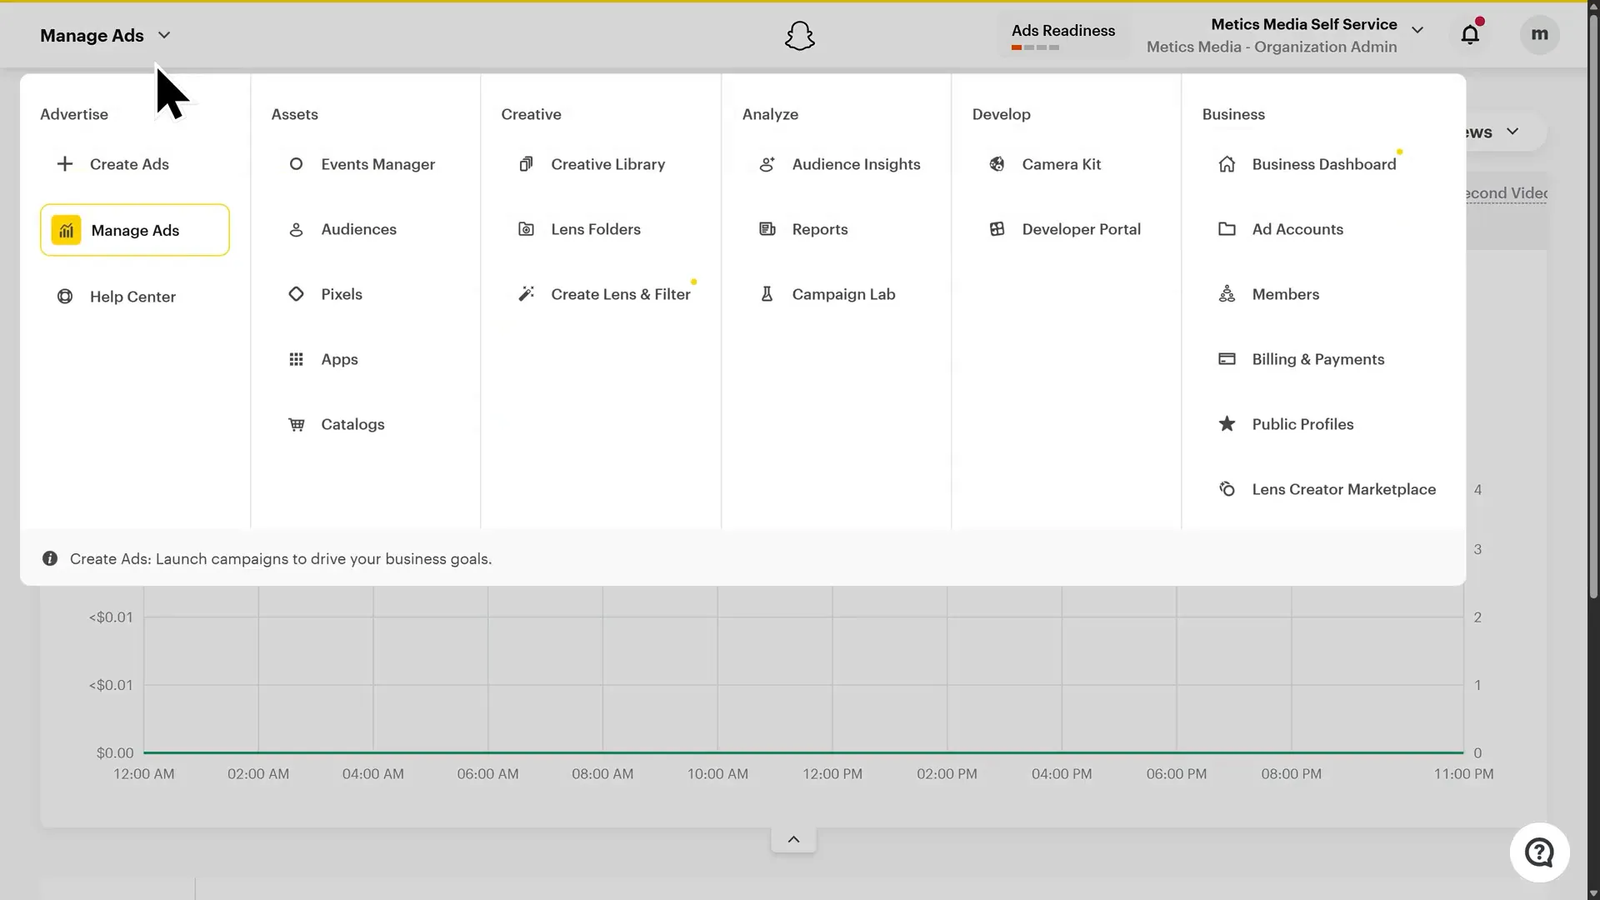
Understanding the Snapchat Ads Manager dashboard is crucial as it houses all the tools you need to create, manage, and optimize your ads.
At the top left of your screen, you’ll see a dropdown menu that lets you navigate between different sections:
- Advertise Tab: This is your workspace for creating and managing ad campaigns. Expect to spend most of your time here during campaign setup and optimization.
- Assets Tab: Here, you’ll find core tools like Snap Pixels, custom audiences, and product catalogs. These help with tracking and targeting.
- Creative Tab: Manage your ad creatives and utilize Snapchat’s tools for video and augmented reality (AR) content creation.
- Analyze Tab: Track your campaigns’ performance, generate reports, and run split tests to optimize your ads.
- Develop Tab: Designed for advanced users, this section offers tools for creating AR lenses and custom development. Beginners can skip this for now.
- Business Tab: Manage your account settings, billing information, team members, and public profiles.
Now that you know your way around, the next critical step is to set up the Snap Pixel on your website.
Step 3: Installing the Snap Pixel on Your Website 📊
The Snap Pixel is a small piece of code that tracks user behavior on your website. Installing it is essential for measuring conversions, optimizing your ads, and creating retargeting audiences.
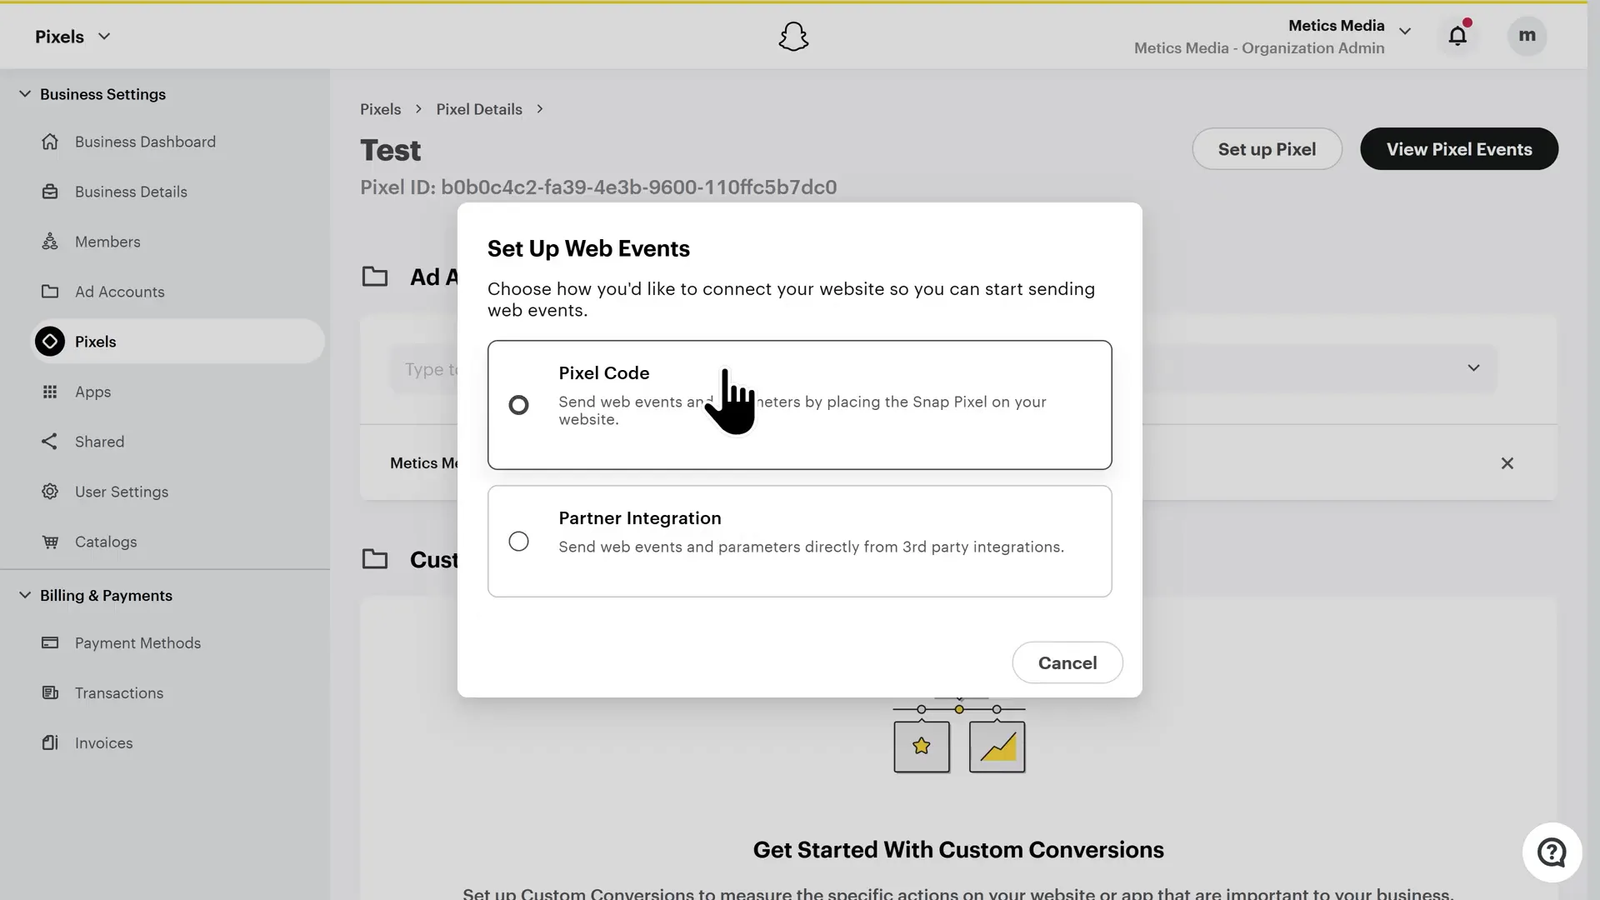
To create your Snap Pixel, navigate to the Assets tab and select Pixels. Click “Create Pixel” and give it a name—for example, “Test Pixel.” Then, link the pixel to your ad account by selecting your business name from the list.
Once linked, click “Set Up Pixel” to configure the web events you want to track, such as page views, purchases, and sign-ups.
There are two main ways to install the Snap Pixel on your website:
- Pixel Code: Manually copy and paste the pixel code into your website’s header. This option requires access to your website’s code.
- Partner Integration: This is the easier and more popular option. Snapchat supports direct integrations with platforms like Google Tag Manager, Shopify, and BigCommerce. Simply select your platform and follow the step-by-step instructions to install the pixel automatically.
Installing the Snap Pixel correctly is key to unlocking powerful tracking and retargeting capabilities that improve your campaign’s performance.
Step 4: Creating Your First Snapchat Ads Campaign 🚀
Now that your account and tracking are set up, it’s time to create your first campaign. Head back to the top left dropdown and click Create Ads.
The first thing to do is select your campaign objective. Snapchat offers five objectives:
- Awareness and Engagement: Ideal for getting your brand or product seen by as many people as possible. This objective focuses on impressions rather than clicks or sales.
- Traffic: Use this objective if your goal is to drive visitors to a website, product page, or landing page.
- Leads: Best for collecting contact information, such as emails or phone numbers, via form sign-ups.
- App Promotion: Perfect for driving app downloads and installs.
- Sales: Designed to drive purchases or sales-related actions on your website.
For this tutorial, we’ll select “Awareness and Engagement” to demonstrate the process. Click “Next” to proceed.
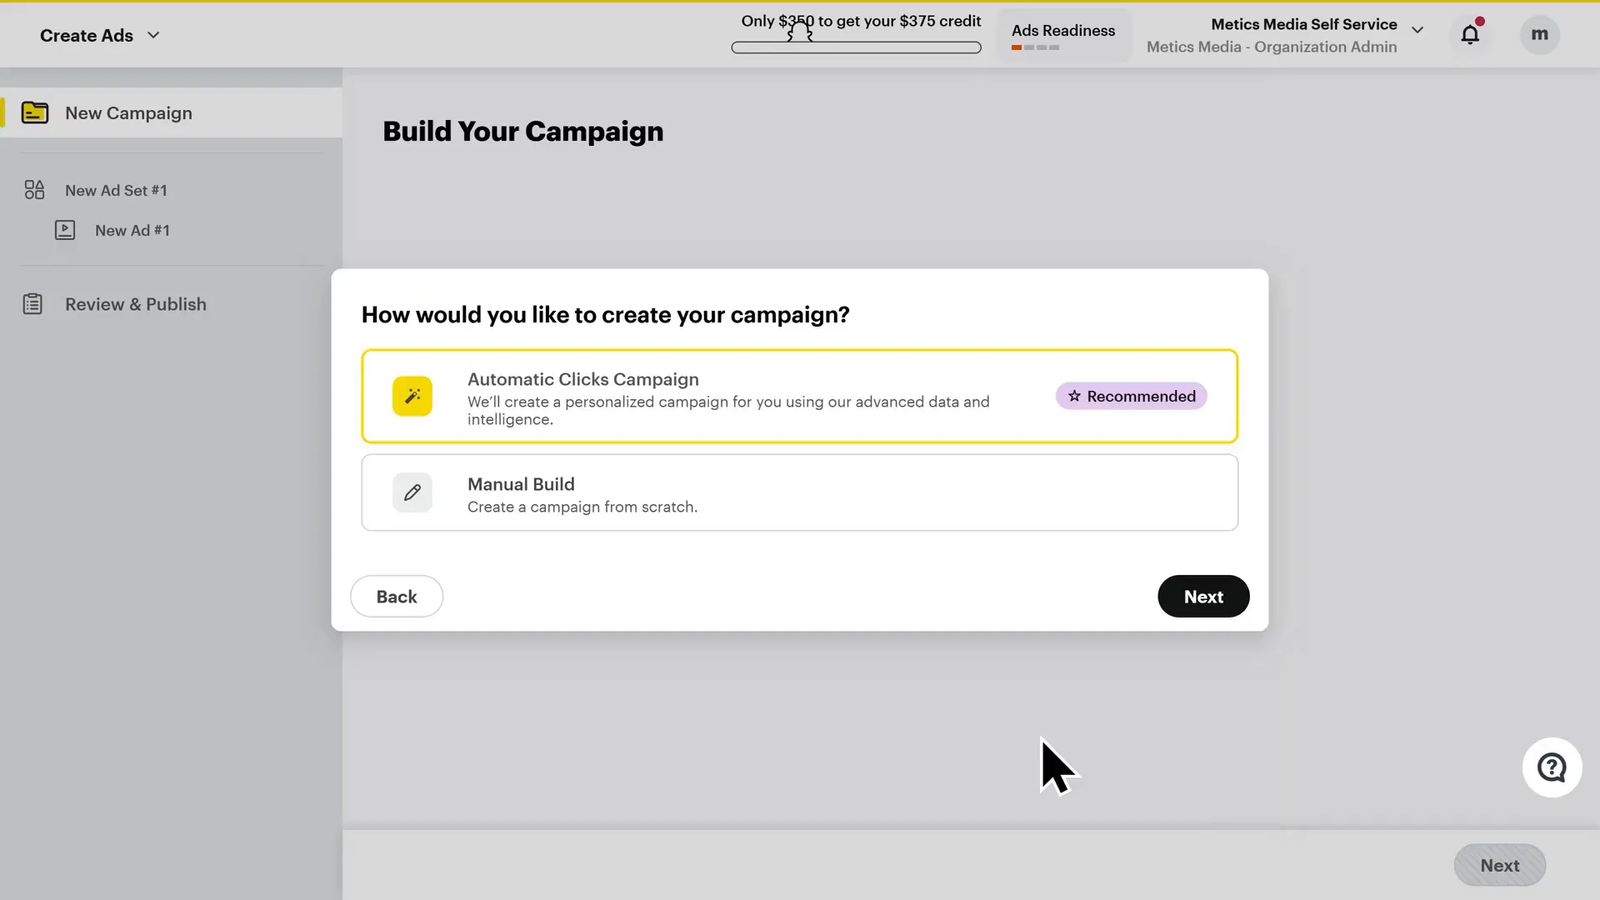
Next, Snapchat gives you two campaign build options:
- Automatic Clicks Campaign: Uses data from your past campaigns to optimize automatically. Best for advertisers with existing data and campaigns.
- Manual Build: Allows you to build your campaign from scratch. Recommended for new advertisers or accounts without historical data.
Since this is a new account, select “Manual Build” and click “Next.”
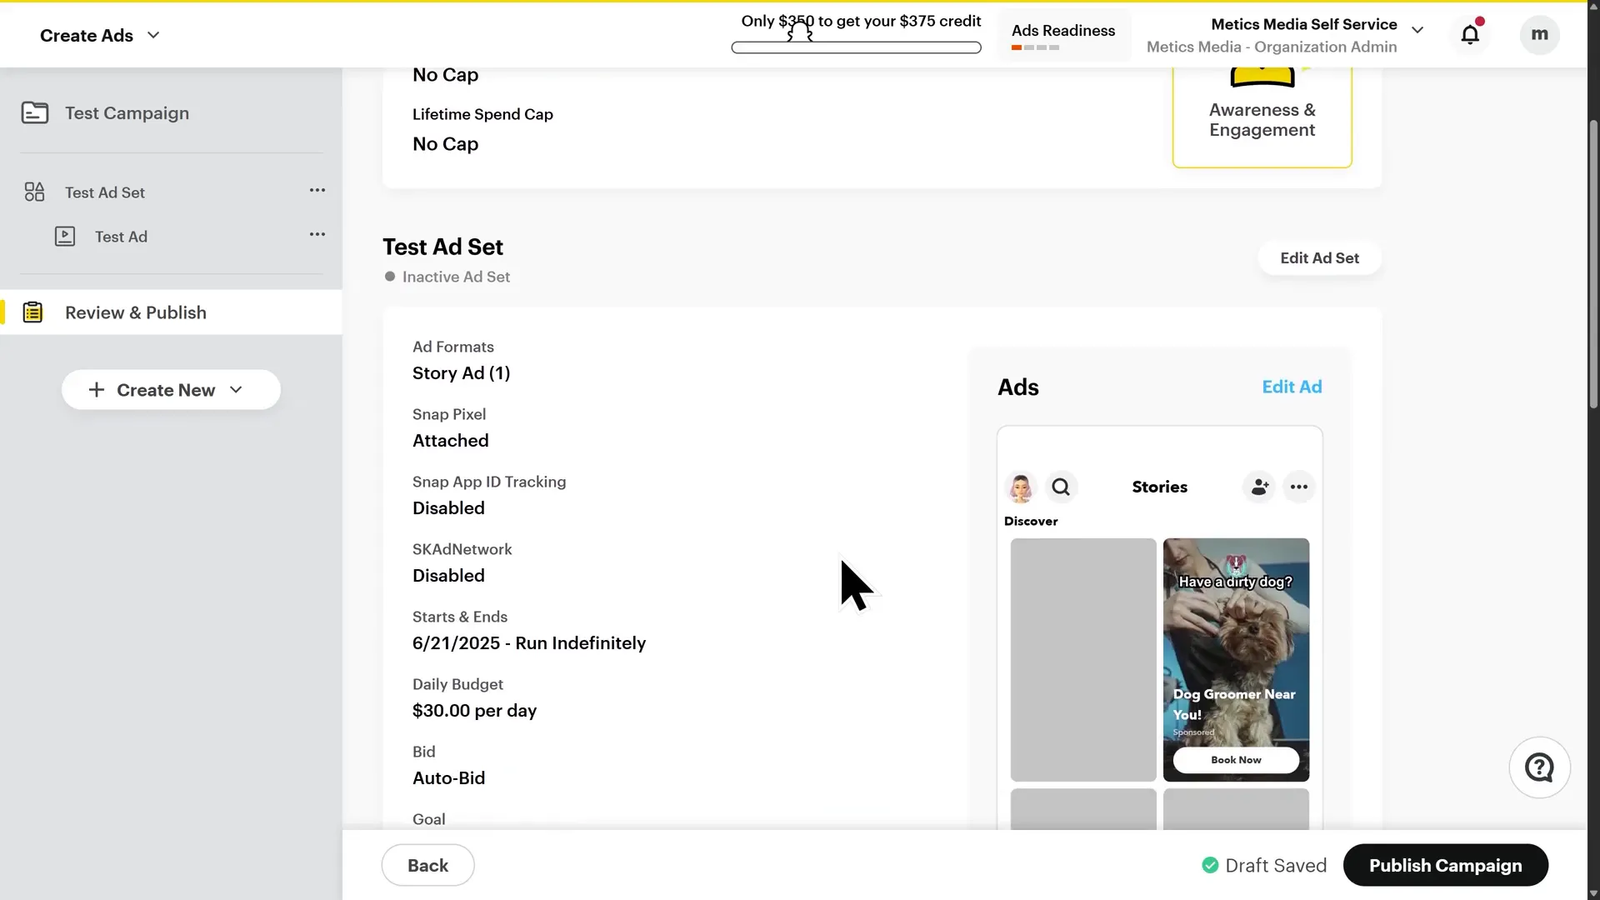
Name your campaign (e.g., “Test Campaign”) and toggle the status to off for now to prevent accidental early launch. You can enable it once your ads are approved.
Snapchat also offers split testing, allowing you to test variables like creatives, audience, placement, and goals. This is essential for optimizing your campaigns, but for this demo, we’ll disable it.
Set your campaign start date to the next day—not the same day—to allow time for Snapchat’s ad approval process.
With these steps complete, your campaign is created and ready for the next phase: building your ad set.
Step 5: Creating Your Ad Set 🎯
The ad set level controls your targeting, budget, schedule, and placements—the factors that determine who sees your ad and how it runs.
Start by naming your ad set (e.g., “Test Ad Set”) and toggle the status off for safety. Then, attach your Snap Pixel for tracking conversions. If you see an error, click “Set Up Pixel” to fix the issue.
If you’re running an app promotion campaign, you can also add your Snap App ID tracking here to monitor app installs and in-app actions. For most other campaigns, this isn’t necessary.
Next, choose your performance goal. Snapchat offers options like maximizing views, clicks, or impressions. Choose the one that best aligns with your campaign objective. For this example, we’ll maximize impressions.
Under bidding, select “Auto Bid” to let Snapchat automatically determine the best bid price. This is recommended for beginners. More advanced users can set a max bid manually.
Set your daily budget. A minimum of $30 per day is advised to provide Snapchat enough data to optimize during the learning phase. Also, schedule your ad to run for at least four days to allow proper optimization.
For ad placements, it’s best to leave it on “Automatic Placement” to let Snapchat distribute your ads across all parts of the app efficiently. You can customize this later for specific campaigns.
Choose your target locations carefully. For example, you can target the United States and Canada if those are your key markets. Bulk location uploads are also supported.
Set your audience demographics, including age, gender, and language. For instance, if you’re in the beauty niche, you might want to target females specifically.
Snapchat also offers predefined audiences based on interests and behaviors. For example, you can target “Dog Lovers” if your product or service relates to pet care.
If you want more precision, create custom audiences such as:
- Customer List: Upload emails or phone numbers of your existing customers for retargeting.
- Website Events: Target visitors who performed specific actions on your site, tracked via Snap Pixel.
- Mobile App Events: Target users based on in-app behavior.
- Ad Engagement: Reach people who interacted with your previous Snapchat ads.
- Profile Engagement: Target users who engaged with your Snapchat public profile.
- Lookalike Audiences: Find new potential customers similar to your best existing customers.
Finally, you can specify device targeting and control ad delivery with frequency caps to avoid showing your ads too often to the same users.

Once you’ve configured all settings, click “Next” to move on to creating your actual ad.
Step 6: Creating Your Ad 🎥
At the ad level, you’ll design the creative that users will see. Start by naming your ad (e.g., “Test Ad”). Snapchat offers several ad formats to choose from:
- Single Image or Video Ad: Ideal for quick promotions or offers. Keep videos between 6 to 10 seconds for optimal engagement.
- Story Ad: A series of images or clips shown in the Discover feed, perfect for product demos or storytelling. Highly recommended for beginners.
- Collection Ad: Showcases multiple products in a swipeable carousel, great for e-commerce brands.
- Commercial Ad: Short, unskippable videos for polished brand awareness campaigns. Best suited for larger budgets.
- AR Ad: Interactive lenses or filters. These are advanced and usually reserved for bigger brands or campaigns with high budgets.
For this guide, we’ll create a Story Ad. Scroll down to add creatives by uploading your media files. You can add multiple “tiles,” which are individual images or videos that play in sequence as users swipe through your story.
Upload your first video tile by clicking “Upload.” Once uploaded, preview it on the right side of the screen by hovering your mouse over it.
If you’re not yet familiar with how Instagram advertising works in 2025, check out our step-by-step guide to mastering Instagram Ads for practical insights and campaign strategies tailored for this year’s algorithm and ad formats.
Set the attachment type—choose between Web View, Deep Link, or App Install, depending on your campaign goal. For most website campaigns, Web View is appropriate. Enter the URL you want to direct users to.
Next, set your Call to Action (CTA). This tells viewers what you want them to do, such as “View,” “Shop Now,” or “Book Now.” For example, if you run a dog grooming service, “Book Now” is a compelling CTA.
Want to drive affiliate product sales directly via DMs? Our article on Facebook Ads and Messenger campaigns for affiliate marketing explains how to set up high-converting funnels using AI-powered outreach tools.
Add additional tiles by duplicating the previous asset to keep the same URL and CTA, then replace the media with your next video or image. Preview your full story ad to ensure it flows smoothly and delivers a consistent experience.
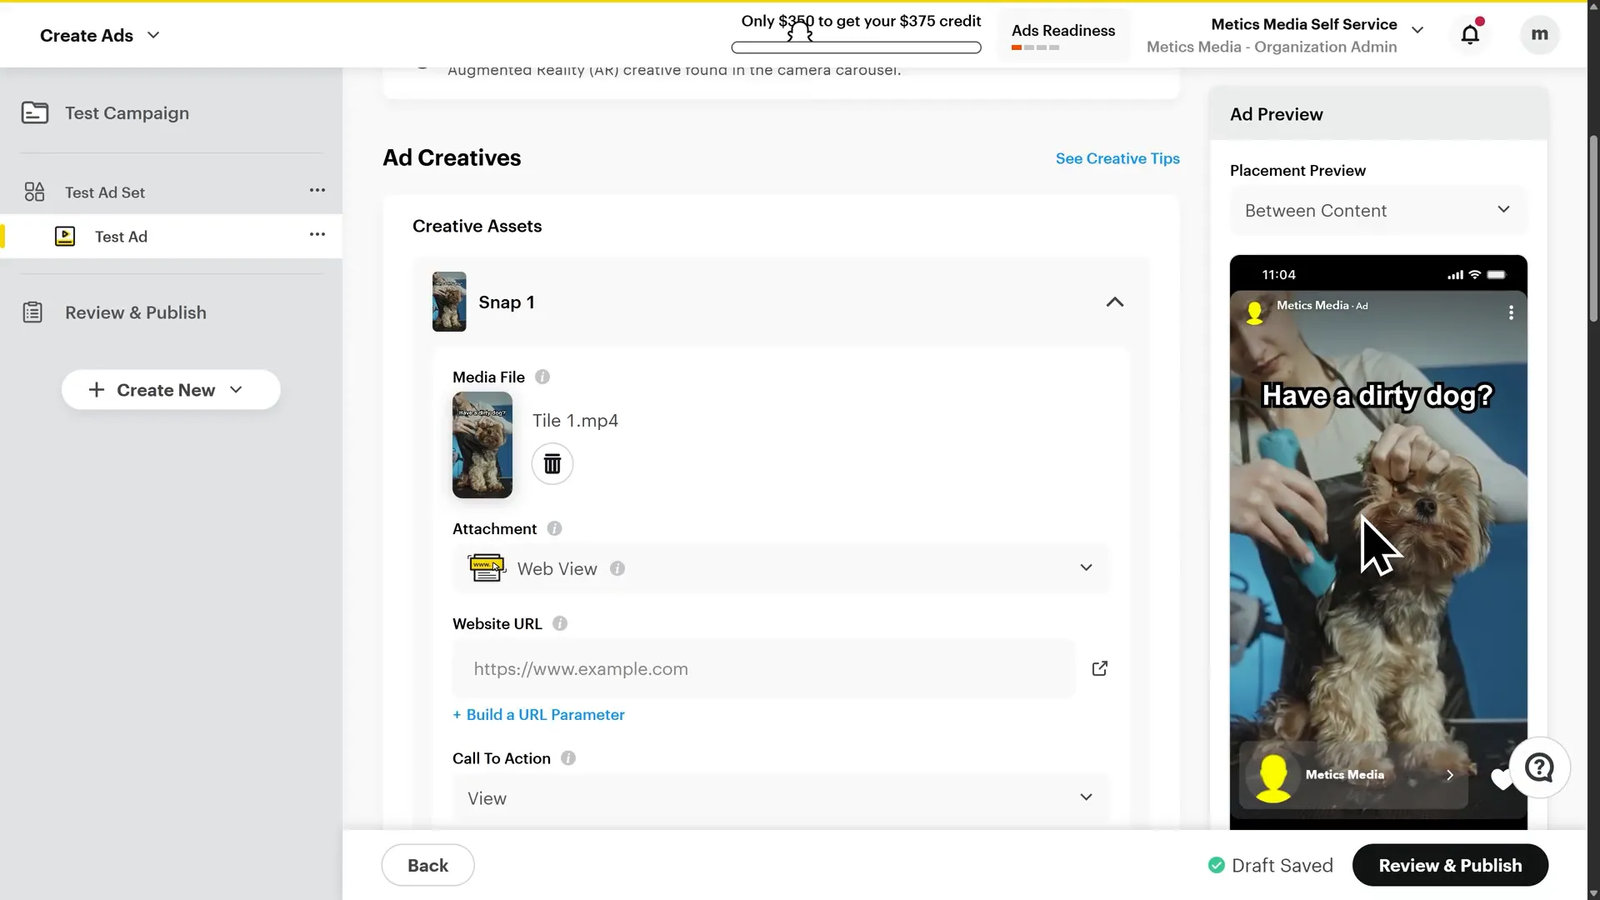
Give your ad a headline, such as “Dog Groomer Near You.” Upload your logo—Snapchat recommends a size of at least 700×100 pixels.
Decide whether to enable your ad’s Discover tile, which allows it to appear in Snapchat’s Discover feed, increasing visibility.
Optionally, you can customize message design settings if you want your ad to be sent as a chat message with an autoresponder. For beginners, it’s best to leave this off.
Toggle the ad status off until you’re ready to launch. Advanced features like impression and click trackers are mostly used by larger brands and can be skipped initially.
Click “Review and Publish” to finalize your ad.
Step 7: Publishing and Managing Your Snapchat Campaign 📈
Before publishing, review all your campaign details including business address and payment information. Once everything is set, click “Publish Campaign.” Your ads will enter Snapchat’s review process.
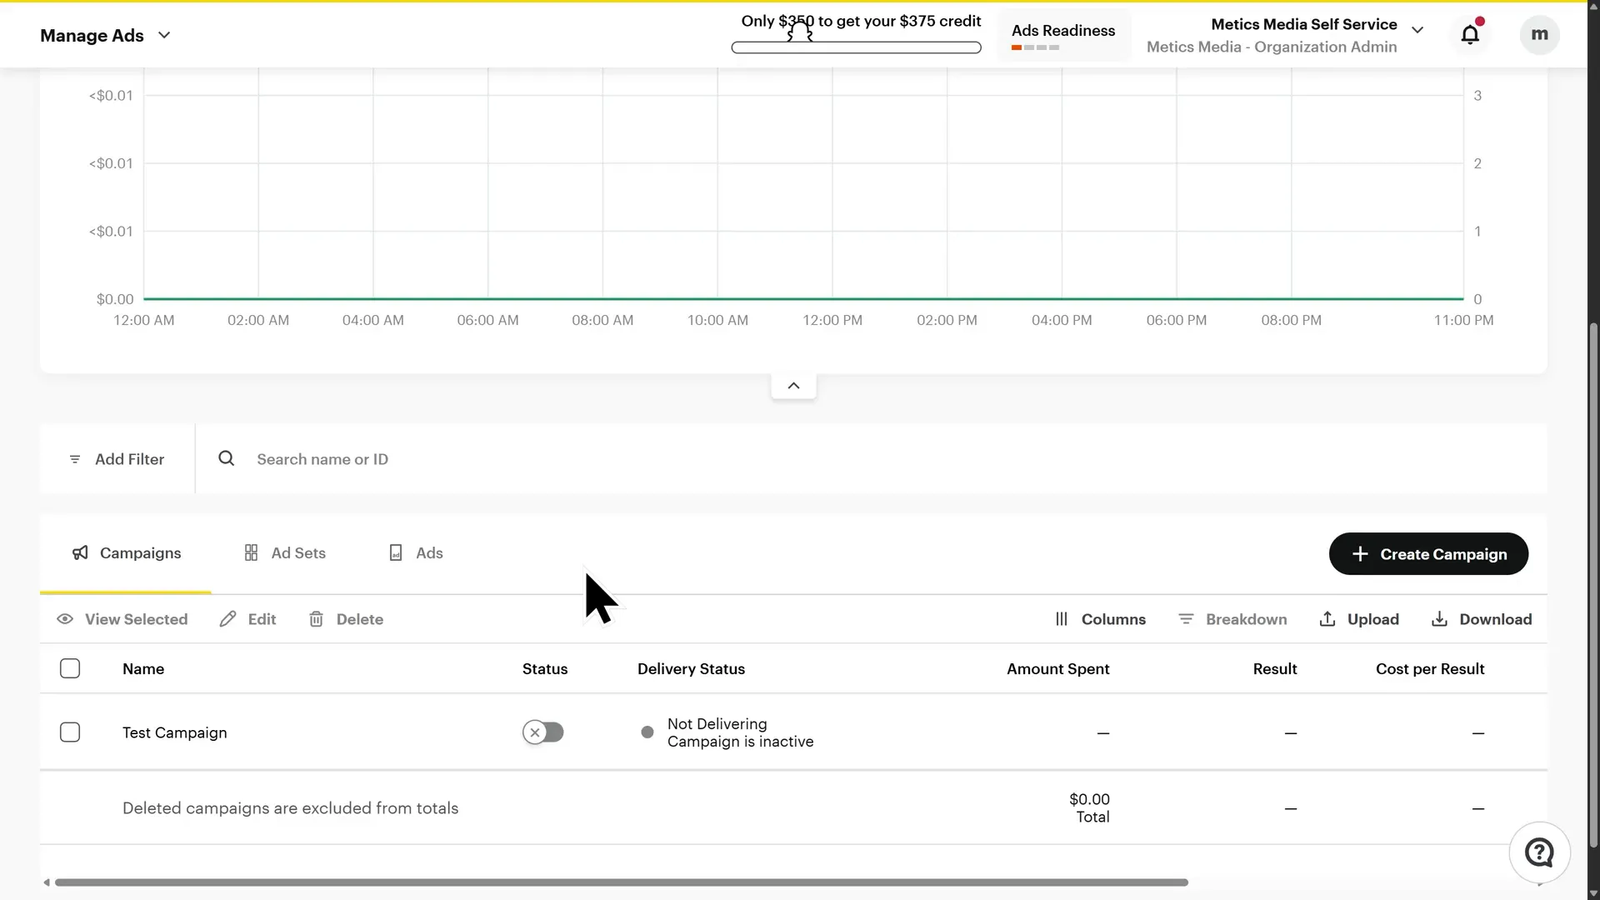
After publishing, you’ll be brought to the Manage Ads page where you can monitor your campaign’s performance metrics like amount spent, impressions, clicks, and click-through rate.
As you create more campaigns, explore the Analyze tab to access audience insights, generate reports, and conduct split tests in the Campaign Lab. Split testing allows you to compare different creatives, audiences, placements, or goals to find what works best.
Step 8: Optimizing and Scaling Your Campaigns 📊
Once your campaign is live, it’s important to let it run for at least four days before making judgments. This allows Snapchat’s algorithm to complete its learning phase and optimize delivery to your best audience.
After identifying winning ad sets, scale your budget gradually. A good rule of thumb is to increase your budget by 20-30% every 48 hours. This steady scaling helps maintain stable performance and avoids shocking the algorithm.
Continuously monitor your campaign performance and experiment with different creatives, targeting options, and bidding strategies to improve results over time.
Frequently Asked Questions (FAQ) ❓
What is the Snap Pixel and why is it important?
The Snap Pixel is a piece of code installed on your website that tracks user actions such as page views, sign-ups, and purchases. It helps Snapchat optimize ad delivery, measure conversions, and build retargeting audiences.
How much should I budget for my Snapchat ad campaigns?
For beginners, a daily budget of at least $30 is recommended to give Snapchat enough data to optimize your campaign effectively during the learning phase.
Can I target specific audiences on Snapchat?
Yes! Snapchat allows you to target predefined interest and behavior-based audiences, create custom audiences from customer lists or website visitors, and build lookalike audiences to find new potential customers similar to your best ones.
What ad format should I use as a beginner?
The Story Ad format is highly recommended for beginners because it allows you to tell a story using a series of images or videos in the Discover feed, offering deeper engagement and flexibility.
How do I know if my Snapchat ad is performing well?
Monitor key metrics such as impressions, click-through rate (CTR), and conversions in the Analyze tab. Use split testing to compare different variables and focus your budget on your best-performing ads.
Can I use Snapchat Ads for e-commerce brands?
Absolutely. Snapchat Ads work well for e-commerce, dropshipping, Shopify stores, reselling, and clothing brands. Features like product catalogs and collection ads are especially useful for showcasing multiple products.
Is Snapchat Ads good for reaching young audiences?
Yes, Snapchat is one of the best platforms to reach audiences aged 13 to 34, making it ideal for brands targeting millennials and Gen Z.
Conclusion 🎉
Snapchat Ads in 2025 offer a powerful and cost-effective way to reach a highly engaged and valuable audience. From setting up your account and installing the Snap Pixel, to creating targeted campaigns and compelling story ads, this guide has walked you through every step to get started confidently.
Remember to take advantage of the special $375 ad credit offer to maximize your initial budget. Be patient with the learning phase, optimize your campaigns with split testing, and scale your budget gradually for best results.
With the tools and strategies covered here, you’re well-equipped to launch successful Snapchat ad campaigns that drive traffic, engagement, and sales for your brand.
Happy advertising, and here’s to your Snapchat Ads success in 2025!
