


How to Create a Shopify Store 2025 – Looking to start your own online business? Shopify makes it easy to launch a fully functional e-commerce store—even if you’re a beginner. In this guide, you’ll learn step-by-step how to create a Shopify store in 2025, from signing up and choosing your theme to adding products, customizing pages, setting up payments, and publishing your site. Whether you’re starting dropshipping or selling your own products, this tutorial has everything you need.
Step 1: Sign Up for Your Shopify Account 🛒
The first step in building your Shopify store is to create an account. Shopify offers a free trial that allows you to explore all the features without immediate commitment. To get started:
- Go to the Shopify signup page using the special link that offers a 3-day free trial plus an additional month for just $1. This extended trial period gives you ample time to build and launch your store before upgrading to a paid plan.
- Enter your email address and click on Start free trial.
- Shopify will ask some questions about your business; you can skip these to save time.
- Select your business location and proceed.
- Create your Shopify account by setting a password.
Once you complete these steps, you’ll be taken to your Shopify dashboard, your central hub for managing your online store.
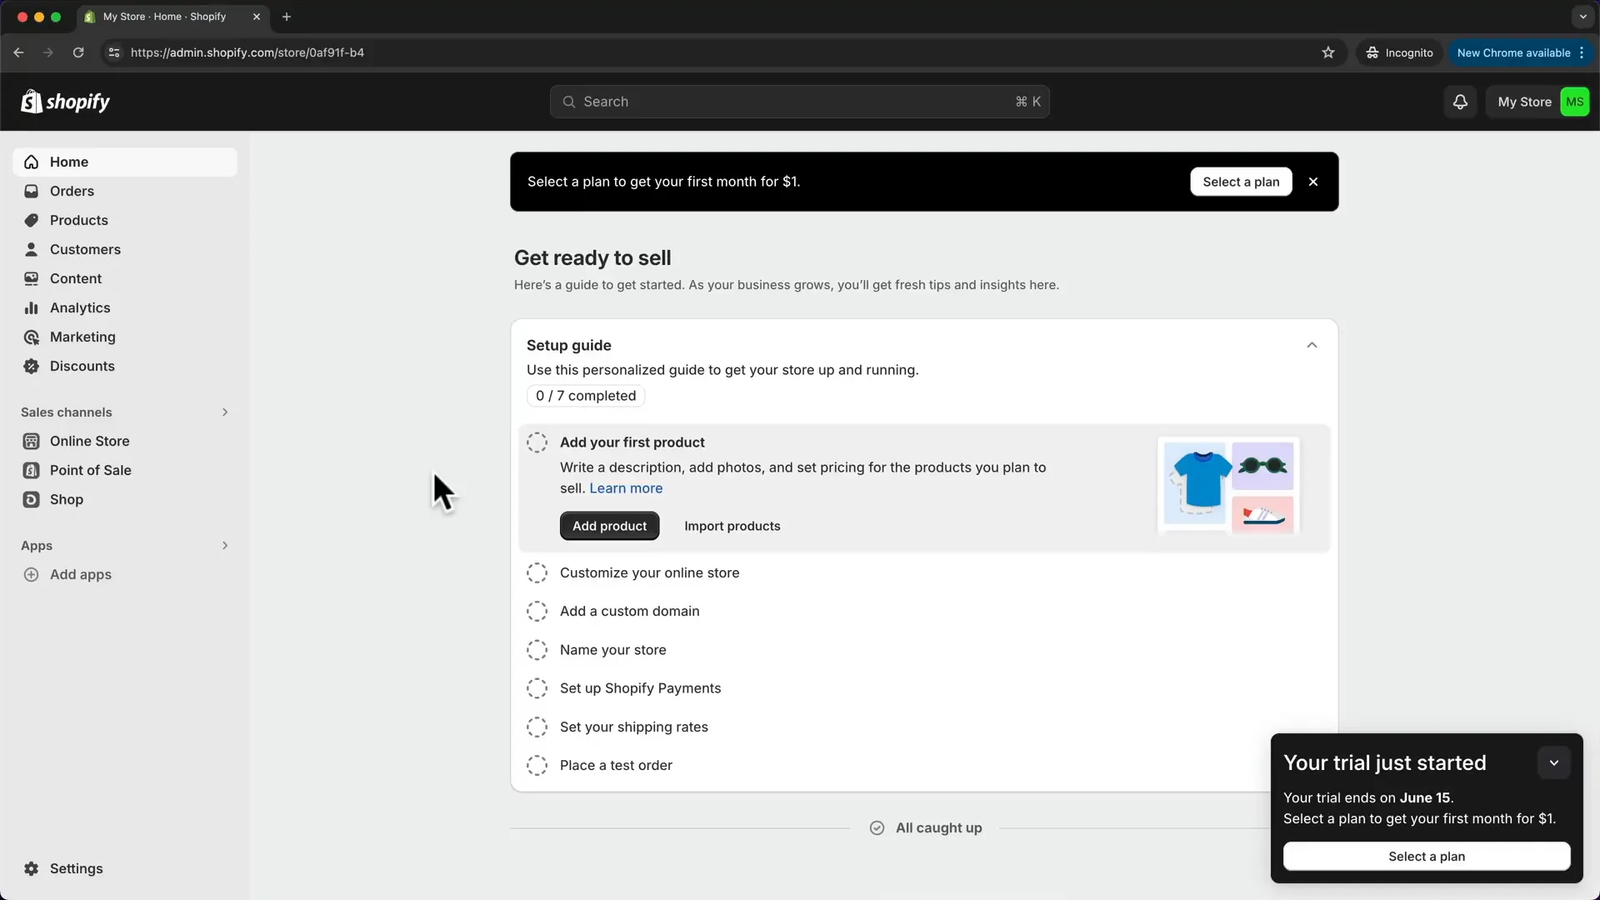
Step 2: Activate the Extended Shopify Trial 💰
To maximize your trial benefits, you should activate Shopify’s extended trial within the first 3 days of signing up. This allows you to use Shopify with full features for an additional month at just $1, giving you plenty of time to perfect your store before committing to a full plan.
Here’s how to do it:
- From your Shopify dashboard, click on Select a plan.
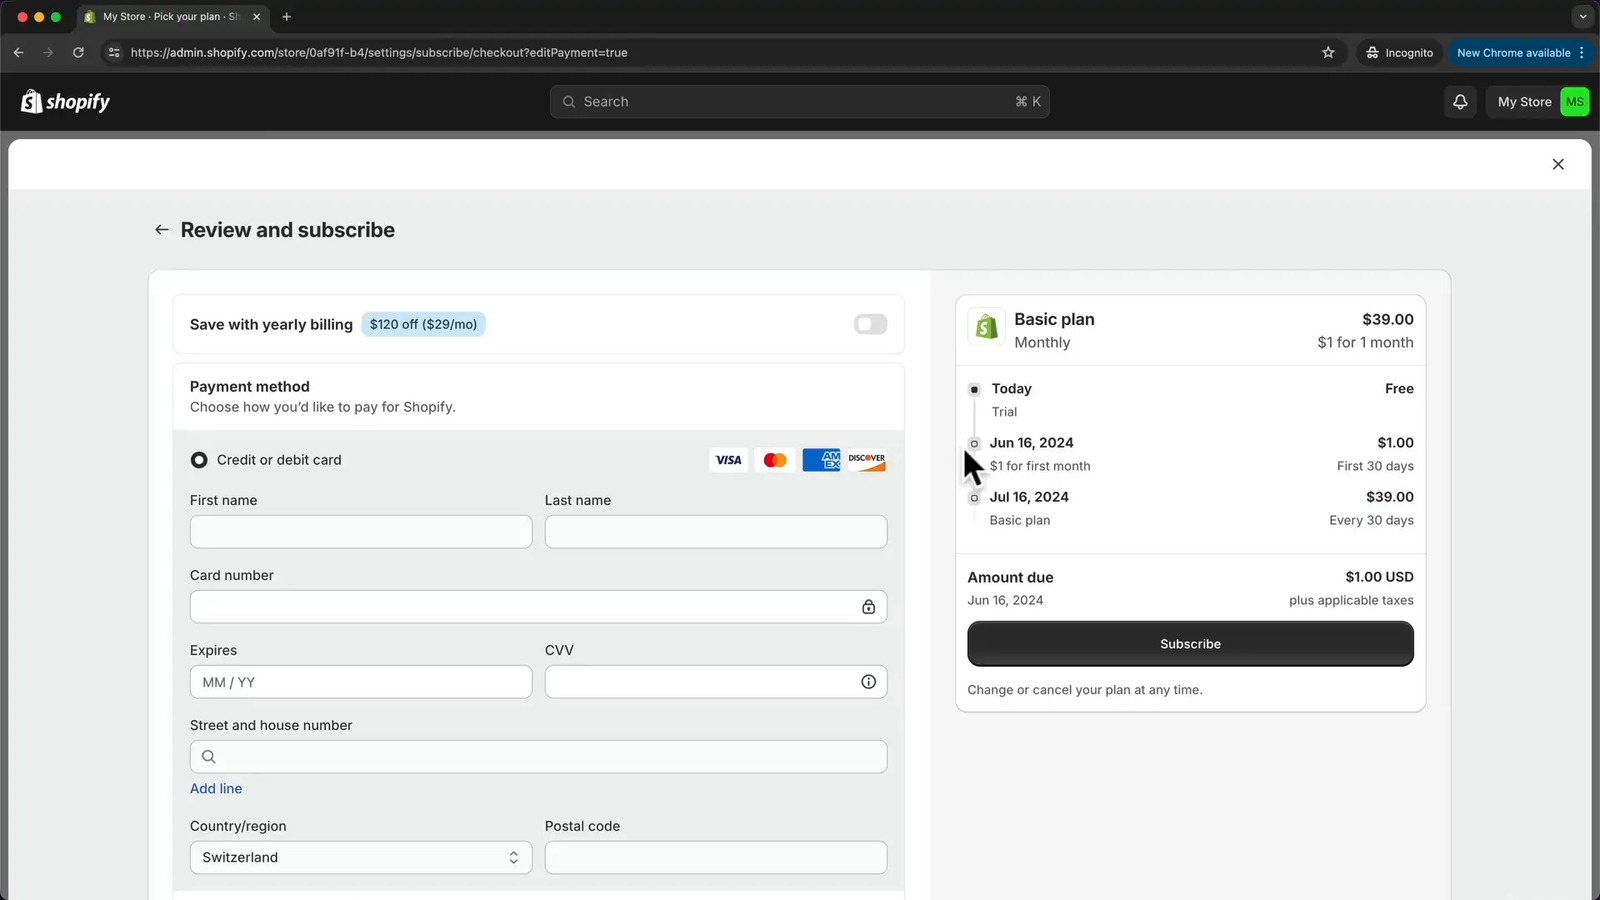
- Choose the Basic Shopify plan, which includes all the necessary features for your store.
- Review the plan terms: 3 days free trial, then $1 for 30 days, followed by the regular monthly fee of $39.
- Enter your payment method — credit card or PayPal — and confirm your business address.
- Subscribe to activate the extended trial.
This step ensures you won’t be rushed when building your store and can test all functionalities thoroughly.
Note: If you don’t activate the $1/month trial before the 3-day window ends, your store will be locked until you choose a paid plan. Be sure to activate it early to avoid interruptions.
Step 3: Choose and Publish Your Shopify Theme 🎨
The look and feel of your online store are crucial for attracting and retaining customers. Shopify offers a variety of themes, including many free options that are fully responsive and optimized for all devices.
To select your theme:
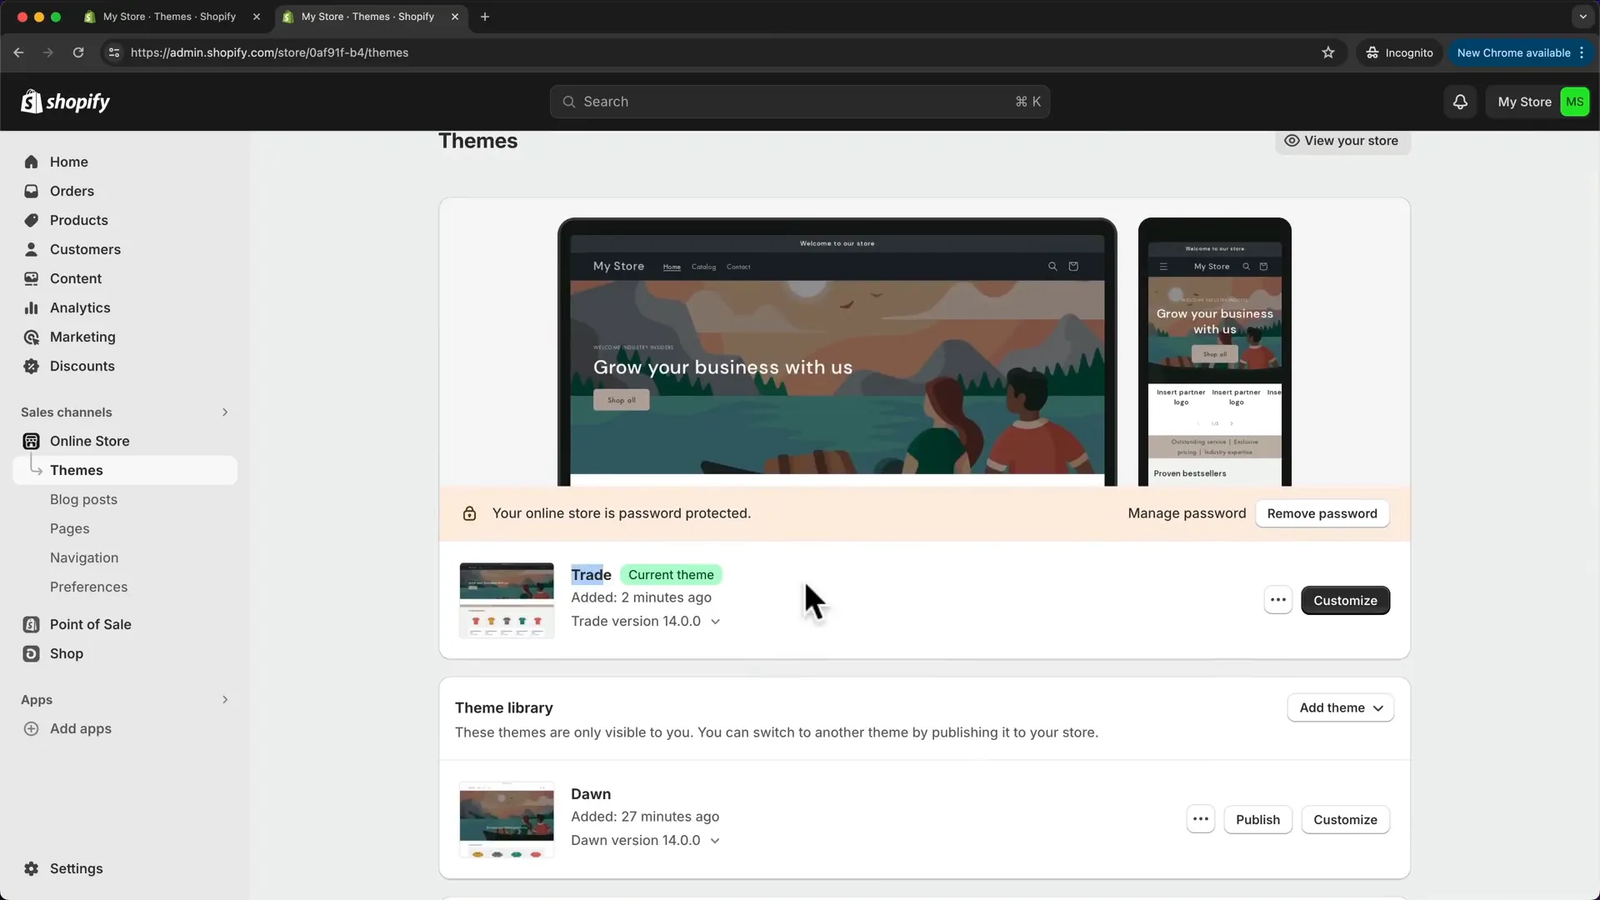
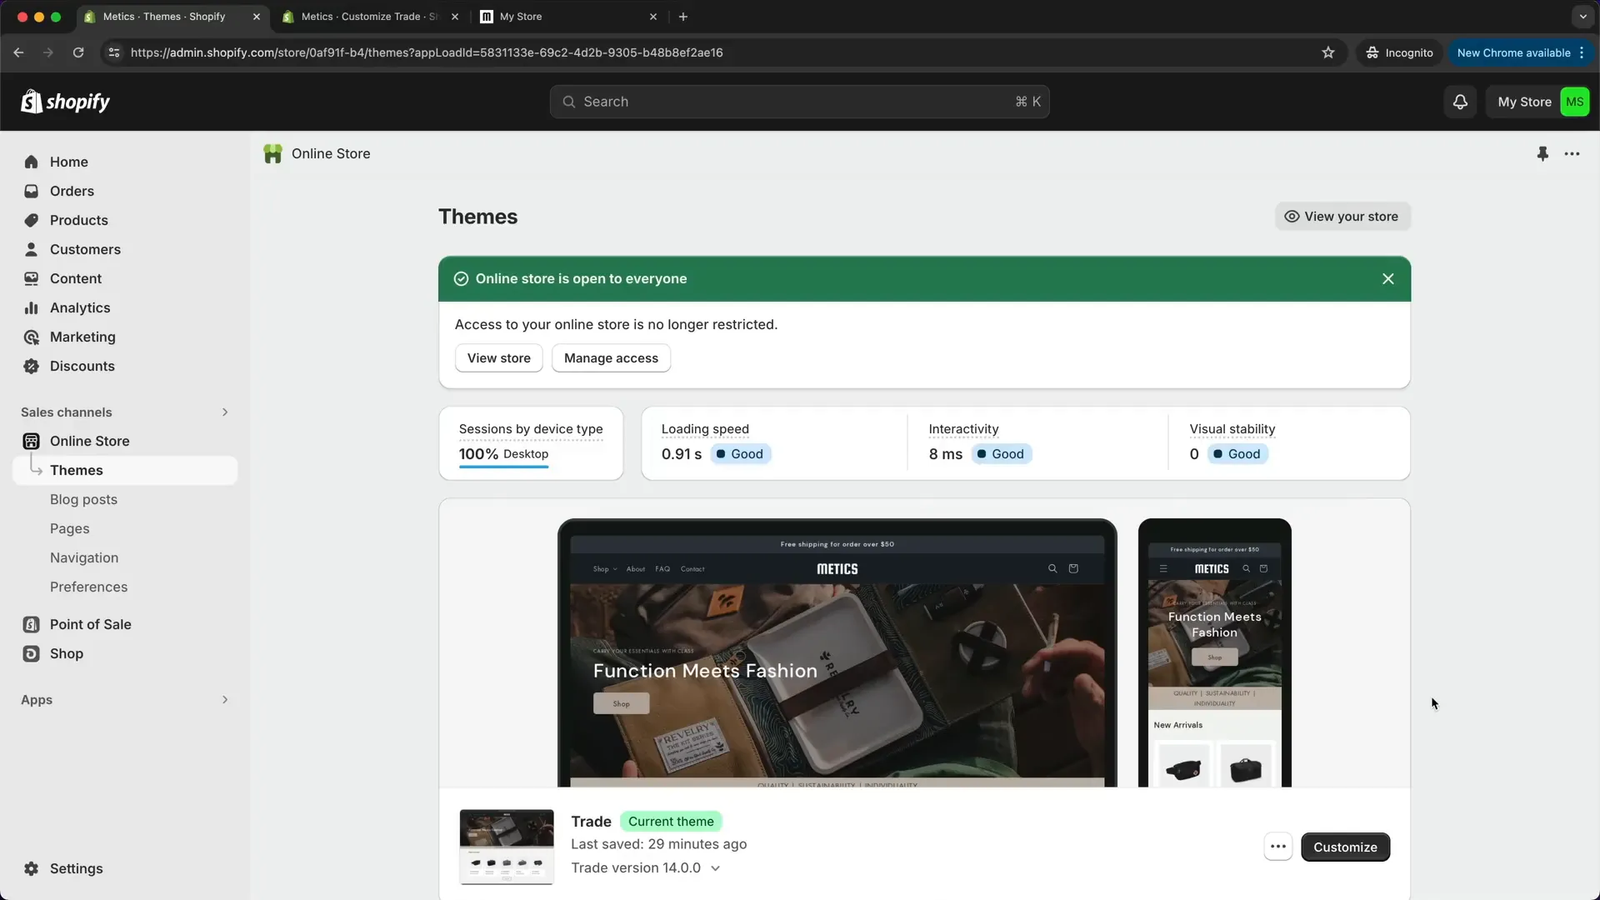
- Navigate to Online Store > Themes in your Shopify dashboard.
- The default theme is usually “Dawn,” but for this tutorial, we use the Trade theme, one of Shopify’s newest and best free themes.
- Scroll down and click Visit Theme Store.
- Filter by free themes and find the Trade theme.
- Click Try theme to add it to your library.
- Publish the Trade theme to activate it on your store.
Publishing your theme will set the foundation for your store’s design and layout.
Step 4: Customize Your Website Using Shopify’s Page Builder 🏗️
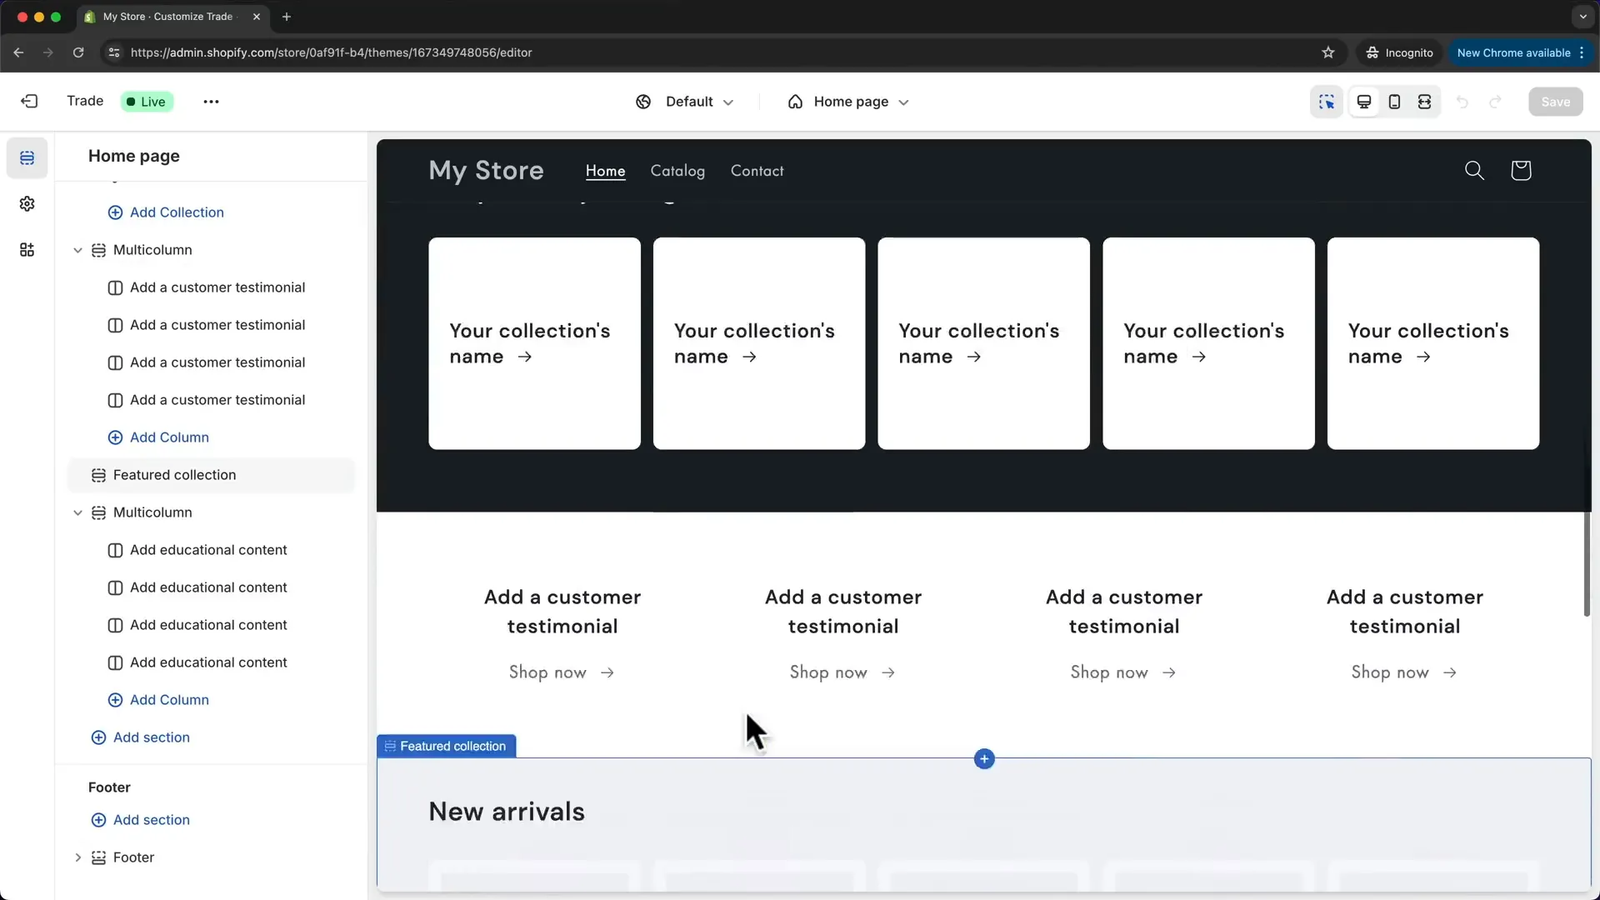
Shopify’s page builder makes it easy to tailor your website without any coding. It uses sections and blocks to organize content, giving you full control over your store’s appearance.
Here’s what you need to know:
- The header and footer appear on every page and can be customized separately.
- You can switch between different page views (homepage, product page, collection page, etc.) within the builder.
- The builder allows you to preview your site on desktop, mobile, or full screen to ensure responsiveness.
- Sections are large content areas like image banners or collections, and blocks are smaller elements like text or buttons within these sections.
- You can add, delete, or rearrange sections and blocks easily by clicking the respective icons.
This modular setup makes it intuitive to create a visually appealing and user-friendly store.
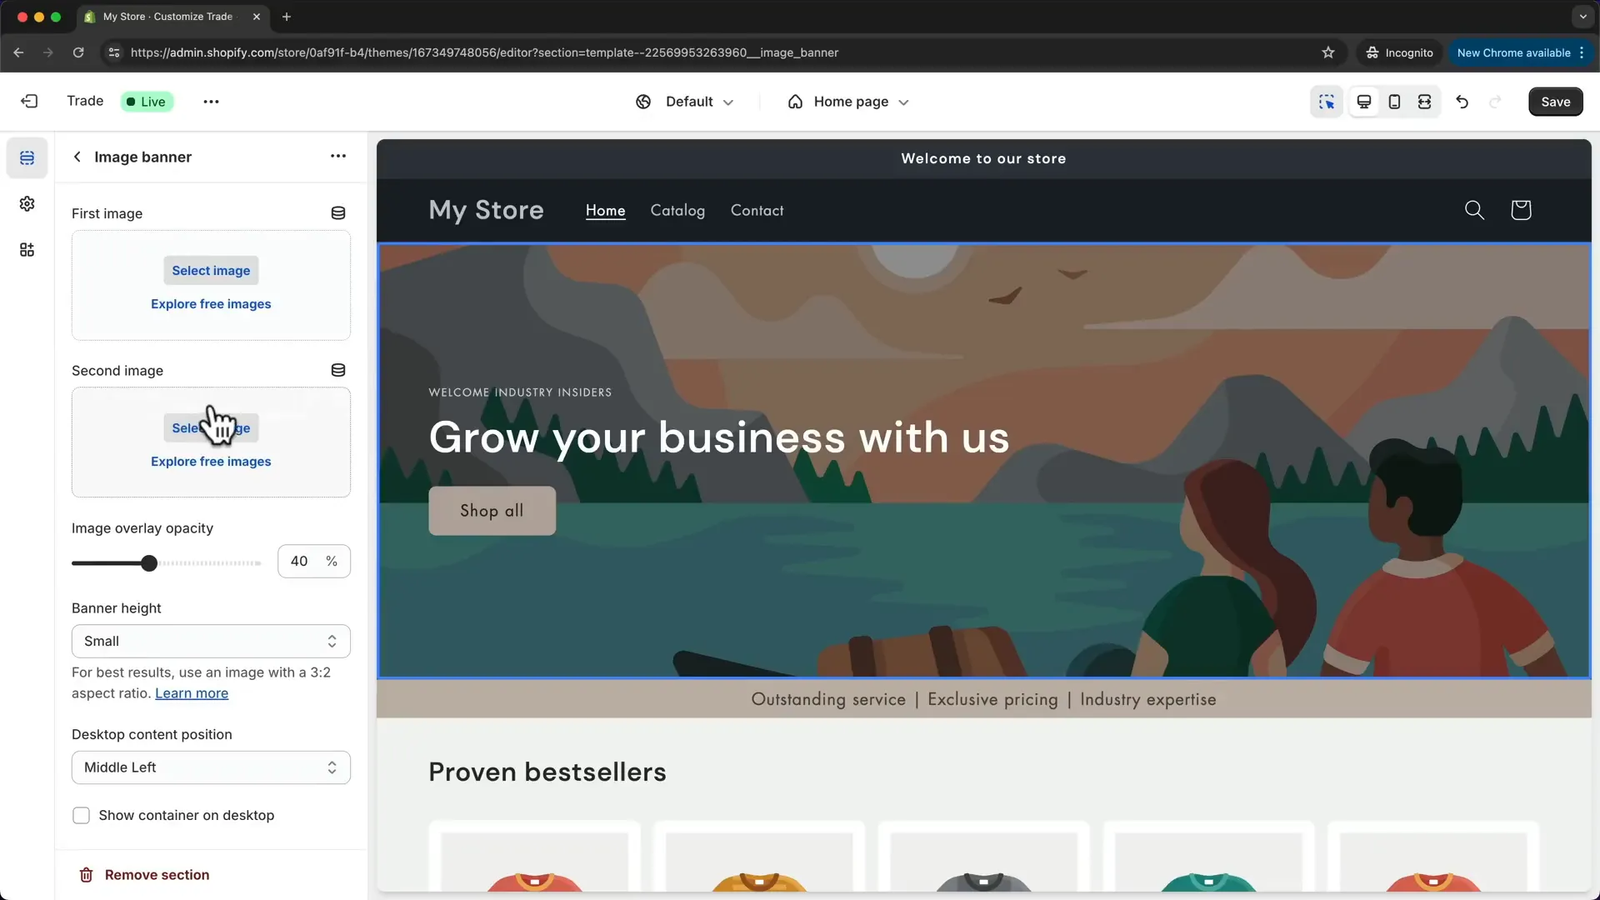
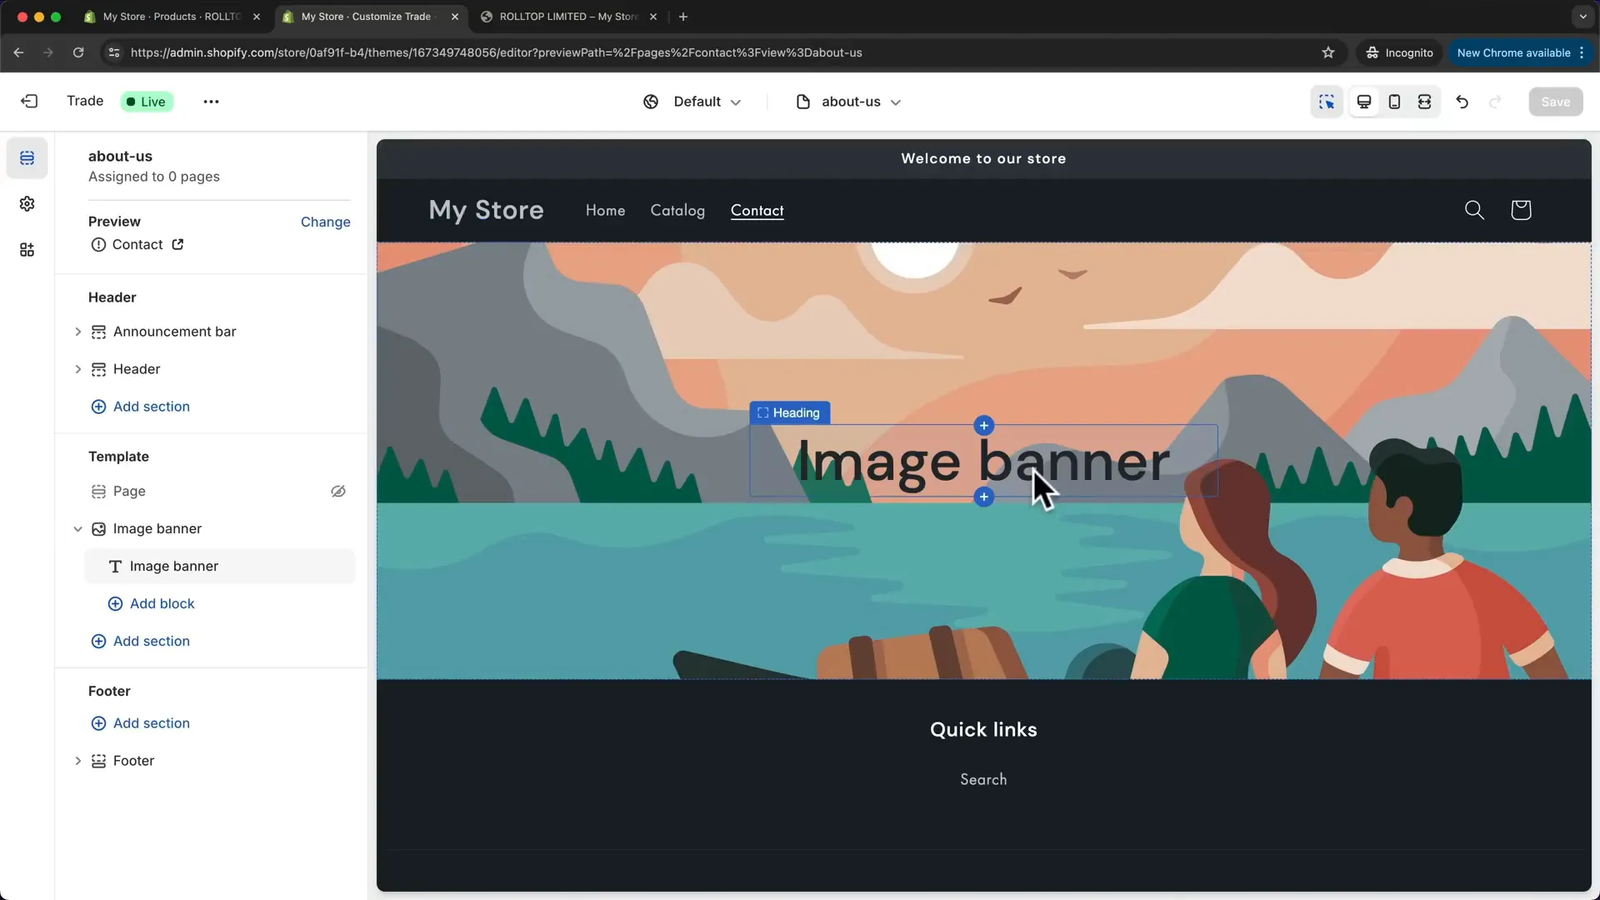
Step 5: Design Your Hero Section with a Custom Image Banner 🖼️
The hero section is the first thing visitors see when they land on your homepage, so it should be captivating and on-brand.
To customize the hero section:
- Click on the image banner section in the page builder.
- Select or upload an image that represents your brand or product.
- Adjust settings such as overlay opacity to darken or lighten the image for better text visibility.
- Choose the banner height (small, medium, large) and content alignment (left, center).
- Edit the heading and subheading text to reflect your store’s message.
- Customize the call-to-action button text and link it to your product collection or all products page.
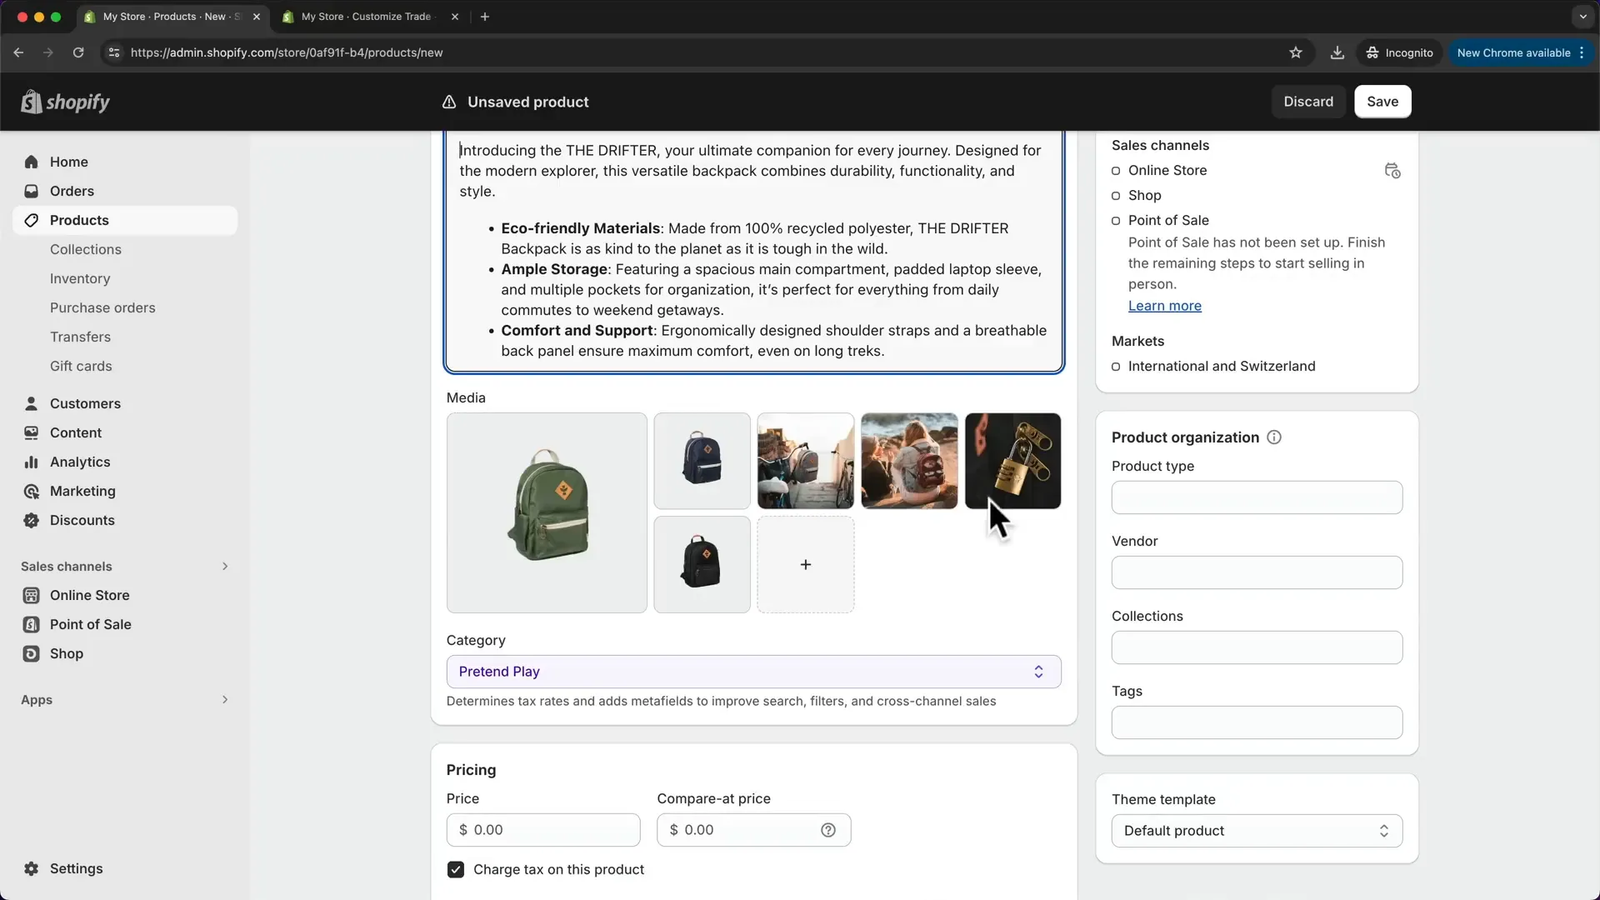
Step 6: Add and Organize Your Products 📦
Now that your homepage looks inviting, it’s time to add products to your store. High-quality images and detailed descriptions are essential for showcasing your products effectively.
Here’s how to add your first product:
- Go to Products > Add product in your Shopify dashboard.
- Enter the product name (e.g., “Explorer Backpack”).
- Add a detailed description. You can use AI tools to generate compelling descriptions if needed.
- Upload multiple high-quality images and arrange them in the desired order.
- Set the price and optionally add a “compare at price” to show discounts.
- Manage inventory by entering stock quantities and enabling options such as allowing purchases when out of stock.
- Specify shipping details like product weight if you plan to calculate shipping rates based on it.
- Add product variants such as color or size, assign images to each variant, and set individual stock counts and prices if necessary.
- Optimize your product’s SEO by editing the search engine listing’s title, description, and URL handle.
Pro Tip: Use relevant keywords in your product title and meta description to improve your chances of ranking higher in Google search results.
10. Save the product.
Repeat this process to add all your products. Organizing your inventory properly right from the start helps with managing your store effectively.
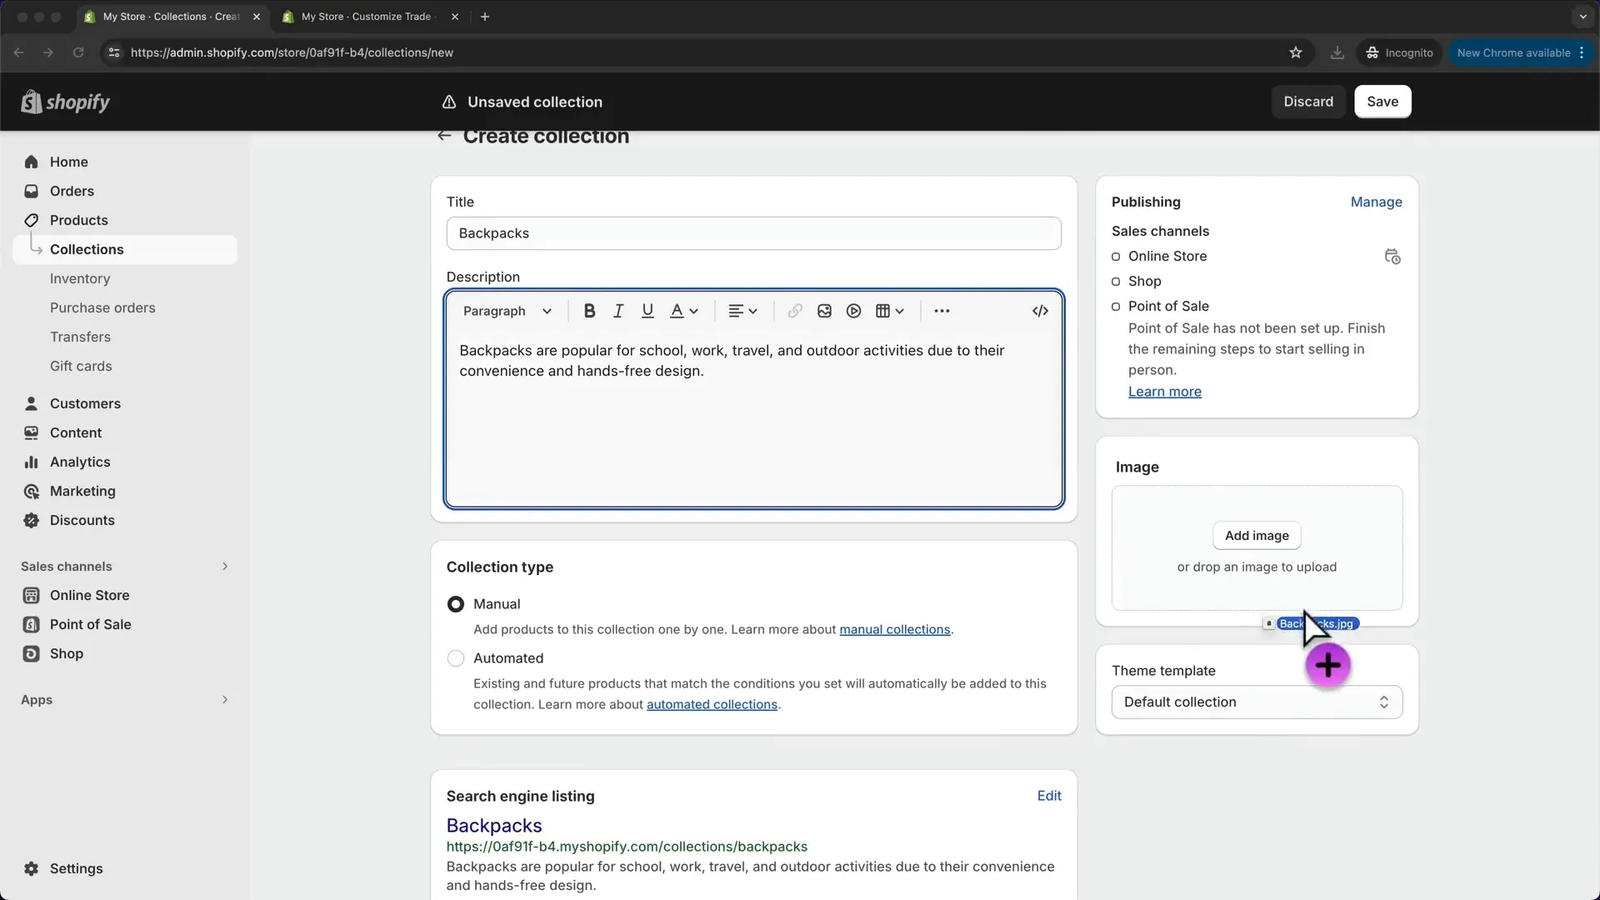
Step 7: Create Product Collections to Categorize Your Store 🗂️
Organizing your products into collections (categories) makes it easier for customers to browse your store and find what they want.
To create collections:
- Navigate to Products > Collections in your Shopify dashboard.
- Delete any default collections you don’t need.
- Click Create collection and enter the collection name (e.g., “Backpacks”).
- Add a short description if desired.
- Choose the collection type: manual (you add products yourself) or automated (products added based on conditions).
- Upload a collection image to visually represent the category.
- Save the collection.
- Create additional collections for other categories like “Accessories,” “New Arrivals,” and “Best Sellers.”
After creating collections, you need to add products to their respective categories:
- Go to Products and select all products that belong to a specific collection.
- Click on the three-dot menu and select Add to collections.
- Choose the appropriate collection and save.
- Repeat for all collections.
Having well-structured collections improves your store’s navigation and user experience.
Step 8: Build a Stunning Homepage Layout 🏠
With your products and collections set up, it’s time to design a homepage that showcases your brand and offerings effectively.
Key elements to include:
- Image Banner: Your hero section that grabs attention.
- Featured Collection: Highlight a specific collection such as “New Arrivals” or “Best Sellers.”
- Collection List: Display your main product categories for easy browsing.
- Slideshow Section: Add lifestyle images to showcase your products in use.
- Featured Product Section: Spotlight a particular product directly on the homepage.
- Collage Section: Combine images with product and collection highlights for a dynamic look.
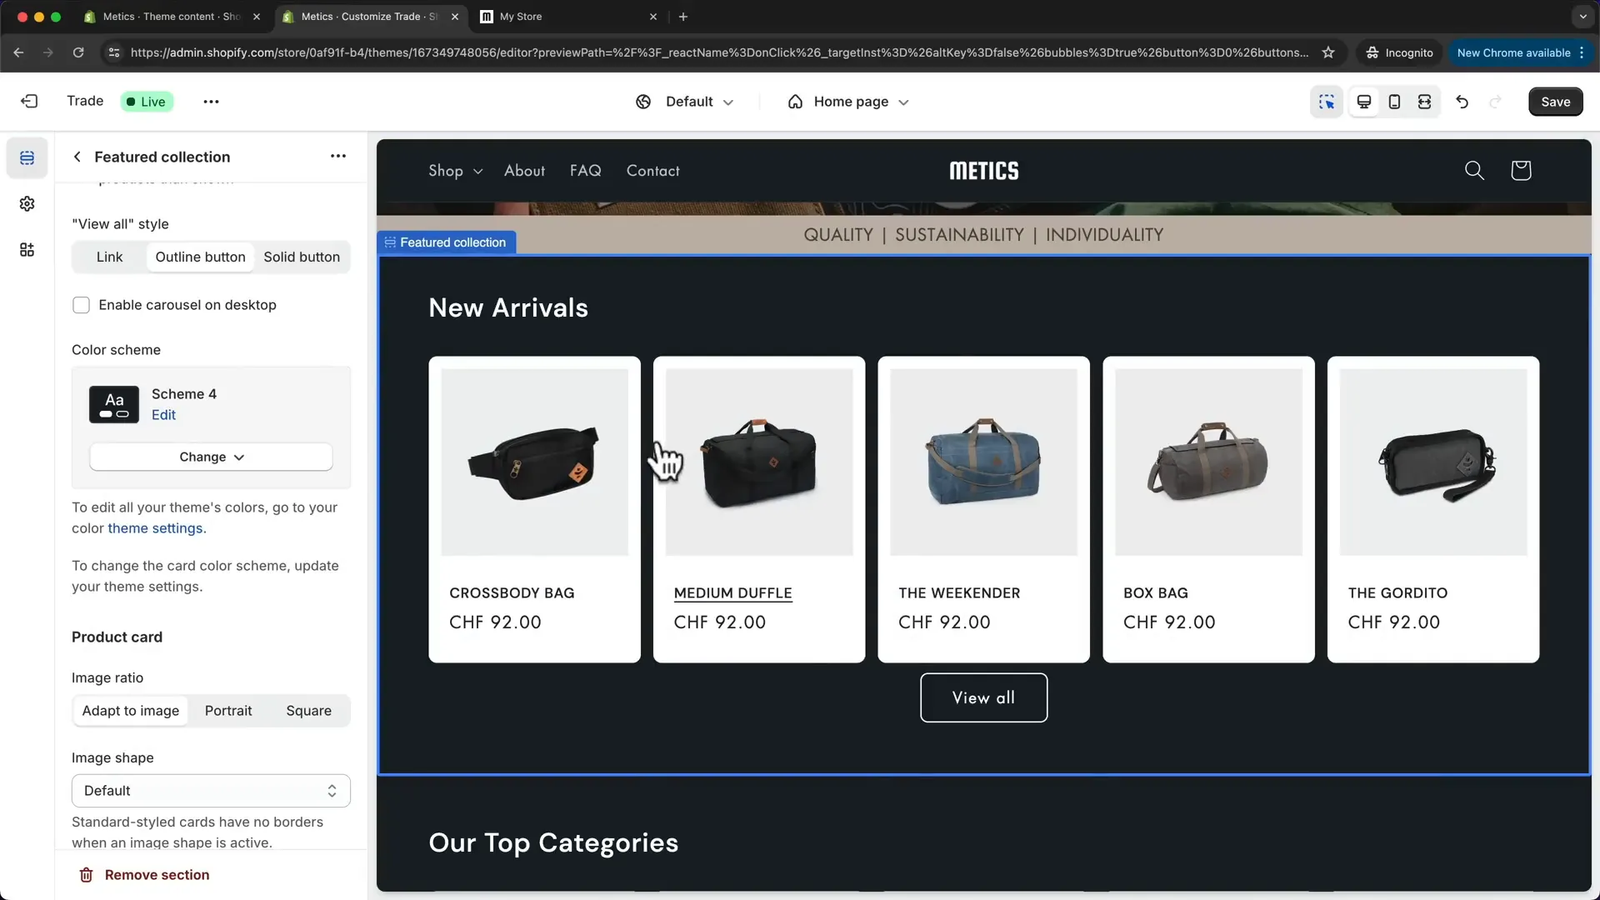
To customize these sections:
- Use the page builder to select and edit each section.
- For the featured collection, select the collection you want to showcase and set the number of products to display.
- Adjust button styles and quantity selectors to suit your design preferences.
- Add or remove collections in the collection list and enable a “View All” button if you have many categories.
- Add slideshow images by duplicating slides and uploading new photos, removing text or buttons if desired.
- Select specific products to feature and link them appropriately.
Remember to preview your homepage regularly to ensure everything looks polished and professional.

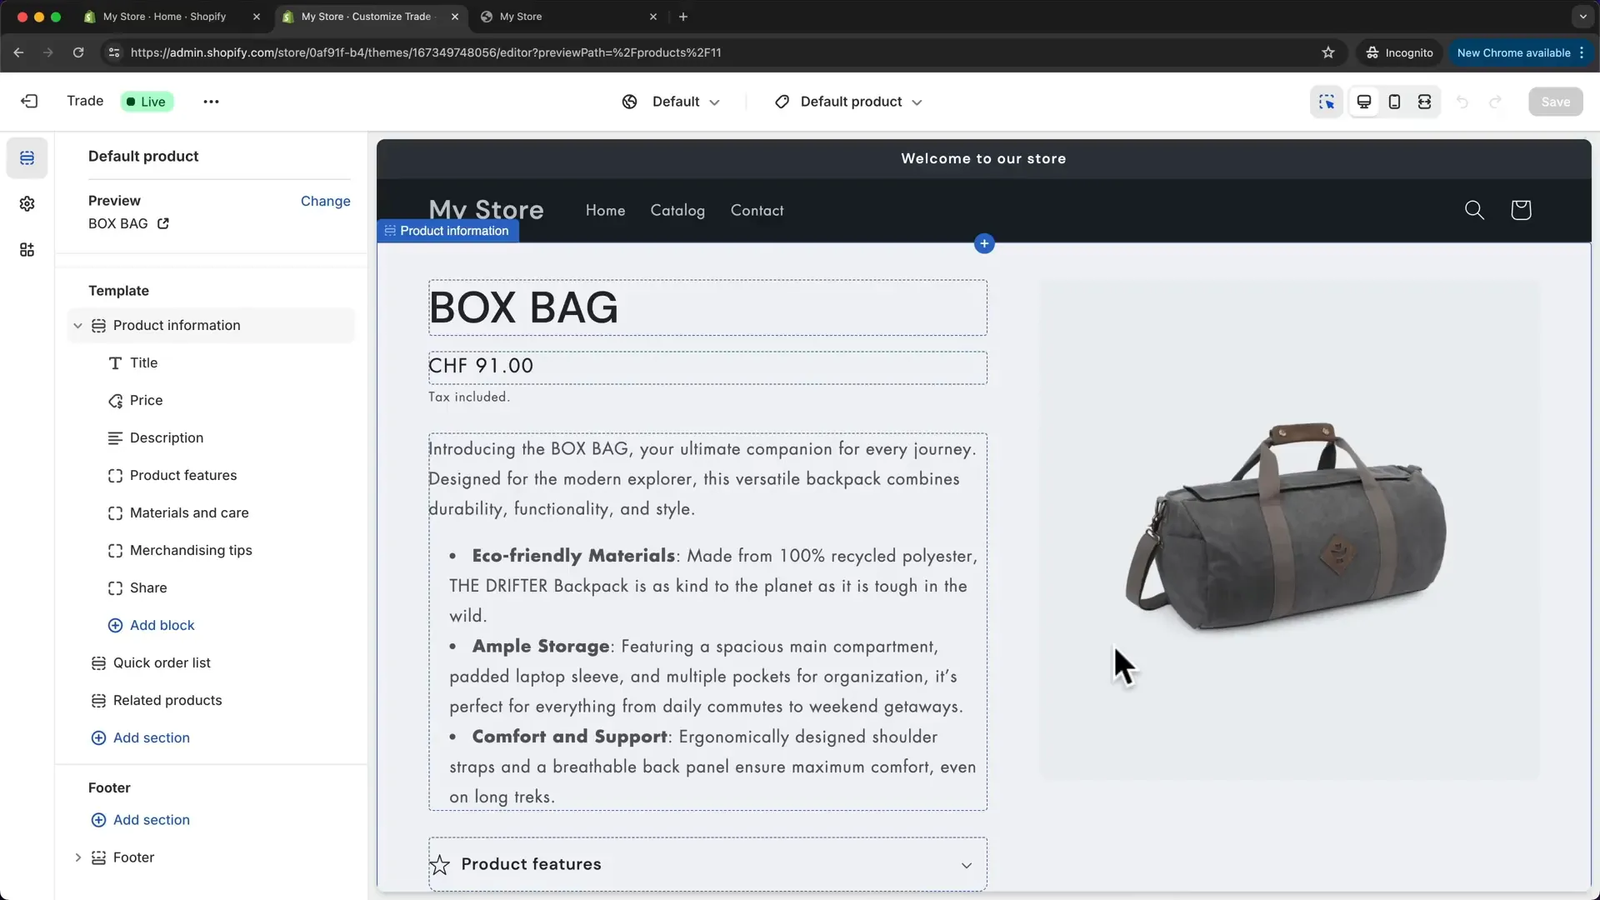
Step 9: Customize Product and Collection Pages 🛍️
Your product and collection pages are crucial for converting visitors into buyers. Shopify allows you to tailor these pages with flexible layouts and content sections.
For product pages:
- Access the product page template in the page builder.
- You can hide or show elements like product descriptions, related products, or reviews.
- Add additional sections such as slideshows or testimonials to enhance the page.
- Create multiple product page templates for different product types (e.g., backpacks vs. duffel bags) and assign products accordingly.
For collection pages:
- Customize the layout to include banners, filters, or promotional content.
- Modify how products within a collection are displayed.
- Add sections that improve navigation and engagement.
These customizations help create a cohesive and engaging shopping experience.
Step 10: Create Essential Pages: About, FAQ, and Contact 📄
Every professional online store should have key informational pages that build trust and provide customer support. These include an About page, FAQ page, and Contact page.
About Page:
- Create a new page template named “About Us.”
- Add a stylish image banner with a compelling heading.
- Add rich text and multi-column sections to tell your brand story, showcase values like quality and sustainability, and include images.
- Optionally, add a newsletter signup section to engage visitors.
- Create the actual About page in Shopify and assign this template.
FAQ Page:
- Create a new FAQ page template.
- Add an image banner and change text colors for readability.
- Add a collapsible content section for questions and answers.
- Create a template question and duplicate it for all FAQs.
- Add a call-to-action section linking to the Contact page for unanswered queries.
- Create the FAQ page and assign the template.
Contact Page:
- Use the default contact page template, which includes a contact form.
- Add a matching image banner for consistency.
- Customize heading and styling as needed.
These pages foster transparency and improve customer confidence.
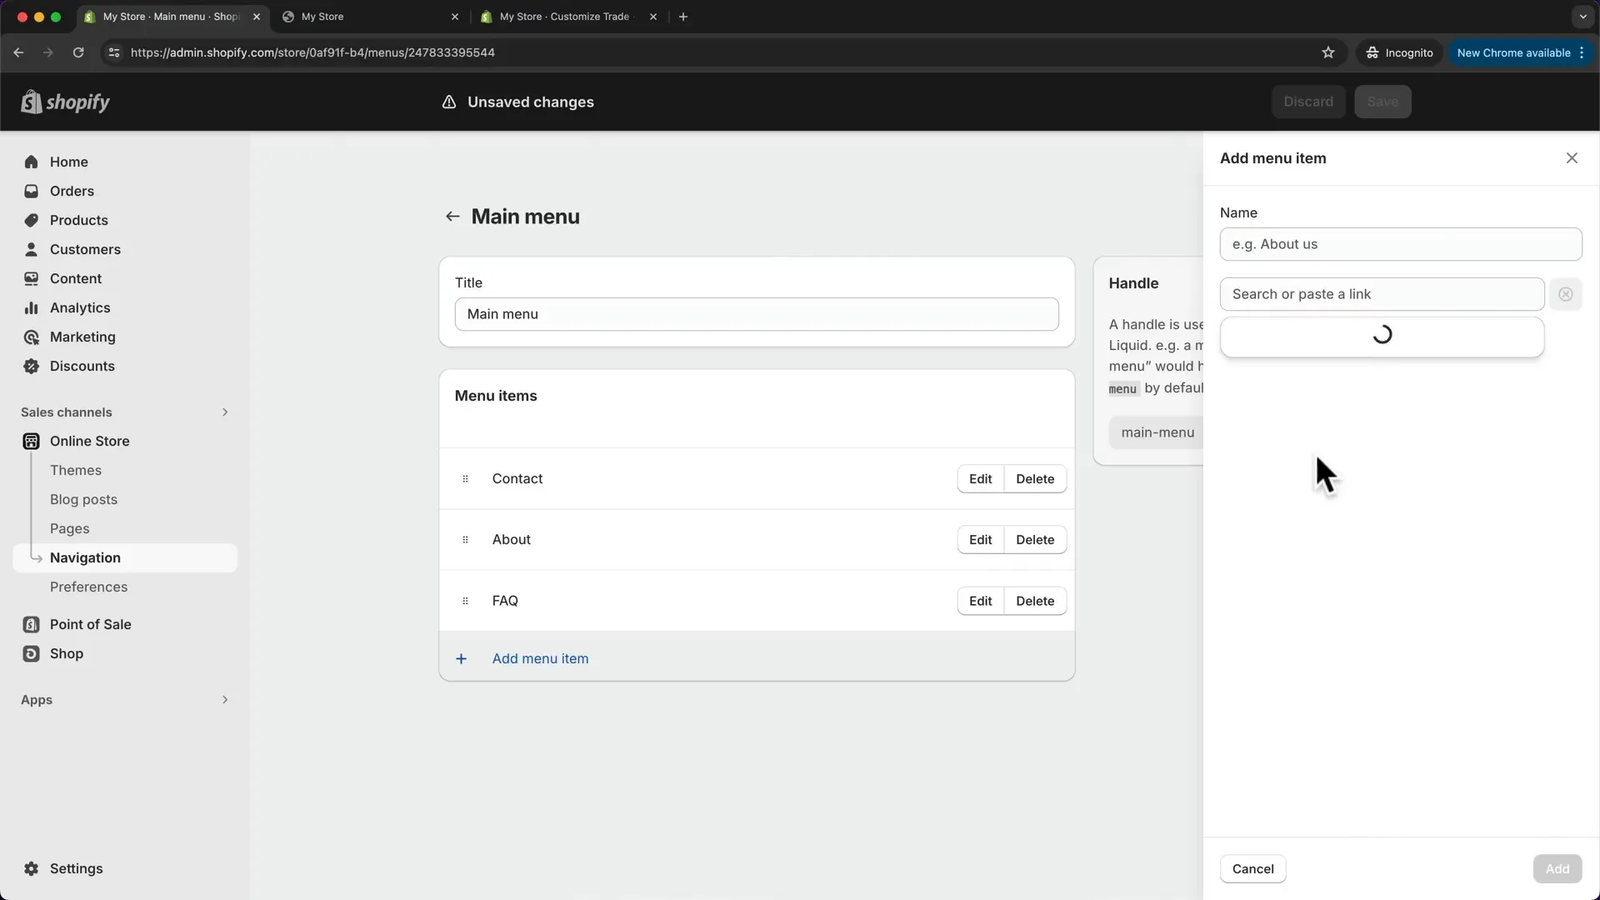
Step 11: Build and Optimize Your Navigation Menu 🔗
A well-organized navigation menu is key to helping visitors explore your store effortlessly. Shopify’s navigation editor lets you customize your menus with links to pages, collections, and products.
To set up your main menu:
- Go to Online Store > Navigation and select the Main Menu.
- Remove default links like Home or Catalog if you don’t need them.
- Add new menu items such as About, FAQ, Contact, and Shop.
- For the Shop link, add submenus for each product category (collections).
- Further organize by adding sub-submenus for special categories like New Arrivals and Best Sellers.
- Add featured products as submenu items under a “Featured” column if desired.
- Drag and drop menu items to arrange them in your preferred order.
- Save your menu and preview it on your store.
Using multi-level menus with columns helps present a clean and professional navigation experience.
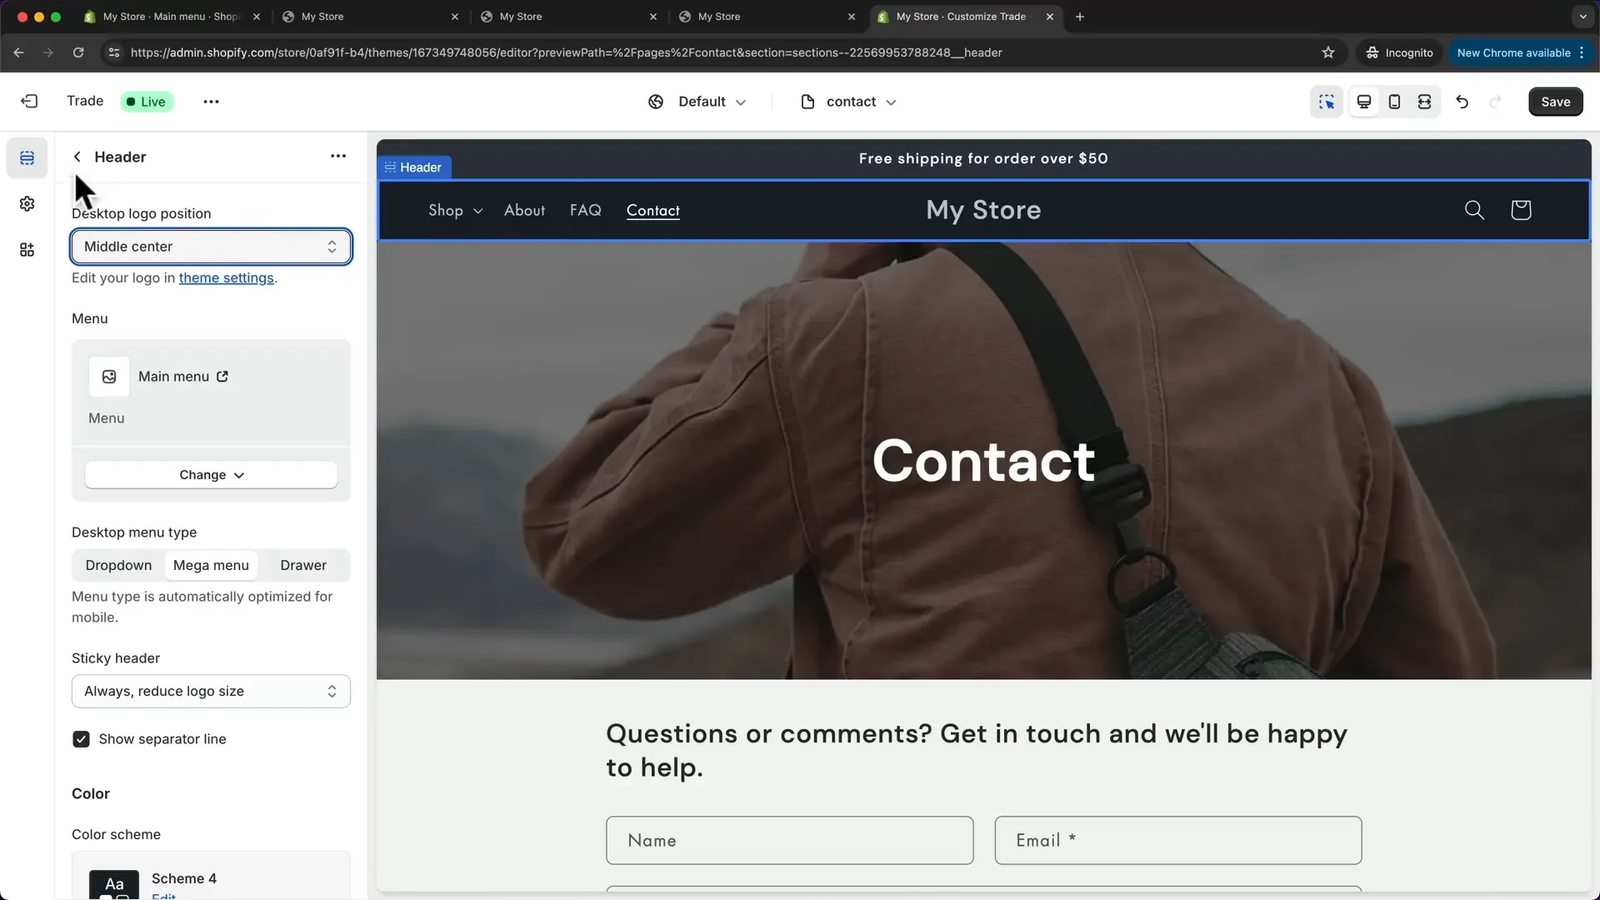
Step 12: Customize Your Header and Add Your Brand Logo 🏷️
The header is the first visual element customers see when they visit your site. Customizing it with your logo and preferred layout reinforces your brand identity.
Steps to customize your header:
- In the page builder, open the header section.
- Change the desktop logo position to center and menu to the left, or choose your preferred layout.
- Go to the theme settings and upload your logo. Upload a bright logo variant if your header background is dark.
- Adjust logo width for optimal size (e.g., 100 pixels).
- Upload a favicon (site icon), which appears in browser tabs, making your site instantly recognizable.
- Add your logo to the checkout page for a consistent brand experience during purchase.
These small touches greatly enhance brand professionalism and user trust.
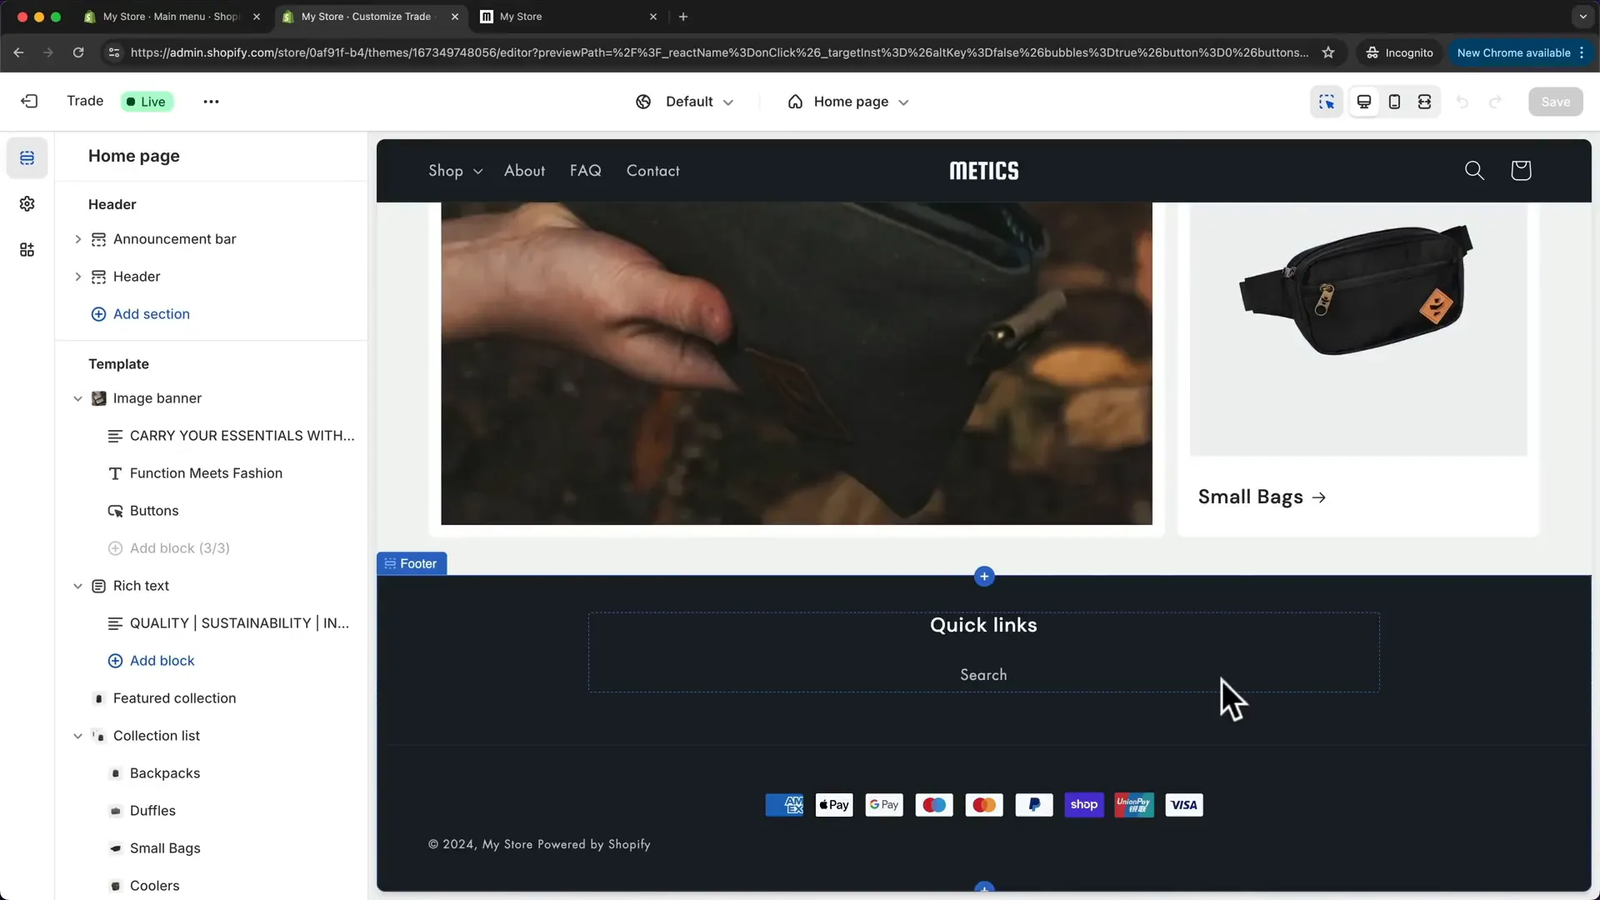
Step 13: Set Up Your Website Footer with Policies and Social Media Links 📜
The footer is an important area to include essential legal information and social media links, helping customers find policies and connect with your brand.
To configure your footer:
- Go to Shopify Settings > Policies and generate your refund, privacy, and terms of service policies using Shopify’s templates.
- Review and edit the policy text to fit your business specifics.
- For shipping policies, you may need to create your own text.
- Save your policies and close the settings.
- Go back to the page builder and add these policy pages to your footer menu.
- Disable default policy links at the bottom of the footer to avoid duplication.
- Remove unnecessary links like search if you prefer a cleaner footer.
- Add your social media links in the theme settings under Social Media. Icons will display automatically.
- Optionally, show payment icons to inform customers of available payment methods.
- Change the store name in the footer to your brand name and remove Shopify’s “Powered by” text for a cleaner look.
Having this information accessible builds confidence and improves user experience.
Step 14: Customize Your Store’s Colors and Fonts 🎨
Brand colors and typography define your store’s visual identity. Shopify themes come with multiple color schemes and font options you can customize.
To adjust colors:
- Open the theme settings and select Colors.
- Explore the five color schemes available (light, dark, colorful, etc.).
- Change colors for backgrounds, text, buttons, and accents within each scheme.
- Be mindful to update colors consistently across all schemes to maintain a cohesive look.
To customize fonts:
- Go to Typography in theme settings.
- Choose fonts for headings and body text from Shopify’s font library.
Most fonts in Shopify come from Google Fonts, meaning they’re free, fast-loading, and optimized for the web — a great advantage for performance and SEO.
3. Adjust font sizes using the scale slider.
For checkout pages, you can separately customize button colors to match your brand.
Consistent colors and fonts ensure your store looks professional and trustworthy.
Step 15: Optimize Your Store for Mobile Devices 📱
With most shoppers browsing on mobile, it’s vital that your store looks great and functions well on smaller screens.
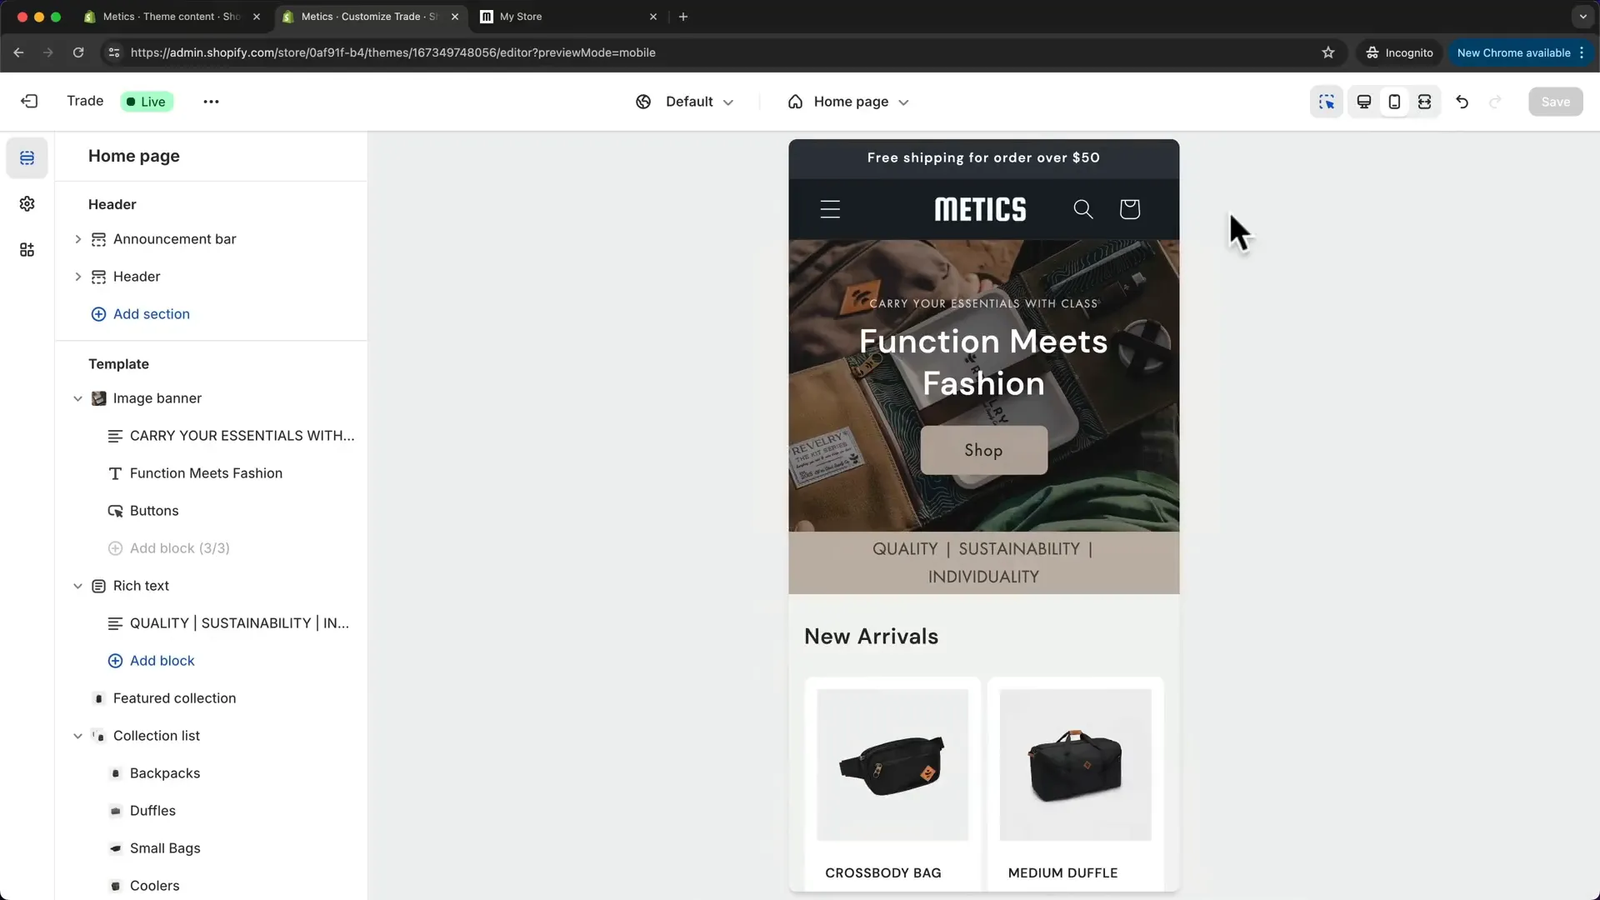
Shopify themes are fully responsive, but you should:
- Use the page builder’s device preview to switch between desktop and mobile views.
- Check each page on mobile to ensure content fits well and is easy to navigate.
- Adjust mobile-specific layout options where available, such as changing collection list columns from one to two for better display.
Taking the time to optimize mobile usability will improve customer satisfaction and sales.
Step 16: Finalize Store Settings and Payment Gateways ⚙️
Before launching your store, review your settings to ensure everything is configured correctly.
Focus on:
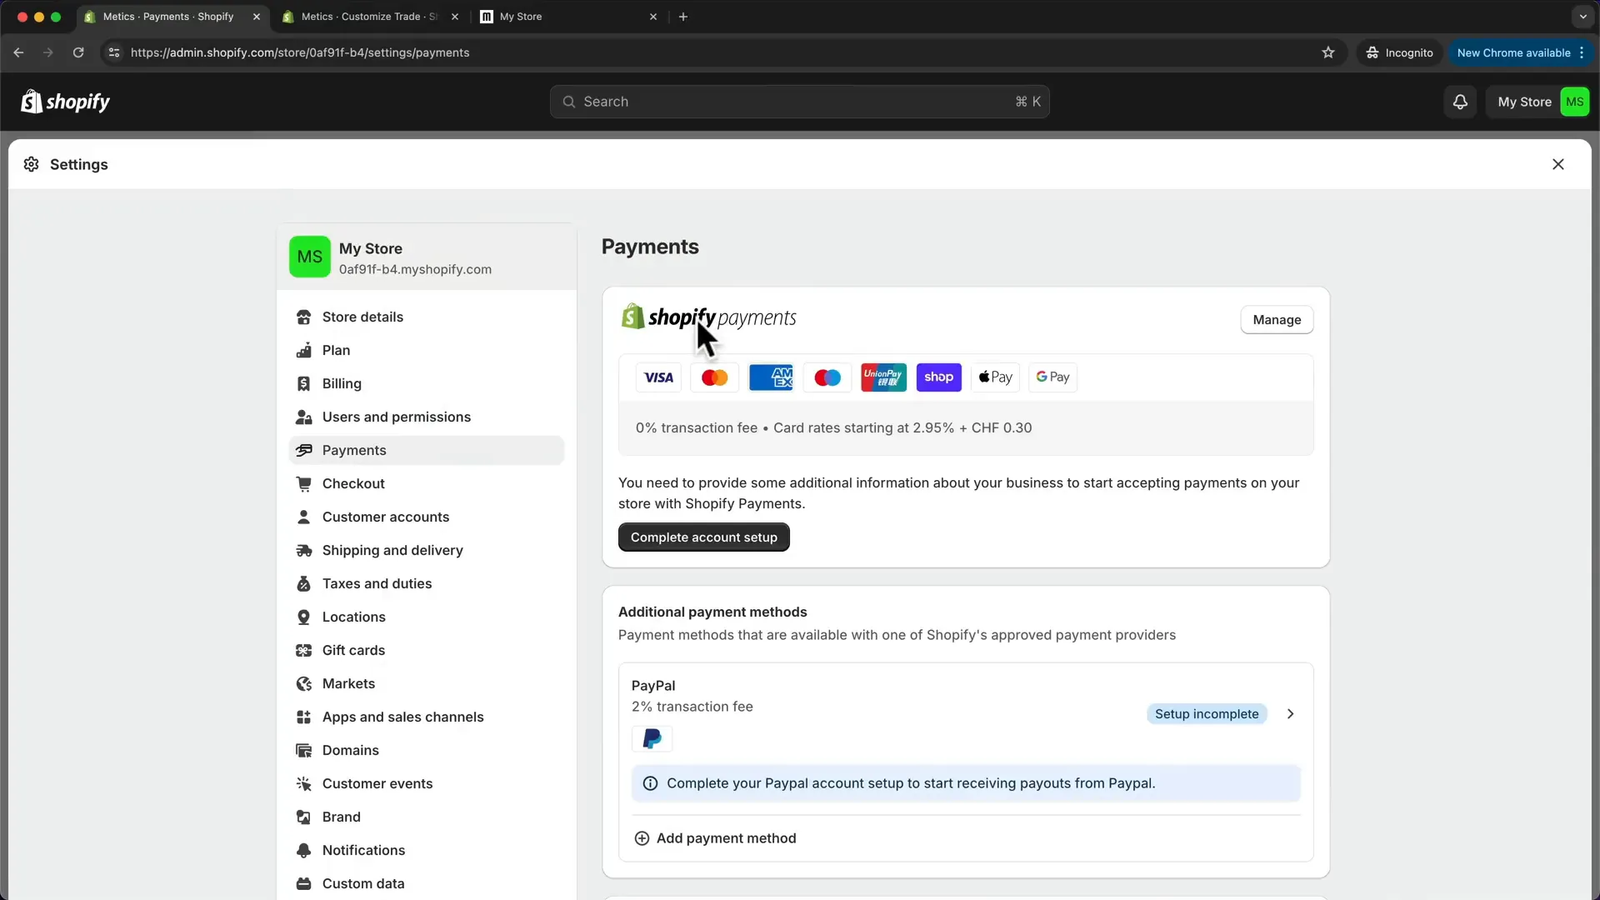
- Store details: Check your store name, address, currency, and measurement units.
- Payment gateways: Set up Shopify Payments to accept credit cards and digital wallets like Apple Pay and Google Pay.
- PayPal: Connect your PayPal account for additional payment options or disable it if you prefer. If you’re selling locally, consider enabling manual payment methods like Cash on Delivery or Bank Transfer, especially in regions where card usage is low.
- Shipping rates: Define shipping zones and rates based on location and order price.
For example, you can create a U.S. shipping zone with a standard rate and free shipping for orders over $50, plus an international zone with a flat rate.
Step 17: Purchase and Connect a Branded Domain 🌐
Using a custom domain enhances your brand’s professionalism and makes your store easier to find.
To get your domain:
- Go to Online Store > Domains in your Shopify dashboard.
- Buy a new domain directly through Shopify or connect an existing one.
- Search for your desired domain name and purchase it.
- Shopify will automatically connect your domain to your store.
Once connected, go to Settings > Domains and set your custom domain as the primary domain so customers only see your branded URL.
A domain like yourbrand.com is much more memorable than the default Shopify URL.

Step 18: Publish Your Shopify Store and Go Live 🎉
Once you are satisfied with your store’s design, products, pages, and settings, it’s time to make your store accessible to customers.
To publish your store:
- Go to Online Store > Preferences.
- Remove the password protection by toggling off the password page.
- Your store is now live and ready to welcome visitors!
Remember to test your store on different devices and browsers to ensure a smooth shopping experience.
Also, use a free tool like Google PageSpeed Insights to test your site speed. A fast-loading store improves user experience and search engine ranking.
❓ Frequently Asked Questions (FAQ)
1. How long does it take to set up a Shopify store?
Setting up a basic Shopify store can take a few hours to a couple of days, depending on how many products you have and how much customization you do. With this step-by-step guide, most users can launch a polished store in under 24 hours.
2. Do I need coding skills to build a Shopify store?
No. Shopify is beginner-friendly and uses a drag-and-drop page builder. You can design your entire store — homepage, product pages, and menus — without writing a single line of code.
3. Can I use my own domain with Shopify?
Yes! You can buy a new domain directly from Shopify or connect an existing one you already own.
After connecting, make sure to go to Settings > Domains and set your domain as the primary domain, so customers always see your branded URL.
4. What happens if I don’t activate the $1 trial after 3 days?
If you don’t activate the trial plan within 3 days, Shopify will lock your account until you select a plan. Activate the $1/month offer early so you can continue building without disruption.
5. Can I sell digital products on Shopify?
Absolutely. Shopify supports both physical and digital products. You can use apps like Digital Downloads or SendOwl to deliver digital goods automatically after purchase.
6. Is Shopify good for dropshipping?
Yes. Shopify is one of the most popular platforms for dropshipping. You can use apps like DSers, Zendrop, or Spocket to find products, automate order fulfillment, and manage your dropshipping business easily.
7. How do I add payment gateways on Shopify?
Go to Settings > Payments and enable Shopify Payments to accept credit cards, Apple Pay, and Google Pay.
You can also add PayPal, or third-party gateways like Stripe, and even manual payment methods like Cash on Delivery for local markets.
8. How do I improve my store’s SEO?
-
Use keywords in product titles, meta descriptions, and URLs.
-
Fill in alt text for every product image.
-
Make sure your site loads fast (test it using Google PageSpeed Insights).
-
Write custom content on your About, FAQ, and Blog pages.
9. How do I customize how my store looks on mobile?
All Shopify themes are fully responsive, meaning they adjust to mobile devices.
Still, use the mobile preview in the page builder to fine-tune layouts. Adjust sections, text sizes, and image alignment to ensure everything looks clean and readable.
10. How do I remove the “Powered by Shopify” text?
Go to Online Store > Themes > Edit default theme content.
Search for “Powered by Shopify,” then delete the text from the field and save. This helps make your store look more professional and branded.
✅ Conclusion
Building a Shopify store from scratch may seem daunting, but with the right guidance and tools, it’s completely achievable. By following this detailed step-by-step tutorial, you can create a stunning, fully functional e-commerce website that is ready to attract customers and generate sales.
Remember, the key steps include signing up and activating your trial, selecting the perfect theme, adding and organizing your products, designing your homepage and essential pages, customizing navigation and branding, and setting up payment and shipping options.
Take your time to explore Shopify’s powerful customization features and always preview your store on multiple devices to ensure a great shopping experience. Also, once your store is live, don’t forget to monitor its health—keeping your SEO clean is important. Learn how to remove bad backlinks and reduce your site’s spam score to maintain trust and performance.
With dedication and creativity, your Shopify store can become a successful online business.
Good luck with your Shopify journey!
